Showing posts with label Ingredient Spotlight. Show all posts

Wednesday, April 25, 2012

Ingredient Spotlight - Fava Beans; Recipe - Fresh Fava Beans with Tomato and Pecorino


from Popscreen.com
Can anyone in the US hear the word “favas” without thinking of Hannibal Lecter and his nice Chee-antee? (It’s one of my favorite movies, but I still curse it for launching 100,000 mispronunciations of my favorite wine!) Outside of mentions in movie references, favas are not often featured in American cuisine. The Italians, however, have been spinning up great fava bean dishes for centuries, and the June issue of La Cucina Italiana features an entire spread of recipes starring these beans.

Tonight, I spotted a basket of fresh fava pods in Savenor’s market, so I added a few handfuls to my bag. Originally, I was going to bring them home and set them aside until I procured the ingredients necessary to make one of La Cucina’s recipes, but instead, I chose to use them immediately and make one of my tried-and-true springtime favorites - favas with tomato and pecorino.

If you come across fresh fava bean pods during your next trip to the market, be sure to try this recipe. It takes some time, but the fresh, clean flavors make it worth the effort.


Fresh Fava Beans with Tomato and Pecorino

4 lb. / 1.75 kilo favas in pods (about 4 c. when shelled)
4 medium sized fresh tomatoes, seeded and cut into small dice
4 T / 60 g pecorino romano, chopped or coarsely grated
1 large clove garlic, crushed with the flat edge of a knife
5 T / 75 mL top-quality olive oil
Freshly ground black pepper
1 t. / 15 g smoked sea salt

First, you must prepare the favas. This step can be done ahead of time. Some people like to boil the pods whole and then shell them, but I prefer to peel the pods open and pop the individual beans out - it takes a little longer, but if you’re cooking with others, this is a great shared task to do over a glass of wine and some great conversation. Or, if you’re cooking alone, pop on your hands-free headset and call someone you haven’t talked to in a while, or do it while you’re watching your favorite TV show.

Once the favas are out of the pods, boil them for 1-2 minutes in boiling water. Once they’ve cooked for about 2 minutes and they’ve swelled a bit, drain them immediately and rinse in cold water. Now, you’re ready to slip the beans out of their skins - simply pierce the skins with your thumbnail and squeeze; the bean should pop right out. Once the skin is removed from all the beans, you’re ready to prepare the salad.

Combine the shelled and peeled favas with the tomatoes, pecorino, garlic, and olive oil. Gently stir to combine. Refrigerate for about an hour, checking at 10-15 minute intervals to gently toss.

Once the salad has chilled for at least an hour, remove the garlic clove, and add the smoked salt and a generous sprinkling of freshly ground black pepper. Stir to combine, and serve in individual bowls with a crisp Italian white wine.


Nutritional info: 4 servings. Per serving - 505 calories, 22 g fat, 34.6 g carbohydrates, 24.2 g protein


Wednesday, January 18, 2012

Ingredient Spotlight - Chanterelle Mushrooms

This is yet another one of those occurrences in which I never intended to create a blog-worthy recipe but ended up doing so. It all started with a basketful of chanterelle mushrooms on display at Whole Foods. Being a mushroom lover and never having cooked chanterelles, I picked one up, placed it in a produce bag, tossed it in my basket, and drifted over to the jicamas and peppers…and then I inched my way back to the chanterelles, putting another large mushroom in the bag. And another. With a shoplifter’s quick hand and shifty eyes scanning the periphery, I loaded up an entire produce bag as if I was trying to get away with wrongdoing. I guess I felt kind of guilty about taking most of the Chanterelles and depriving my fellow shoppers.

Fresh chanterelle
Other wild mushrooms such as morels, black trumpets, and truffles may garner all the accolades, but chanterelles are stars in their own right. When I took the first bite, I was overwhelmed, in a good way. The flavor was not what I expected, and the texture was absolutely delightful. Tasting a chanterelle for the first time was only comparable to meeting that one special person who cements in your mind the reason why it never worked out with any of your past loves and lovers and erases any doubts you had about whether or not you made the right call in holding out for something more congruent.

It’s no surprise that the flavor of a food that grows on the floors of coniferous forests amongst damp and decomposing plant debris would be characterized as “woodsy” or “earthy,” but I cannot think of a better description. The flavor is delicate; chanterelles are neither pungent nor musty. Unlike a porcini or a truffle, a chanterelle would not overpower other flavors in a recipe. When sautéed, chanterelles have a texture similar to slightly past its prime lemon meringue pie filling - delicate, but still firm.

Chanterelles cooking
When I cooked these, I planned on simply sautéing the chanterelles in a ton of butter with some sliced garlic. About two minutes into the cooking process, I splashed a bit of the Pouilly-Fuisse in my wine glass into the pan with the mushrooms, adding a bit more moisture and flavor to the mix. While stirring with one hand and using the other to peruse the ‘net for info on chanterelles via iPhone, I decided to add a few crushed juniper berries to the mix so that the flavor would be reminiscent of the pine forests in which the mushrooms grow. I didn’t stop at juniper berries. All these flavors needed a piquant boost; I achieved this by adding an ever-slight dash of finely ground white pepper, then I added a splash of light cream to fuse the whole dish together. This was definitely not what I had in mind as I was hoarding chanterelles at Whole Foods like a crack fiend, but it turned into a cohesive dish with flavor combinations that seemed like a big “DUH” after the fact. I am not exaggerating when I say that my eyes rolled back in my head with pleasure when I took the first bite. This is one of the best side dishes I’ve ever created. Hell, this is one of the best recipes I’ve created, period. I’m very proud of this one.

As an aside, the entire time that I was eating my ego-inflating chanterelle creation, I couldn’t stop thinking about roast chicken. This dish would pair extremely well with a very subtly seasoned roast chicken. Try this recipe if you can get your hands on fresh chanterelles! 


Chanterelles with Juniper Cream Sauce

2 T. butter
2-3 cloves garlic, sliced
1 lb. Fresh chanterelle mushrooms, sliced
Splash Pouilly-Fuisse, Chardonnay, or other oaked white wine
1/8 t. finely ground white pepper
4-6 juniper berries, crushed with the back of a spoon*
2 T. light cream
Pinch sea salt
Mild paprika, to garnish**

Melt the butter in a large saucepan over medium-low heat. Add the garlic and sauté for a 2-3 minutes, or until the garlic has turned slightly golden. Add the mushrooms, wine, white pepper, and juniper berries. Sauté, stirring gently but frequently, for approximately 10 minutes, or until the mushrooms are no longer firm. Add the cream and sea salt; sauté for a minute or two longer. Serve on individual plates, and garnish with a dash of mild paprika. 

* If you cannot locate juniper berries, simply add a teaspoon or two of gin, or purchase them online. 

** If you have a jar of paprika that has lost its flavor, don’t throw it away - use it as a colorful yet flavorless garnish.


Friday, January 13, 2012

Stuffed Plantain Rolls with Callaloo, Bacon and Warm Chipotle Butter

This Christmas, Santa brought me some books on Puerto Rican and Floridian cooking. While I'm familiar with the names of most of the ingredients, I haven't had the experience of cooking with some of them, particularly plantains.  I love plantain - whether it's fried, mashed, or grilled, I've always been a fan of their starchy, semi-sweet flavor. So when I saw plantains in my produce department with a "4 for $1" tag, I threw a few into my basket. Talk about an offer I couldn't refuse! 

semi-ripe plantain
For those of you unfamiliar with plantains, they look almost identical to bananas.  However, they do not taste like bananas, nor can they be eaten raw - plantains must be cooked.  The great thing about plantains is that they can be eaten from their green stage to their fully black stage, each stage of ripeness offering different flavors and textures.  When green, they are starchy and potato-like; when black, they are much sweeter and less firm.  I like them best in the in-between phase, when the skins are starting to turn brown and spotted. 

Unsure of how I wanted to cook my plantains, I reached out to my friends and my Baconbutterbooze.com Facebook followers for input, but in the end, a spark of inspiration (and my compulsion to spike everything with bacon) led me to create the recipe below.  If you can find ripe plantains and callaloo, this recipe is one that I highly recommend! 


Stuffed Plantain Rolls with Callaloo, Bacon and Warm Chipotle Butter

4 c. cooked callaloo leaves*
4 chipotles in adobo, minced
1 T. adobo sauce
2 t. ground ginger
1 t. garlic powder
1/2 t. ground allspice
generous amount finely ground black pepper
1/2 t. salt
2 T. bread crumbs
2 semi-ripe plantains, peeled and cut lengthwise in 4 thin slices
8 slices thick-cut bacon
8 pats butter
Warm Chipotle Butter (recipe below)

Preheat the broiler to high, and soak 16 toothpicks in water.  In the meantime, make the stuffing.  If the cooked callaloo has any moisture, drain it in a colander, pressing any remaining liquid out.  Once drained, place it in a mixing bowl with the minced chipotles, adobo sauce, ginger, garlic powder, allspice, pepper, salt, and bread crumbs.  Mix well and set aside. 

Now, assemble the plantain rolls.  Take each strip of plantain, create a ring, and secure with a toothpick, as shown in the photo to the left.  Stuff the center with the callaloo stuffing, packing it in - it should be packed in tightly.  Next, stretch a slice of bacon around the plantain, and secure with a second toothpick.  Push the toothpicks in so that only the ends of each toothpick are visible - they have a tendency to burn.  Finally, top each roll with a pat of butter. 

Broil 3-4 minutes per side, using barbecue tongs to turn.  Turn them over carefully so that you don't squish the plantains or lose the stuffing mid-turn.  Once both sides are broiled, remove from the oven, turn the broiler to low, and finish under the broiler for about 10-15 more minutes. 

Remove from oven, drizzle with Warm Chipotle Butter, and serve hot.

* If you cannot find fresh callaloo leaves, canned callaloo can be purchased online. 


Warm Chipotle Butter

3 T. butter
1 T. adobo sauce, from can of chipotles in adobo
1 T. malt vinegar

Melt the butter in a small saucepan.  Whisk in the adobo sauce and malt vinegar.  Continue whisking until the vinegar's aroma has dissipated, and drizzle the hot melted butter over the Plantain Rolls.


Monday, January 2, 2012

Ingredient Spotlight - Beets

For many years, beets were not popular in American cuisine, but sometime during the past decade, a visionary chef decided to throw a few roasted baby beets on a plate with a handful of lettuce and about an ounce of some goat cheese made by ex-yuppies who now own a farm but still drive BMWs. A star was born! The baby beet salad soon became the trendy, modern bistro salad menu's Tickle Me Elmo - everyone had to have it. 

Soon, another chef decided to one-up the original beet salad guy by using golden beets, and shortly after, shaved fennel, shaved parmesan, shaved truffle, shaved endive, shaved whatnot appeared. Meanwhile, the French, the Italians, and the Russians were most likely cracking up laughing, collectively cackling, “You A-holes JUST thought of that?!?” The French have been making salads of crisp lettuces, soft cheeses, and roasted root vegetables for eons. The Italians use beets to dye pasta and risotto, and they use the leaves in savory pies. And the Russians? Just ask NHL superstar Evgeni Malkin, who swears that his mom’s borscht brings him good luck. 

Beets came into the spotlight for a while, but soon their small-plate dynasty was displaced by the ubiquitous mesclun salad with watermelon and feta. I hope that chefs continue to find creative ways to use beets; they’re lovely. Nutritious, sweet, and like a drag queen Midas, everything a beet touches turns hot pink (including your pee - I hate to be crass, but the strong red pigment in beets can affect the color of some people’s urine, so if you tinkle pink, don’t panic - it might just be the beets saying goodbye). It is a little-known fact in the U.S. that beets’ leaves and stems are not only edible, but delicious - cook them like you would cook chard. The recipe below uses the entire plant - the bulbs, stems, and leaves. Its bold flavor and fantastic magenta color reminded me of iconic fashion design legend Betsey Johnson, and if I ever had the opportunity to cook for her, this is what I would serve. 

Next time you’re at the market and you see beets with their leaves attached, put them in your basket and try this rich, colorful, stick-to-your-bones pasta - you might fall in love. 

Pasta with Beets and Polish Sausage

1 lb. Dry fusilli or rotini
1 T. butter
12 oz. Polish sausage (Wellshire brand is fabulous!)
1 onion, sliced
3-4 beets with greens, beet bulbs diced, stems and leaves chopped
2 t. caraway seeds
½ t. garlic powder
¼ t. finely ground white pepper
1 t. smoked salt
Handful chopped fresh dill
8 oz. Sour cream

Cook the pasta. In the meantime, heat the butter over medium heat in a large, heavy bottomed pot.  Once the butter has melted, add the sausage, onion, diced beet bulbs, and caraway seeds. Cook for 5-7 minutes, or until onion has softened up a bit. Add the beet greens and stems, garlic powder, white pepper, and smoked salt, along with a splash of the pasta water (approx ¼ cup). Cover, reduce heat to low, and cook for 10-15 minutes. 

Once the beets, greens, and sausage have cooked, add the cooked pasta, the dill, and the sour cream. Stir, blending well until all the pasta is coated and has turned a bright shade of magenta. Serve with an extra dollop of sour cream and garnish with a sprig of fresh dill. 

Sunday, December 4, 2011

Ingredient Spotlight - Cardoons

After years of curiosity, I was recently able to find cardoons. I didn’t hunt them down, I simply saw them in the produce section of my local supermarket. Cardoons are not a common vegetable in America, and they are very hard to find, so imagine my surprise when I saw them displayed next to common leaf lettuce and carrots!

Cardoons grow wild in Mediterranean countries, and they are a very popular vegetable in Italy. They grow in bunches and resemble celery, although the flavor tastes nothing like celery - more like a mild artichoke. If you ever see cardoons in the market, pick up a bunch and try this simple pasta recipe that showcases this hard-to-find vegetable!


Spaghetti with Cardoons and Pecorino Romano

Cooked cardoons

1 bunch cardoons, sliced
Salt
Juice of 1 lemon
Splash mild vinegar
1 lb spaghetti rigati (textured long pasta) or plain spaghetti
Splash olive oil
2 slices bacon, chopped
2 large shallots, minced
1 cup chopped parsley
2 T. Butter
½ - 1 teaspoon crushed red pepper flakes
Generous amount of coarsely ground black pepper
Pecorino Romano, grated
 
Place the cardoons in a large pot with enough water to cover them. Add a few pinches of salt, the lemon juice and the vinegar. Cover; bring to a boil, and boil for 30-40 minutes. Once they are done cooking, drain them and set aside.

Cook the pasta in salted water. In the meantime, heat the olive oil over medium-high heat in a large, heavy-bottomed pan and add the bacon. Once the bacon begins to crisp, add the shallots and cook for a few more minutes, or until the shallot softens. Add the cardoons, then add the cooked pasta. Toss to combine, then add the parsley, butter, crushed red pepper flakes, and ground pepper. Toss again, then serve with lots of grated pecorino romano.


Tuesday, September 27, 2011

Ingredient Spotlight - Bitter Melon

"Ugh, I HATE bitter melon!" my friend proclaimed, inspiring a sarcastic "Once again, with feeling!" from me.  "My mom makes bitter melon, I think she only cooks it when she's mad at me," he said.

Bitter melon
We were chatting about fruits and vegetables that are hard to find in the US, and my mention of bitter melon sparked an immediate, and quite heated, reaction.  That was the moment I knew I had to get my hands on a bitter melon and see for myself why it was my friend's most hated vegetable. 

Bitter melon is technically a fruit, although it is eaten as a vegetable.  Interestingly, it is also widely used as a medicinal plant.  Some cultures use bitter melon to treat ailments and diseases such as malaria, cancer, and some viruses.  Bitter melon does in fact contain compounds that are useful in medicine.  The fruit grows in tropical and sub-tropical climates and looks like a pale, ridged cucumber.  Some specialty stores and higher-end markets will sell bitter melon from time to time, but you're far more likely to find it if you live in a city with a good-sized Asian population.  I found mine in Boston's Chinatown. 

Once it was time to taste-test this new and exciting veggie, I realized that I had no clue how to prepare it - does the skin stay on?  Are there seeds, and if so, are they edible?  Those were questions for Google.  Turns out, the skin is edible, and while the seeds and the pith are technically edible, removing them takes away the overwhelming bitterness.  Just slice lengthwise and remove the seeds as you would from a cucumber (I, however, cut a cross-section so that you could see what the inside looked like).

The verdict?  I loved it!  It keeps the crunchy, watery texture of a cucumber when stir-fried, and I thought it tasted like a grassy cross between artichokes and chicory.  When I mentioned that to my bitter melon-hating friend, his reaction was, "Exactly.  I don't know why you would want to eat that."  I liked bitter melon for the same reason I love broccoli rabe, escarole, and radicchio - no, not because they're Italian - I like the taste of bitter vegetables.  Bitter melon is certainly not for everyone; it's one of those veggies you either love or you hate.  That being said, if you ever see a bitter melon, try it and decide for yourself! 


Bitter Melon Stir-Fry

boiling water
10 dried shiitake mushrooms
10 dried tree ear mushrooms*
2 T. coconut oil or vegetable oil
2 shallots, minced
2 cloves garlic, minced
2 T. dried shrimp (optional)
1 bitter melon, sliced

For the stir-fry sauce:
1/4 c. low sodium soy sauce
2 T. rice wine or dry sherry
1/2 t. szechuan peppercorns
1 t. red chili flakes
1 t. grated ginger
1/4 t. white pepper
1 t. cornstarch
1 T. cold water

cooked rice, to serve
toasted sesame seeds, to garnish

Dried mushrooms
First, prepare the dried mushrooms by placing them in a bowl and covering them with boiling water (approx. 1/2 cup).  Let them soak for about 10 minutes.  In the meantime, prepare the stir-fry sauce by combining all ingredients but the cornstarch and water in a bowl.  In a separate bowl, blend the cornstarch into the cold water, then add this to the sauce.

Now, drain the mushrooms and squeeze out any excess water.  Slice them into 1/4" strips and set aside. 

Heat a wok or large frying pan over high heat.  Add the coconut or vegetable oil, and once it is melted, add the shallots, garlic, and dried shrimp, if using.  Stir-fry for a minute or so, then add the bitter melon and the sliced mushrooms.  Stir-fry for an additional 3-4 minutes. 

Finally, add the stir-fry sauce and continue to stir-fry until all the vegetables are coated and the sauce has thickened up a bit, approximately 2 minutes. 

Spoon into individual bowls of cooked rice and sprinkle with a generous pinch of toasted sesame seeds.


* These may also be labelled "cloud ear mushrooms" or simply "black fungus." 

Monday, September 5, 2011

Ingredient Spotlight - Concord Grapes

Concord grapes.  Their unmistakable aroma caught me by surprise as I scanned a produce market with my mom.  I picked up the container of grapes, breathed in their scent, and put them in my basket.  "What are you going to do with those?" my mom asked.

"No idea," I replied.  "Smell them?" 

Just one sniff of Concord grapes always manages to transport me right back to my childhood in Erie, Pennsylvania.  For those unfamiliar with the dot on the map where I spent the first 18 years of my life, Erie is home to more than decaying industry, lake effect snow, and the infamous pizza bomber.  Seated on the shore of the shallowest Great Lake, Erie has miles of sandy beaches and truly gorgeous sunsets.  Head east on PA Route 5, pointing away from the rusted out city, and you'll find acre after acre of vineyards belonging to local wineries, where seemingly endless rows of native grapes grow atop cliffs overlooking the lake's blue waves. 

As a child, I had access to a grapevine.  Yup, a single grapevine.  A sore thumb in my working-class neighborhood of brick rowhouses, postage-stamp yards, and blue-collar folks more loyal to beer than Barolo, my neighbor's vine of Concord grapes grew along the wire fence separating her yard from ours.  Although the scent of the grapes was intoxicating in the fall, my mom's flower garden didn't appreciate the shadows cast by the grapevine's broad leaves.  My neighbor, who canned and preserved whatever she could get her hands on, often juiced the grapes.  I don't remember her doing this so much in later years, but man, oh man, did those grapes smell delicious. 

Reminiscing aside, I still had no idea what to do with my grapes after I purchased them.  I don't know how to make wine, and even if I did, Concords are a "foxy" grape ("foxy" refers to a musty characteristic in grapes), and as such, they aren't generally used in winemaking.  Concords are pretty tart to eat out-of-hand, and their large seeds offer a crunchy, bitter surprise to the unsuspecting eater.  I wasn't quite convinced that I wanted to use the grapes as anything more than a catalyst to ignite a stroll down memory lane, but in the end, I decided it was time to make new memories and a new recipe. 


Grilled Pork Tenderloin with Concord Grape and Wild Boar Bacon Reduction

1 pork tenderloin, about 1.5 pounds
1 c. Concord grapes, halved
2 large garlic cloves, minced
2 T. olive oil
2 T. balsamic vinegar
2-3 sage leaves, minced
1 T. coarsely ground black pepper
1 T. butter
2 ounces wild boar bacon, cut in 1/4" dice*
1 small shallot, finely minced
1/3 c. light-bodied white wine
1/3 c. chicken or ham broth
Concord grapes on the stem, to garnish

Combine the grapes, garlic, olive oil, balsamic vinegar, sage leaves, and pepper in a large glass or plastic container with a tight-fitting lid.  Using a potato masher or the back of a fork, mash all the ingredients together until a fragrant paste is formed.  Place the pork in the dish with the grape paste, rubbing the paste on the pork.  Marinate up to 24 hours, shaking the dish occasionally.  The longer you marinate the pork, the fuller the flavor will be. 

When you are ready to cook the pork, heat a grill or grill pan over high heat.  In the meantime, brush the grape marinade off the pork, reserving the marinade.  Grill the pork on each side until no pink shows.  Each side should take about 5 minutes; the pork is ready to turn when the pork easily releases from the grill/grill pan.  If you are using a grill pan, transfer the pork loin to a shallow ovenproof dish or a baking sheet lined with foil, and bake for 10-15 minutes.  This step is not necessary if using a charcoal grill. 

While grilling the meat, make the grape and boar bacon reduction.  Place the reserved marinade in a small saucepan with the wine and chicken broth.  Bring to a quick boil, then reduce heat to a low simmer.  Keep covered so liquid does not evaporate, and simmer for about 10 minutes. 

In a separate saucepan, melt the butter over medium-high heat.  Add the diced wild boar bacon and saute until the fat has melted and the boar bacon is crispy.  Add the minced shallot and saute for another 3-5 minutes, stirring frequently, until the shallot is soft and translucent.  Do not let the shallot burn. 

Now it is time to add the marinade liquid.  Place a very fine sieve (or a strainer lined with cheesecloth) over the saucepan containing the boar bacon and the shallot.  Pour the contents of the marinade pan through the sieve, pressing the remaining solids with the back of a spoon to release as much liquid as possible.  When all the liquid has been squeezed out, discard the solids and bring the grape liquid to a boil, and whisk the sauce until it begins to thicken.  If it does not thicken up, you can "cheat" by blending 1 T. cold water with 1/2 t. cornstarch, and then whisking this into the sauce. 

Once the meat is done, take it off the grill or out of the oven and let it rest for 10 minutes.  Slice into 1/2" thick rounds, and arrange the rounds over polenta squares.  Spoon the grape sauce over, and garnish with a small bunch of Concord grapes. 


* If you cannot find wild boar bacon, you can substitute regular bacon or pancetta.  Wild boar bacon is available by mail from Savenor's, one of my local butcher shops.

Wednesday, August 31, 2011

Ingredient Spotlight - Ricotta Salata

Most people are familiar with ricotta cheese.  Used to stuff pasta and cannoli, ricotta is made from whey left over after cheese production.  When ricotta cheese is pressed, salted, and aged, it becomes ricotta salata.

Ricotta salata is similar in texture to feta, but it is milder and much less salty.  Traditionally used in shaved or grated form to add a finishing touch to dishes, its fresh, milky flavor is a pleasant addition to any salad containing tomato, cucumber, or cold, cooked grains.  Ricotta salata can also be used as a lighter, less pronounced substitute for parmesan or pecorino when finishing a risotto or a simple pasta dish. 

If you are not fortunate enough to live in a city with a large Italian population, ricotta salata may be difficult to locate, as it is not a common or mass-produced variety.  Italian markets, specialty shops and better supermarkets are good sources, but if you cannot find ricotta salata, it can be purchased online.  If you can get your hands on this cheese, do try it in the recipe below!


Spaghetti with Fresh Tomatoes, Green Onions, and Ricotta Salata

1 lb. spaghetti or linguine
splash olive oil
2 garlic cloves, minced
2 pounds fresh tomatoes, diced
1/2 cup dry white wine
4 green onions, sliced into rings
salt and pepper to taste
ricotta salata*

Cook the pasta.  In the meantime, heat the olive oil in a large, heavy-bottomed pan over medium heat.  Add the garlic and cook until the garlic becomes fragrant, approximately 3-5 minutes.  Do not let the garlic burn.

Add the tomatoes and the wine.  Cook for 10-15 minutes, stirring occasionally until the liquid has reduced and the tomatoes begin to break down. 

Add the sliced green onions, salt, and pepper.  Cook for about five minutes, or until the onions' flavor has mellowed a bit.  Do not let them become soft and mushy. 

Drain the cooked spaghetti and dress it with a splash of olive oil.  Divide the cooked pasta among plates, and spoon the sauce over the hot pasta.  Using a vegetable peeler, shave your desired amount of ricotta salata over each individual bowl. 

* If you cannot find ricotta salata, it can be purchased online.

Sunday, August 28, 2011

Ingredient Spotlight - Ghost Peppers

"Would you like an atomic pepper, Mr. Mentolino?"


Remember that scene in "Dumb & Dumber?"  I'm pretty sure the atomic peppers consumed by the movie's two lovable losers were bhut jolokia, better known as 'ghost peppers.'  Native to India, these fiery fruits set a record in the Guinness Book of World Records in 2007 for being world's hottest pepper.  At 1,041,427 heat units, ghost peppers are approximately 400 times hotter than tabasco sauce on the Scoville scale, which measures a chili's heat based on how much sugar water is needed to neutralize its heat.  To put into perspective just how hot ghost peppers really are, consider that habaneros register 100,000 - 350,000 heat units, while law-enforcement grade pepper spray falls in the 500,000 - 5,000,000 heat unit range.  Rumor has it that biting into a ghost pepper can trigger a heart attack, but according to web sources, it isn't the heat of the pepper that could kill you, it's the potential that the concentration of capsaicin could cause anaphylaxis in some individuals and lead to suffocation. 

That was small comfort as I paid for a 50g carton of ghost peppers at Savenor's Market on Beacon Hill.  Operation "Woman vs. Food" had officially commenced. 

With a tall glass of sugared milk by my side, wearing my large-lensed sunglasses to protect my eyes in case any bits of chili went flying, my heart pounding with nervous anticipation, I pierced a ghost pepper's thick, slightly tough flesh with the blade of my paring knife, then held the cold metal blade against my tongue.  "That's not so bad," I thought.  The pepper tasted bright, almost citrusy, whereas I did not expect to be able to experience any discernible flavor through the fire.  That's when I learned why they're called ghost peppers - boy, do these babies sneak up on you!  The heat hit, but it didn't deliver a burn so much as a tingle.  The heat resonated throughout my mouth, spreading from the point of contact where I'd licked the blade of my knife, and a slight sting crept across my lips.  I sipped some sugared milk to snuff out the heat, then decided I should to try the ghost pepper again, only for real this time.  I sliced off a piece of pepper about the size of a grain of risotto rice, placed it on my tongue, bit into it, and sloshed it around in my mouth, letting the fire spread.

These peppers make "Dave's Insanity" look like "Dave's mild, completely manageable neuroses." 

The ghost pepper's effect was not nearly as devastating as I imagined - after all, I'd pictured myself screaming and scrambling for ketchup and mustard bottles, just like Harry and Lloyd in Dumb & Dumber - but keep in mind that I only consumed a minuscule amount.  If you can get your hands on ghost peppers, try them if you dare, even if only to satisfy your curiosity.

Not knowing if I could handle the heat if I chopped them and added them directly to a dish, I decided to use my ghost peppers to make a batch of hot pepper oil.  With the kind of heat ghost peppers pack, only a few drops will add a spicy kick to any food! 


Ghost Pepper Oil

2 ghost peppers, quartered*
2 cups olive oil

Add the peppers and the oil to a clean, resealable glass bottle.  Shake and allow to sit for 24 hours.  Use sparingly, adding drop-by-drop to any dish that could use some heat.  Great for bloody marys! 


* Be very careful when working with chiles.  If possible, wear gloves, and do not let the chiles, or anything the chiles have touched, come into contact with your eyes.

Wednesday, July 6, 2011

Ingredient Spotlight - Skate Wings

It is not often that I will use the words "skate" and "wings" in a sentence that has nothing to do with a hockey team from Detroit - but today, I will do so as I write about a new seafood item that I tried recently.  Skates, those weird, flat, diamond-shaped, bottom-dwelling sea creatures that you may have touched during a visit to an aquarium's touch pool, make a pretty delicious main course!  

Previously thought of as a "trash fish," meaning a fish with little market value in the food arena, skate has gained popularity in recent years.  Similar in flavor to a mild whitefish, such as haddock, but firmer in texture, skate wings are extremely versatile and compatible with many flavor combinations and cooking methods.  Last time I visited my mom's house, I spotted these at the local fish market and decided to see what the fuss was all about.  

There are many different forms and flavors my skate wings could have taken, but when I cook with a new ingredient, I like to keep the recipe as simple as possible so I can experience the flavor and texture of the ingredient as close to its natural state as possible.  If you spot skate wings at your fish market, pick up a few and try them simply prepared with a little butter, lemon, and capers, as I did in the recipe below.   


Skate Wings with Lemon & Capers
2 T. butter
2 skate wings
juice of 1 lemon
1 T capers, chopped
salt & pepper, to taste

In a heavy-bottomed frying pan, melt the butter over medium heat. Add both skate wings, flat side down, then add the lemon juice and capers. Cover, then cook for about 5 minutes, or until the skate wings flake easily with a fork. Remove the wings with a spatula, transfer to serving plates, then add the salt and pepper to the pan juices. Stir a few times, then pour the sauce onto the plated skate wings.


Tuesday, June 28, 2011

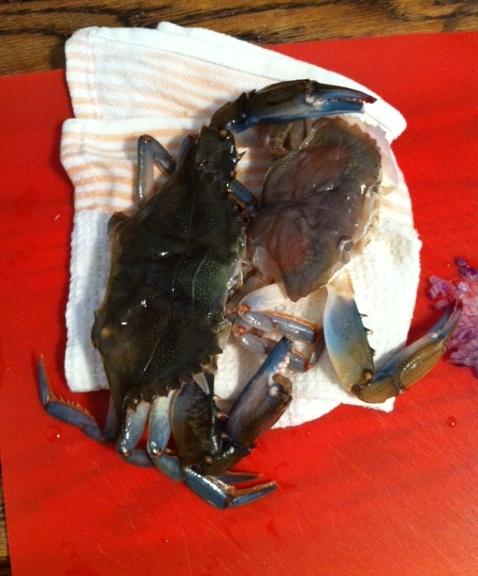
Ingredient Spotlight - Soft-Shell Crabs

Soft-shell crabs.  I’ve read about them, I’ve seen them, but until my last trip to my mom’s, I never tried them.  To tell you the truth, I had no idea where to start, and I found the whole concept confusing.  “Wait – it’s a crustacean, but the shell is soft?  How do I eat it?  Is it crunchy, or is it soft?  Do I eat the whole thing, or just the legs, like regular-shell crab?  Why must they look like freaky, mutated spider sci-fi creatures?!?  BAAAHHH I GIVE UP!” …and that is the mental conversation I had with myself every time I considered buying and trying soft-shell crabs. 

Soft-shell crabs are nothing more than crabs that have shed their old shells and whose new shells are still soft…hence the name “soft-shell crabs.”  Kinda self-explanatory, eh?  What isn’t self-explanatory is how to cook and eat them, so here’s the 411.  Eating them is easy; you devour the whole thing, shell, legs, body…the whole thing.  It may seem weird to eat the shell, but it’s similar to cheese in that soft cheeses are eaten as-is, while hard cheeses have a tough rind that needs to be cut away.  Same deal with crabs, apparently.  Cooking them is also a snap, just make sure to use a direct heat method or else they won’t get crunchy (click here for a very informative article).  If, like me, you are clueless about how to prepare them for cooking, it’s simple – have your fishmonger do it for you.  That’s what I did.  However, it’s not difficult – if you insist on cleaning them yourself, click here for easy-to-follow instructions! 

Truth be told, although the websites listed above and cookbooks everywhere claim that soft-shell crabs are easy to prepare and cook, I didn’t have the confidence to give it a shot until I was at my mom’s.  I’ve never handled failure very well, and maybe this is ridiculous, but I would have been very disappointed if I tried to cook them and the end result sucked.  I probably would have cried.  Combine my fear of failure with the fact that I’d feel awful that an animal died of unnatural causes just to have me desecrate it by turning it into a shitty dish, and you’ve got a recipe for culinary paralysis.  Honestly, I think I got a much needed confidence boost by tackling a cooking challenge in the company of someone who has had my back since I was an embryo.

I didn’t even comprehend the emotional aspect of my hesitation to cook soft-shell crabs until I sat down to write this post and asked myself, “How am I going to explain to my readers that I waited so long to try something?”  Sure, there’s tons of foods I haven’t tried, but this is the first situation where I’ve had access to an ingredient and shied away because I was afraid I’d f*** it up.  Guess what?  I didn’t.  The crabs were incredible, and if they weren’t so delicious and crunchy and absolutely perfect when paired with a cold IPA, I may have taken a moment to open up a can of whoop-ass on myself as penance for wussing out. 

Since I was a teenager, the advice I’ve given has always taken the form of a line from a Red Hot Chili Peppers song – “It’s better to regret something you did than something you didn’t do.”  Take this advice, especially when you’re in the kitchen or at the market.  If you want to try something, try it.  If a recipe looks complicated, conquer it.  If you don’t know what to do with an ingredient, research it.  Ask a fishmonger, a butcher, a farmer, a chef, or a friend who has an unhealthy obsession with “weird” food.  Just try it.  If you hear your little inner Yoda mumbling about “Do or do not, there is no try,” kick him to the curb.  Do try…and don’t forget to add butter. 

Soft-Shell Crabs in Beer Butter

This recipe will serve one.  If you're cooking for guests, simply multiply the proportions by the number of people you’re serving.

2 soft shell crabs
Rice flour, lightly seasoned with old bay*
¼ stick butter
1 T. minced red onion
¼ c. IPA-style beer
Salt and finely ground pepper, to taste
Lemon wedges, to serve

Rinse the crabs in cold water and pat dry with a kitchen towel.  They will still remain moist, but you don’t want them dripping.  Dredge them in the seasoned rice flour.

Melt the butter in a large, heavy-bottomed frying pan over medium heat.  Place the floured crabs in the pan and fry 2-3 minutes per side, or until they have turned red (hint: sometimes they tend to “pop” and splatter as their natural juices are released into the hot butter – you may want to invest in a mesh splatter screen).  Once the crabs are cooked, lift them from the pan with a spatula and set them aside on a plate. 

Lower the heat under the frying pan and lift the pan from the heat source for about 20 seconds.  Place it back on the burner and add the onion.  Cook for a minute or two, then add the beer, salt and pepper to the pan.  Whisk the beer into the butter, scraping up any browned bits on the bottom of the pan.  Pour this sauce over the crabs, then eat them and wash them down with an ice-cold beer.    

* You can use regular wheat flour if you'd like, but rice flour delivers a better crunch and is gluten-free.

Wednesday, May 25, 2011

Ingredient Spotlight - Shad Roe

No, I didn't get sucked up into the heavens during the rapture, I fell ill and I've been busy playing catch-up at work. My apologies for neglecting the site.  Anyway, let me back up - a little over a week ago, I excitedly posted on Facebook and Twitter that I would be picking up my order of shad roe from Mercato del Mare. Foodies everywhere know how exciting it is to be able to get their mitts on fresh shad roe - after all, it is highly perishable and has a limited season - so you can imagine my excitement when I got my "Today's Catch" newsletter and saw shad roe on the list. Not surprisingly, the ladies at Mercato recommended that orders be placed in advance.

What is shad roe? For those of you who aren't food nerds like me and didn't spend your adolescence leafing through your mom's 1970's printing of James Beard's New Fish Cookery, I'll give you the biologist's answer - shad roe is the egg sac of the female shad, an ocean fish related to herring. A cook, however, would tell you that shad roe is a prized delicacy. Knowing this, I called Mercato to place my order immediately, for I feared that all the other gastro-geeks would beat me to it. I picked up my order after work and rushed home so I could get started on making a mess of my kitchen. I developed a great original recipe, but before I got around to posting it I contracted Ebola or Rift Valley Fever or something else equally horrific (OK, it was just a sinus infection, but it still sucked).


Lobe of uncooked shad roe.
Uncooked shad roe resembles a chicken liver in the way that it comes in a pair, attached by a thin membrane. The sight of the roe caused my brain to drift back to my childhood. My dad loved going fishing, and I vividly remember him bringing his catch down to his work station in our basement where I'd watch him clean the fish (most often trout). He always threw the egg sacs to Snoopy, the most curious of our three cats. (Side note: If Snoopy had lived through the 90's, I most definitely would have nicknamed him "Snoop Catt.") Looking back, the chef in me can't believe that we threw away such a delicious part of the fish. However, the alarmist in me can't believe we thought it was OK to eat anything that came out of Lake Erie, which was once declared dead. It still shocks me that my Pops never reeled in anything resembling the radioactive man-worm featured in the all-time creepiest episode of "The X Files." But radioactivity/heavy metal toxicity aside, I can't help but wonder what sort of culinary magic could have been conjured up if we'd held on to that roe.

So what does shad roe taste like? It tastes like a combination of very mild liver laced with mild whitefish. It has a delicate texture that could easily be overpowered if you overseason it, so don't go crazy with the accoutrements, just let its flavor shine. While it's traditional to cook it simply in bacon fat or butter, try my twist - Shad Roe Saltimbocca!

 
Shad Roe Saltimbocca

1 T. bacon fat
2 T. butter, divided in half
several fresh sage leaves, minced
2 pairs shad roe
4 slices prosciutto
splash dry white wine
lemon wedges, to serve


Prepare the shad roe by dividing the pairs into individual lobes, being careful not to tear the membrane. Using a pin or the tip of a very sharp knife, poke several microscopic holes in each lobe of roe - this will prevent them from bursting.

Preheat your broiler. In the meantime, melt the bacon fat and 1 T. of the butter. Pour this into a casserole dish to coat the bottom. (Hint: You'll want to use a casserole dish that just barely fits the roe - you don't want much space between each lobe of roe or between the roe and the sides of the dish.)

Sprinkle the minced sage into the greased casserole dish, then add the shad roe. Divide the remaining butter into 4 pats and place one on top of each lobe of shad roe, then top each lobe with a slide of prosciutto. Pour a quick splash of dry white wine into the dish, shake the dish to distribute the wine, then throw the dish under the broiler for 5-7 minutes or until the proscuitto is crisp and the roe has firmed up and lost its pink color.

Serve with lemon wedges - a quick squirt of lemon juice really perks up the flavor!


Wednesday, March 30, 2011

Ingredient Spotlight - Cactus Pads (Nopales)

Artichokes.  Asparagus.  Fresh peas.  I doubt many of my fellow New Englanders would add cactus to this list of veggies we associate with spring, but if we lived in Mexico, we might change our tune.  Cactus pads, or nopales, are grown and sold in Mexico and are at their best in the spring, but they are neither common nor easy to find in the U.S., especially the northern U.S.  This is unfortunate.  If you ever see nopales at the market, do yourself a favor and pick up a few.  Just be careful picking them up - after all, they ARE cactii, and they WILL stab you. 


Preparing nopales is a pain in the you-know-what (and the hands, if you're careless), but I'm willing to put up with a little aggravation in order to experience new tastes and textures.  I found that nopales taste like a cross between a green bean and an artichoke, with the texture of cold Chinese-style jellyfish...wait, what?  OK, I guess I could compare it to just-barely-cooked calamari...but the jellyfish comparison is far more accurate, so if you haven't tried jellyfish, get on that!  Anyway, to prepare fresh nopales, simply trim the edges and slice off the spines using a small, sharp paring knife, then slice into bite-sized pieces, boil in salted water for about 10-15 minutes, and use in recipes of your choice.  I've included two refreshing recipes below!

Nopales Salsa

1 lb. nopales, prepared as described above*
1/2 red onion, minced
1 cup canned tomatillos, drained and chopped
2 fresh serrano chiles, minced
1 t. dried oregano
juice of 1 lime
splash olive oil
handful chopped cilantro
salt and freshly ground black pepper to taste

Combine all the ingredients in a glass bowl.  Chill at least 24 hours to let the flavors blend, then serve as desired.

* If you cannot find fresh nopales, prepared nopales in a jar can be purchased online. 

Individual Rice Bowls with Nopales Salsa

1 cup cooked rice, seasoned with Goya Adobo
1/2 c. shredded grilled chicken (you can also use pork, steak, or shrimp)
1/2 c. nopales salsa
avocado slices, to serve
sour cream, to serve
lime wedges, to serve

In a shallow bowl, place the rice, chicken and nopales salsa alongside each other.  Garnish with the avocado slices, sour cream, and lime wedges.

Friday, January 7, 2011

Ingredient Spotlight - Thai Eggplant

What is Thai Eggplant?  From what I determined, it's a cuter version of common purple eggplant!

I stumbled across a bag of Thai Eggplant in the produce department of my grocery store. Each no larger than a tangerine, some as small as a golf ball, these shamrock green spheres speckled with white aroused my curiosity. Do they they taste any different from regular eggplant? Is their texture the same? What color is the flesh inside?  I stopped staring at them and threw them into my basket, mentally shuffling my shopping list to include the ingredients for a traditional Thai green curry with beef.

While slicing the Thai Eggplant, I noticed that they contained more seeds than regular purple eggplant. This could be due to their small size. The flavor is exactly the same as purple eggplant, and so is the texture. My conclusion? Unless you want to add visual interest to a dish, there is no need to seek out these eggplants when you could simply use the easier to locate and easier to prepare common purple eggplant. That being said, here is the recipe I created with my Thai Eggplant.

Thai Eggplants in Beef Curry

1 T. coconut oil (can substitute vegetable oil)
1 lb. beef sirloin, sliced into 1/4" strips (also known as "stir-fry beef")
1 shallot or small onion, minced
2 lb. Thai eggplants, quartered or cut into eighths (or substitute diced purple eggplant)
1 can coconut milk
1t - 2T. Thai green curry paste (depends on how spicy you like it)
1t. grated fresh ginger
2 T. soy sauce
1 T. fish sauce
black pepper to taste
generous handful shredded basil leaves
red chile flakes (optional)

cooked rice noodles

Heat the coconut oil over medium-high heat in a large, heavy-bottomed pan. When heated through, add the beef strips and brown for 2-3 minutes. Add the shallot or onion and saute for another minute or so, or until the shallot is translucent. Now, add the eggplant and stir a few times to combine.

Add the coconut milk, curry paste, ginger, soy sauce, fish sauce, and pepper. Stir to combine, reduce heat to low, and simmer for about 10 minutes, or until the eggplant has softened and the sauce has thickened up a bit.

Spoon the curry over cooked rice noodles, and garnish each dish with shredded basil, and chile flakes if you prefer a little extra heat.