Showing posts with label gluten-free. Show all posts

Saturday, September 22, 2012

Curry Crusted Swordfish With Vegetables and Sriracha Cream

This is the first actual meal that I cooked from scratch in my new kitchen! There’s not much to it – if you can slice, you can cook this dinner. This dish goes together in no time, and the combination of hot jalapeno, bold spices, and cool cucumber is surprisingly refreshing!


Curry Crusted Swordfish with Vegetables and Sriracha Cream

For the spice crust
Pinch kosher salt
1 t. / 5 g coriander
1 t. / 5 g cumin
1 t. / 5 g mustard seed
½ t. / 2.5 g kala jeera*
½ t. / 2.5 g turmeric powder
½ t. / 2.5 g coarsely ground black pepper

16 oz / 455 g swordfish, tuna, or other firm-fleshed fish steaks
2 roma tomatoes, chopped
1 large cucumber, quartered lengthwise and thinly sliced
2-3 jalapeno chiles, chopped

For the sriracha cream
4 T. / 60 g sour cream
1 T. / 15 g sriracha
2 t. / 5 mL mild vinegar (white wine vinegar is a good choice)
2 c. / 450 g cooked rice
 
 
toasting the spices
First, toast the salt, coriander, cumin, mustard seed, and kala jeera in a frying pan until they become fragrant, approximately 3-4 minutes. Place them in a mortar and pestle along with the turmeric and black pepper. Grind coarsely. Rub the spice mixture into the swordfish, set aside.

Preheat your broiler. Line a baking dish with foil, then add the tomato, cucumber, and jalapeno in a single layer. Place the spice-crusted swordfish on top of the veggie layer, and broil for 12-15 minutes, or until the fish is cooked through.

While the fish and vegetables are cooking, make the sriracha cream by whisking together the sour cream, sriracha, and vinegar. If the mixture seems too thick, add a few drops of water to the sauce until it is thin enough to drizzle.

Take the fish and vegetables from the oven; let rest for 3-5 minutes. In the meantime, divide the rice among four individual plates. After the fish has rested, divide the fish and vegetables into four equal portions, serve atop the cooked rice. To finish, drizzle with the sriracha cream.

* Also known as black cumin – if you cannot find kala jeera, you can order it online from Penzey’s.

Nutritional info: serves four. 317 calories, 9 g fat, 29 g carbohydrates, 25 g protein.


Sunday, July 22, 2012

Creamed Callaloo with Jerk-Seasoned Chicken

This summer, the local farmers’ harvests have been good to me. I’ve picked up early season green tomatoes, some fantastic golden raspberries, fresh garlic, rainbow carrots, and a bounty of other goodies, and to my surprise, one of the vendors was once again selling Callaloo, a green leafy vegetable that grows in tropical climates and is popular in Caribbean cooking, especially when made into a hearty stew bearing the same name (click here for my Callaloo recipe).

The actual species that gives us Callaloo leaves is the amaranth plant, a powerhouse whose seeds nutrient-packed, gluten-free seeds are cooked like grains. Back to the leaves—Callaloo leaves are full of vitamins A and C, and they taste like milder spinach.


Creamed Callaloo with Jerk-Seasoned Chicken

Callaloo leaves
1 T. / 15 mL coconut oil
1 t. / 4 g grains of paradise (also known as melegueta pepper)
1 large brown onion, sliced
1 serrano chile, minced
1 bunch callaloo leaves, chopped and rinsed
1 c. / 230 mL coconut milk
Juice of 1 lime
Salt and pepper to taste
Cooked rice, to serve
Grilled Jerk-Seasoned Chicken, to serve (recipe below)

Heat the coconut oil over medium heat in a large, heavy-bottomed pot. Add the grains of paradise, onion, and Serrano chile. Cook for about 10 minutes, stirring occasionally, until the onion becomes soft and translucent.

Add the callaloo leaves and a splash of water. Stir, then cover and reduce heat to low. Cook until the leaves have begun to wilt.

Add the coconut milk, lime juice, salt and pepper. Cook, stirring frequently, until heated through. Spoon over cooked rice and serve alongside Grilled Jerk-Seasoned Chicken


Grilled Jerk-Seasoned Chicken

20 allspice berries, ground
½ t. / 3 g grains of paradise (also known as melegueta pepper)
1 t. / 4.5 g. ground ginger
2 t. / 9 g cayenne pepper
2 t. / 9 g garlic powder
2 t. / 9 g dried thyme
2 t. / 9 g salt
Approx. 2 lbs. / 1 kg chicken breast tenders, pounded ultra-thin

Combine all ingredients except the chicken. Blend well, then rub the spice mixture into the chicken. Grill over medium heat, approximately 2 minutes per side. Serve with Creamed Callaloo.

Nutritional info: serves six.  425 calories, 14 g fat, 34.5 g carbohydrates, 39 g protein.


Saturday, June 9, 2012

Blackened Grouper with Tequila Sunrise Slaw

I’ve been back from Florida for over a week, but apparently no one told my tastebuds. Each day since I’ve been back has been filled with citrus fruits, Island-inspired seafood recipes, and a few lovely Cuban-style black bean dishes. When I opened Mercato del Mare’s newsletter on Friday and saw that they had fresh Florida grouper for sale, I began to truly believe that while my brain belongs in Boston, my stomach belongs in Key West.

I wanted to serve something crunchy and cool with a little bit of a kick alongside the grouper, which I immediately knew I’d serve blackened. I’m still a little hazy on how my idea evolved and how I ended up inspired to make a slaw based on the tequila sunrise, a classic cocktail made with tequila, orange juice, and grenadine, a dark red syrup made from pomegranates or black currants. However I landed here, I sure am glad I did—this dish worked so well that it may be my signature summer dish going forward!


Blackened Grouper with Tequila Sunrise Slaw

For the Slaw:
1 large orange- zest in thin strips, segments diced
1 small jicama, grated with the large holes of a box grater
1 fresno chile, minced
1 jalapeno, minced
1 green onion, sliced
½ t. / 3 g dried chipotle flakes
2 T. / 30 mL tequila
2T. / 30 g pure pomegranate juice
1 T. / 15 mL olive oil
Salt and pepper to taste

For the Grouper:
6  2.5 oz. / 70 g portions grouper fillet
olive oil
Cajun seasoning

First, prepare the slaw by mixing all the ingredients in a large bowl. Cover and refrigerate for at least one hour.

Now, prepare the grouper. Heat a large cast-iron frying pan over the highest heat. It is hot enough when a drop of water dances across the surface rather than sizzling. Brush each grouper portion with olive oil, then coat in Cajun seasoning. Add the grouper to the hot frying pan and cook for about 1-2 minutes per side, or until the coating starts to turn black. Note, this process will create smoke – if you don’t want to deal with your smoke alarms, make sure to have your windows open and air circulating.

Divide the slaw into six portions and place on small plates, then place a portion of blackened grouper on top of the slaw on each plate.

Nutritional information: serves 6. 144 calories, 4 g fat, 10 g carbohydrates, 16 g protein.


Monday, June 4, 2012

Conch Chowder – The Boston Version

Of all the foods I tried in Key West last week, Conch Chowder was the recipe that struck me as The One – the one I had to duplicate, that is. The intermingled sounds of reggae, country, and Cuban jazz competing with each other from the nearby bars, the scents of cigar smoke, fried seafood, and suntan lotion, and the company of friends that I can only see after I’ve been felt up by TSA may have enhanced the flavors of the warm, mildly spiced tomato broth and the bits of salty, rich shellfish, but I did not want that bowl of soup to end.

The soup ended. The vacation ended. While city lights and potty-mouthed cabbies immediately conjure up a strange sense of home in my brain, my tastebuds still longed for the Keys, so I went on a mission to find conch and duplicate that delicious chowder.

This mission, while not impossible, was not fruitful. Tropical Foods, a Latin American/Caribbean Grocer located near Boston’s Dudley Square neighborhood, sells conch. Unfortunately, $55/pound is just not feasible for me, so I ended up back at square one – yearning for conch chowder, no conch.

Quahog
Fate must have been on my side, because just when I had mentally given up on my conch chowder, I spotted live quahogs at the grocery store. For my non-New Englanders, quahogs are large, hard-shell clams that weigh about a half-pound each in the shell. Once shucked, the meat inside is about the size of a golf ball, with a texture resembling calamari more than New England’s beloved steamer clams. Interestingly, one of our first stops in the Florida Keys was Alabama Jack’s, a roadside bar known for its conch fritters and sassy elderly dancers—where the New Englanders among us tried conch fritters for the first time. One girl compared the flavor and texture of conch to our quahogs.

To me, finding live quahogs was the equivalent of having my cake and eating it too – I could have my conch chowder, with a New England twist!


Conch Chowder – The Boston Version

Quahog, shelled
8 quahogs*
3 slices streaky bacon, chopped
1 onion, diced
1 potato, diced
1 red bell pepper, diced
1 green bell pepper, diced
3-4 leafy celery stalks, chopped
8 allspice berries, crushed
2 large bay leaves, torn
1 t / 5 g dried thyme
5 roma tomatoes, diced
1 canned chile in adobo, minced
2-3 carrots, shredded using the large holes of a box grater
3.5 c / 830 mL shellfish stock
Juice of 1 lime
1 green onion, sliced
Large handful cilantro, chopped

First, prepare the quahogs. Place them in a large pot with a splash of water, and steam for about 6-8 minutes, or until the shells open up a bit. Quahogs will not open like small clams or mussels, they simply gape a bit. Remove from heat, and once the shells are cool enough to touch, pry the shells apart and remove the meat. Chop into small bits and set aside.

In a large stockpot, heat the bacon over medium-high heat. Cook 3-5 minutes or until the bacon is crisp, then add the onion, potato, red and green pepper, and celery. Cook for an additional 5-7 minutes, stirring occasionally, until the vegetables have softened.

Place the crushed allspice, bay leaves, and thyme in a mesh tea ball or in cheesecloth (if using cheesecloth, tie it into a small packet). Add the tea ball or cheesecloth packet to the stockpot, along with the tomatoes, the chile, the carrots, and the shellfish stock. Bring to a boil, then cover and reduce to a simmer. Cook for 20-30 minutes, stirring occasionally.

Now, add the conch meat, lime juice, green onion, and cilantro. Cook for a few minutes, stirring frequently, and serve hot. Note, this tastes much better when served outdoors with cigars burning and reggae on the iPod!


* If you do not live in New England, quahogs may be difficult to locate – the landlocked can substitute a half-pound (500g) regular fresh steamed clams or canned whole clams. For authenticity’s sake, you can also substitute canned conch (available at Amazon.com), but it is quite expensive.

Nutritional information: serves six. 437 calories, 8.2 g fat, 70 g carbohydrates, and 20 g protein per serving.


Tuesday, June 28, 2011

Ingredient Spotlight - Soft-Shell Crabs

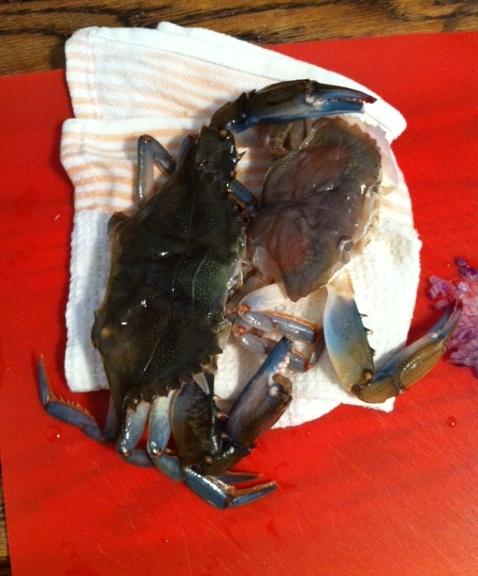
Soft-shell crabs.  I’ve read about them, I’ve seen them, but until my last trip to my mom’s, I never tried them.  To tell you the truth, I had no idea where to start, and I found the whole concept confusing.  “Wait – it’s a crustacean, but the shell is soft?  How do I eat it?  Is it crunchy, or is it soft?  Do I eat the whole thing, or just the legs, like regular-shell crab?  Why must they look like freaky, mutated spider sci-fi creatures?!?  BAAAHHH I GIVE UP!” …and that is the mental conversation I had with myself every time I considered buying and trying soft-shell crabs. 

Soft-shell crabs are nothing more than crabs that have shed their old shells and whose new shells are still soft…hence the name “soft-shell crabs.”  Kinda self-explanatory, eh?  What isn’t self-explanatory is how to cook and eat them, so here’s the 411.  Eating them is easy; you devour the whole thing, shell, legs, body…the whole thing.  It may seem weird to eat the shell, but it’s similar to cheese in that soft cheeses are eaten as-is, while hard cheeses have a tough rind that needs to be cut away.  Same deal with crabs, apparently.  Cooking them is also a snap, just make sure to use a direct heat method or else they won’t get crunchy (click here for a very informative article).  If, like me, you are clueless about how to prepare them for cooking, it’s simple – have your fishmonger do it for you.  That’s what I did.  However, it’s not difficult – if you insist on cleaning them yourself, click here for easy-to-follow instructions! 

Truth be told, although the websites listed above and cookbooks everywhere claim that soft-shell crabs are easy to prepare and cook, I didn’t have the confidence to give it a shot until I was at my mom’s.  I’ve never handled failure very well, and maybe this is ridiculous, but I would have been very disappointed if I tried to cook them and the end result sucked.  I probably would have cried.  Combine my fear of failure with the fact that I’d feel awful that an animal died of unnatural causes just to have me desecrate it by turning it into a shitty dish, and you’ve got a recipe for culinary paralysis.  Honestly, I think I got a much needed confidence boost by tackling a cooking challenge in the company of someone who has had my back since I was an embryo.

I didn’t even comprehend the emotional aspect of my hesitation to cook soft-shell crabs until I sat down to write this post and asked myself, “How am I going to explain to my readers that I waited so long to try something?”  Sure, there’s tons of foods I haven’t tried, but this is the first situation where I’ve had access to an ingredient and shied away because I was afraid I’d f*** it up.  Guess what?  I didn’t.  The crabs were incredible, and if they weren’t so delicious and crunchy and absolutely perfect when paired with a cold IPA, I may have taken a moment to open up a can of whoop-ass on myself as penance for wussing out. 

Since I was a teenager, the advice I’ve given has always taken the form of a line from a Red Hot Chili Peppers song – “It’s better to regret something you did than something you didn’t do.”  Take this advice, especially when you’re in the kitchen or at the market.  If you want to try something, try it.  If a recipe looks complicated, conquer it.  If you don’t know what to do with an ingredient, research it.  Ask a fishmonger, a butcher, a farmer, a chef, or a friend who has an unhealthy obsession with “weird” food.  Just try it.  If you hear your little inner Yoda mumbling about “Do or do not, there is no try,” kick him to the curb.  Do try…and don’t forget to add butter. 

Soft-Shell Crabs in Beer Butter

This recipe will serve one.  If you're cooking for guests, simply multiply the proportions by the number of people you’re serving.

2 soft shell crabs
Rice flour, lightly seasoned with old bay*
¼ stick butter
1 T. minced red onion
¼ c. IPA-style beer
Salt and finely ground pepper, to taste
Lemon wedges, to serve

Rinse the crabs in cold water and pat dry with a kitchen towel.  They will still remain moist, but you don’t want them dripping.  Dredge them in the seasoned rice flour.

Melt the butter in a large, heavy-bottomed frying pan over medium heat.  Place the floured crabs in the pan and fry 2-3 minutes per side, or until they have turned red (hint: sometimes they tend to “pop” and splatter as their natural juices are released into the hot butter – you may want to invest in a mesh splatter screen).  Once the crabs are cooked, lift them from the pan with a spatula and set them aside on a plate. 

Lower the heat under the frying pan and lift the pan from the heat source for about 20 seconds.  Place it back on the burner and add the onion.  Cook for a minute or two, then add the beer, salt and pepper to the pan.  Whisk the beer into the butter, scraping up any browned bits on the bottom of the pan.  Pour this sauce over the crabs, then eat them and wash them down with an ice-cold beer.    

* You can use regular wheat flour if you'd like, but rice flour delivers a better crunch and is gluten-free.

Wednesday, March 9, 2011

Seafood en Espanol

In my travels two weeks ago, I found a Spanish cookbook on sale for $7.99.  Since that purchase, I've wanted to give my cooking a little sabor espanol.  Unfortunately, I haven't had time to sleep lately, much less cook and write, but when I found out that A) my weekend plans were pretty low-key and I'd actually have some time on my hands, and B) Mercato del Mare had razor clams (which I've never tried before), I put my mind to creating the feast of all feasts and seasoning each dish with a sprinkling of sunny Spain. 
 
live razor clams
While most of the ingredients in these recipes are fairly common, you can make simple substitutions for the ingredients you cannot locate.  For example, if you cannot find Manchego cheese, use an aged monterey jack.  Any kind of firm sprouts can be used in place of the pea shoots, just don't use alfalfa sprouts - they're too flimsy.  Any live clam can be used in place of the razor clam, and if you can't locate monkfish, use small (approx 2 oz) pieces of tuna, swordfish, or shark steaks. 

Quinoa and Roasted Red Pepper Timbales

2 c. chicken broth or vegetable stock
1 c. uncooked quinoa, rinsed and drained
1/2 t. cumin seeds
1/2 t. smoked sea salt
1 T. smoked paprika
1/3 cup shredded Manchego cheese
1 fresh red chile, minced (optional)
2 roasted red bell peppers, minced (for instructions, click here)
olive oil

Bring the chicken broth to a boil, then add the quinoa and cumin.  Stir, reduce heat, and let simmer for approximately 15 minutes, or until the liquid has completely evaporated.  Stir in all remaining ingredients except the minced roasted red bell pepper and remove from heat. 

Next, take a small drinking glass or measuring cup, pour in a little olive oil and cover the inside of the glass entirely.  It should be very slippery.  Add a layer of the cooked quinoa and pack in, but not too tightly or it could stick (you might want to practice this a few times - my first try was a disaster, but you develop a feel for it!).  Next, add a layer of the minced roasted red bell pepper.  Add more layers, alternating between quinoa and red pepper, as shown in photo to the left.  Repeat until the cup is filled. 

To serve, invert the molds on a plate (as shown in photo below), and garnish with any additional red pepper. 


Steamed Razor Clams with Pimenton Gremolata

For the gremolata:
zest of 1 lemon
1/4 c. chopped parsley
1 large garlic clove, very finely minced
1 t. smoked paprika
1/2 t. smoked sea salt

For the clams:
1/4 c. olive oil
3 garlic cloves, minced
2 t. fresh red chile, minced
1/4 c. dry white wine
juice of 1 lemon
1 lb. razor clams

First, make the gremolata by combining all gremolata ingredients in a small bowl.  Set aside.

In a large frying pan with a lid, heat the olive oil, then add the garlic and chile.  Saute for a few minutes until the garlic becomes fragrant, but do not let the garlic burn.  Now, add the wine and lemon juice.  Stir to blend, then add the clams.  Cover, then simmer for 3-5 minutes or until the shells have opened.  Remove from heat, but keep warm.

Razor clams require a little more work than regular clams, so be sure to follow this step after steaming if using razor clams rather than regular clams.  You'll see that the clam kind of splits into a "Y" shape - grab the arm of the "Y" that connects to the dark organs, and pull - this should separate the muscle part of the clam from the dark bits.  Just pull and discard the dark bits, and if there is any dark matter remaining, squeeze or slice it away.  Repeat with all the clams. 

To serve, place the cleaned clams back into their shells, sprinkle with a pinch of the gremolata, and arrange on a plate, as shown in the picture above. 


Pea Shoots with Garlic Dressing

1 bunch pea shoots
Reserved cooking liquid from steamed clams

Separate the pea shoots into small parcels, and find the longest shoot in each bunch.  Use the long shoot to tie the others together.  Spoon a few teaspoons of the clam cooking oil over each parcel, making sure to include some of the garlic and chile bits. 


Monkfish Medallions with Sherried Roasted Red Pepper Sauce

For the sauce:
1 roasted red bell pepper, chopped
1/4 c. Amontillado sherry
1 garlic clove, chopped
2 t. smoked paprika
2 T. heavy cream
2 T. olive oil
salt and pepper to taste

For the monkfish:
1 monkfish tail, cut into 1.5 inch thick medallions
flour seasoned with salt and pepper, for dredging
olive oil, for frying

First, make the sauce.  Combine all the ingredients in a blender, puree until liquefied, and set aside. 

Take each of the monkfish medallions and dredge in the seasoned flour, making sure to shake off any excess flour.  Set aside.  Heat a large, heavy bottomed frying pan.  When it is hot, add a generous splash of olive oil.  Once the olive oil is heated and covers the entire surface of the pan, add the monkfish medallions and cook for 2-3 minutes per side until slightly golden.  Remove from heat when they are done. 

To serve, place 2-3 medallions on a plate and drizzle with the Sherried Roasted Red Pepper Sauce. 


Sunday, September 12, 2010

This Weekend's Meat-Free Menu

This weekend, hundreds of dogs and their owners gathered on Boston Common to raise hundreds of thousands of dollars for the Massachusetts Society for the Prevention of Cruelty to Animals. To honor animals and all the work advocates do on their behalf, I not only volunteered at today’s walk, but everything I’ve cooked this weekend has been either vegetarian or vegan.

So what is the difference between vegetarians and vegans? Vegetarians do not eat meat or fish, but they may choose to eat eggs, dairy products, and other products obtained from live animals. Vegans neither eat nor otherwise use any products derived from animals, including honey and wool.

Because this blog is written to celebrate food - nothing more, nothing less - I do not believe that this is the forum to discuss the plethora of issues surrounding meat consumption. I’ll skip the sociology lesson and let you investigate the economic, political, medical and ethical questions on your own time, but I will highlight a few of the benefits of vegetarian and vegan cooking. I’m not expecting meataholics to put down their steak knives and start mainlining tofu, but consider these facts*:

  • Vegetarian/vegan diets are lower in saturated fat and cholesterol than omnivorous diets
  • Factory-farmed meat products are more likely to contain antibiotic-resistant strains of salmonella, E. coli, etc.
  • No animals have to suffer to make falafel, beans & rice, or quinoa salad
  • Intensive livestock production is one of our country’s greatest sources of environmental pollution
  • Vegetarian dishes are generally easier on the wallet than dishes containing meat and/or fish

Even if you don’t want to give up meat, try cooking a vegetarian or vegan meal once or twice a week - most vegetarian recipes are so delicious that you won’t even miss the meat!


Before I did any real cooking, I had to try vegan bacon. Oxymoron, right?!? The stuff isn’t bad. I am thankful that someone has been able to make such a great substitute. No one should be denied the joys of bacon, butter, and booze.


This stuff cooks up just like real bacon. Grease the frying pan for a more authentic flavor, turn it over a few times, and voila! Vegan goodness.


The flavor is very spot-on, and the texture isn’t an exact match, but it’s pretty darn close. And honestly, people who cook bacon in the microwave probably won’t know the difference. The smell of vegan bacon frying is so alluring that Tessie, my roommate’s pup, joined me in the kitchen, barked to get my attention and showed off her “sit” skills when I picked up a piece!


The first dinner recipe I tried was a vegetarian casserole with whole wheat pasta, Savoy cabbage, fontina cheese, and fresh dill. The cabbage is extremely high in vitamins and minerals, and both cheese and 100% whole wheat pasta contain protein. Choose a high quality Italian brand of whole wheat pasta made with durum wheat, which is naturally higher in protein than other varieties of wheat. This dish is rich, gooey, hearty, and delicious - this one will stick to your bones on a cold day.


The next dinner recipe was more of an experiment, and it turned out to be fantastic! I was inspired to make this after accidentally buying a bag of Roland Sweet Dried Tomatoes - sounds like plain old sun-dried tomatoes, right? Wrong - these are sweetened with sugar, and their flavor and texture remind me of a tomato-tinged prune or raisin. I thought their sweet quality could enhance a recipe much in the way that adding raisins to a savory recipe deepens the flavors. In Sicily, golden raisins are sometimes added to tomato-based sauces; this was a perfect starting point.


I decided that I wanted to give myself a greater challenge than simply creating a vegan dish - I wanted to make one that was both vegan and gluten-free. Flavors? Check. Proteins? I call on my favorite legume, red lentils. Carbohydrates? Herein lies the challenge. Gluten-free pasta? Nah, just ate pasta last night. Rice? That’s for gluten-free amateurs. I chose millet.


Millet is the seed of a grass, and it is commonly used in parts of Asia and Africa. It is readily available in health food stores, co-ops, and better supermarkets. Try and get over the fact that you’ll without a doubt recognize it as a key component in commercially prepared birdseed; it’s inexpensive, nutritious, and has a wonderful, fluffy texture. If you cannot find millet, quinoa or amaranth are also great whole grains suitable for those on gluten-free diets, and they also carry the added perk of being two of the only plant sources of complete proteins.  Check out more gluten-free grains here.


Whole grains are a great substitute for couscous, the preferred starch source in Moroccan cooking. Knowing this, and knowing that my sweet dried tomatoes could work in a Sicilian-inspired dish, I decided to try a dish that blended Sicilian and Moroccan flavors, which was not a difficult task since their cuisines are very similar to begin with due to their proximity.


Now, it’s time to get cooking. Try these recipes and eat up!


Cabbage, Fontina, and Dill Casserole with Whole-Wheat Rotini


8 oz. 100% whole wheat rotini

1 small head Savoy cabbage, quartered and shredded into ¼” strips

1 clove garlic, minced

4 T. chopped fresh dill

Olive oil

2 T. chardonnay (try using an Italian variety, known as Sciardonne, produced in Italy’s Alto Adige region)

5 oz. Fontina cheese, shredded (fontina is soft, so grate it fresh from the fridge or it will melt)

Preheat the oven to 400. Cook the pasta in a large pot of salted boiling water. Whole wheat pasta takes a little bit longer to cook than regular pasta, so be patient.


Meanwhile, combine the cabbage, garlic, 3 T. of the dill, a splash of olive oil, and chardonnay in an ovenproof dish. Place in oven. Check after 5 minutes, if the cabbage has wilted, remove from oven. If not, cook for a few more minutes, no more than 10, and remove from oven. Do not let the cabbage brown.


Once the pasta is cooked, add it to the cabbage in the casserole. Add half the fontina, mix well until all ingredients are blended evenly, adding another splash of olive oil to the mix. Once the pasta, cabbage, and cheese are well-blended, top with the remaining fontina. Place in oven and bake for 8-10 minutes. Remove from oven, let sit for 5 minutes, and serve.


Millet with Sweet Tomato and Lentil Stew


Splash olive oil

1 small onion, chopped

2 tomatoes, chopped

Pinch crushed red chile flakes

Pinch fresh ground black pepper

1 cup chopped sweet dried tomatoes

½ cup red lentils

1 cup white wine

¼ t. ground cumin

¼ t. ground coriander

1 t. smoked paprika

½ cup water or vegetable broth (if necessary)

2 T. fresh parsley, chopped

2 T. fresh mint, chopped

2 T. capers, rinsed and drained

Salt to taste


1 batch cooked millet
Chopped toasted hazelnuts


Heat the olive oil in a heavy-bottomed saucepan over medium heat until the onions become translucent. Do not let them brown. Next, add the chopped tomatoes, chile flakes, and ground pepper. Cook, stirring occasionally, for about 10 minutes or until the tomatoes have cooked down and released some of their liquid.


Add the sweet dried tomatoes, lentils, wine, cumin, coriander, and paprika. Cook for 15 more minutes, stirring occasionally. By this point, the lentils should be cooked but still firm. If the lentils need more cooking time and/or no liquid remains, add the ½ cup water or vegetable broth and simmer for 5-10 more minutes.


The final step is to add the parsley, mint, capers and salt, stirring until well-blended. To serve, spoon over cooked millet and sprinkle with chopped toasted hazelnuts.


* information obtained from www.tryveg.com and www.bostonveg.org