Sunday, November 24, 2013

Beef Stew with Bacon & Vegetables

I’ve known for a few days that it was going to be cold today. And by cold, I don’t mean “Waaahhh, a coat ruins this outfit,” I mean “I am legitimately concerned for my extremities.”

As much as I complain about the cold, I can’t help but love the excuse to spend a day next to the stove. Yesterday, when the weather wasn’t so frostbitey, I planned in advance and bought the ingredients I needed to make a lovely slow-cooked beef stew.

This recipe makes a lot—and by “a lot,” I mean “Hey, East Coast, I’ve got enough for all of you!” Nah, just kidding—but this recipe definitely yields enough for 8-10 cold, hungry people! And it has plenty of healthy vegetables, which I think makes up for the fact that bacon fat is the key to the best flavor.


Beef Stew with Bacon & Vegetables

4-5 slices of thick-cut streaky bacon, sliced into ½” pieces
1.5 lbs. chuck steak, cut into bite-sized pieces
1 large onion, diced
3 leafy stalks celery, diced, leaves set aside
3-4 carrots, diced
3 juicy tomatoes, diced
2-3 c. dry red wine
1 32-oz. box organic low-sodium beef broth*
1-2 turnips, diced
3-4 red potatoes, diced
1 large bunch kale, ribs removed, leaves torn into pieces
1 t. dried thyme (or half the amount fresh)
1 t. crumbled dried sage leaves (or 3 fresh leaves, minced)
½ t. ground ginger
½ t. garlic powder
1 lb. green beans, sliced into 1-inch lengths
Smoked sea salt, to taste
Cracked black pepper, to taste


Before you even start chopping, make sure you have a huge pot (I used my 6.75 quart Le Creuset risotto pot). Otherwise, you’re screwed.

Just before adding the liquid
Once your pot is ready, add the bacon over medium heat and cook it until the fat is melted away and the meaty bits are cooked but not burnt. Then, add the beef chunks and cook, stirring frequently, for about 5 minutes until the beef chunks are mostly browned. Then, add the onion, carrots, and celery stalk (make sure to keep the leaves separate and set them aside—they will be added later). Cook for about 5 more minutes, stirring frequently, until the onion has softened a bit.

Next, add the tomatoes (I added a few yellow cherry tomatoes, as you can see in the photo) and 1 cup of the wine. Turn the heat to high, and cook until the wine has reduced and most of the liquid has evaporated.

Now, add one more cup of wine and the beef broth, the turnips, potatoes, and kale, and the thyme, sage, ginger, and garlic. Reduce heat to medium-low and cover. Cook for 30 minutes, stirring occasionally.

Once the kale is completely wilted, add the green beans. If it seems dry, add the remaining wine (if you don’t need to add it, you should probably drink it). Cook for about 5 minutes until the green beans are cooked, then add the smoked sea salt and the cracked pepper. Give it a few good stirs until it is well-blended, then serve piping hot. This dish will stick to your bones!


* If you use pre-made beef broth, make sure to use low-sodium, and preferably organic. Of course, if you have your own beef broth, even better!

Not the prettiest, but it's wicked good!

Monday, November 11, 2013

Linguine with Seafood and Citrus

I swear I’m not going to get emotional…I swear I’m not. Not gonna do it! Why am I getting all sentimental? Because I haven’t been inspired to write for a long time. But this weekend, I got the chance to hang out with some amazing friends, some old and some new, and throughout the day when the conversation turned to food, I began to miss cooking for the purposes of sharing recipes.

I don’t often get to share the actual dishes I create—but I can always share my recipes, and I love sharing food with others, even if it’s just through typed words on a page. It’s time to get back to what I love. So here goes. I don’t know how often I’ll get to post, I don’t know if anyone will read my recipes, and I don’t know if anyone will try to cook them…but I get to do what I love—cook, write, and share. Mangia, bitches!


Linguine with Seafood and Citrus

16 oz. linguine
2 oz. butter (1/2 a standard stick)
3-4 cloves garlic, pressed
1 bulb fennel, sliced
2 T. capers
1 t. dried oregano
½ t. crushed chile flakes
Rind and juice of 1 large lemon
Rind and juice of 1 orange
½ c. dry white wine
1 lb. calamari, tubes sliced into rings*
½ lb. large scallops, sliced into bite-sized pieces**
2 cups roughly chopped parsley
2 large handfuls arugula
Salt and pepper to taste
Splash extra virgin olive oil

Cook the linguine in heavily salted water. In the meantime, melt the butter in a large pot over medium heat. Add the garlic, being careful not to let it burn. When the garlic starts to become fragrant, add the fennel, capers, oregano, chile flakes, and lemon and orange rind (save the juice for the next step). Stir gently, stirring every few minutes, until the fennel slices have softened but are still firm.


Timing is important for these next few steps – when the pasta is about 2-3 minutes away from being cooked, add the lemon and orange juice and the wine to the pot with the fennel and seasonings. Turn the heat to high, and stir until the mixture is bubbling.  Add the calamari and the scallops, and cook for about a minute, stirring constantly. Add the parsley and arugula to the pot, stirring just until it is blended in.  Add the salt and pepper to taste.

Immediately after adding the parsley and arugula, drain the pasta and add the cooked pasta to the pot. Add a splash of olive oil, then toss to coat the pasta. Serve piping hot preferably with wine.


* If tentacles give you the willies you can use all tubes, but tentacles add texture and make for a more interesting presentation.

** Always use “dry” scallops—the texture and flavor are superior. They’re more expensive, but you get what you pay for, and you won’t be ingesting a chemistry project.


Monday, September 9, 2013

Chicken, Carrot, and Bok Choy Coconut Curry

This recipe came about when I wanted to use a bunch of fresh, young carrots that I picked up at the farmers’ market. It goes together quickly, uses easy-to-find ingredients, and it’s loaded with vitamins, minerals, and crunch. Depending on the chiles you use, this can be made hot or mild. Give this recipe a try when you have limited cooking time but want to create something healthy.


Chicken, Carrot, and Bok Choy Coconut Curry

1 T. coconut oil
2 chicken breasts, cut into bite-sized pieces
1 bunch young carrots, sliced into thin rounds
1-3 chiles, chopped*
2 cloves garlic, minced
1 15-oz can coconut milk
1 T. freshly grated ginger
1 T. coriander seeds, toasted and ground
1 t. cumin seeds, toasted and ground
2 t. coarsely ground black pepper
1 bunch bok choy, chopped
Sea salt to taste
Sesame oil

Heat the coconut oil over high heat in a large pan. Once it has melted, add the chicken pieces and begin to cook, stirring occasionally. When the chicken pieces are barely showing any pink, add the carrots and chiles. Keep stirring until no more pink shows in the chicken.

Next, add the coconut milk, ginger, coriander, cumin, and black pepper. Reduce heat to medium-low and cook for 8-12 minutes, stirring occasionally, until the chicken is cooked through and the carrots have lost their crunch but are still firm.

Add the bok choy. Cover and cook until the green tops are barely wilted. Add sea salt to taste and blend, then serve over cooked rice with a drizzle of sesame oil.


* You can make this as mild or as hot as you prefer. If you like it mild, use chiles such as cubanelles or poblanos; if you prefer hot, use a cayenne, Serrano, or even a habanero or scotch bonnet.


Sunday, June 16, 2013

Grilled Bluefish with Poblano Cream

Farmers’ Market season is upon us here in New England, and in addition to the stunning selection of fresh fruits and veggies, many markets also sell meats, eggs, and seafood.

Red's Best package with QR Code
During my recent trip to the Dewey Square Farmers’ Market, I discovered Red’s Best Seafood, a local company that specializes in locally caught sustainable seafood. The company prides itself on its transparency, placing QR codes on its products that tell the consumer who caught the fish and where and how it was caught. Red’s commitment to traceability is especially relevant here in Boston after the Boston Globe's 2011 exposé on the rampant mislabeling of seafood in area restaurants.

I picked up a pound of bluefish, a popular game fish in New England. Bluefish are found throughout the Atlantic. Their strong, oily flavor may be too “fishy” for some people, but seafood lovers appreciate its versatility. Bluefish is most often smoked and made into a popular dip, but it is also great on the grill, as its oiliness keeps it moist.

I prepared my bluefish with a flavorful poblano cream sauce and served it with crispy fried green tomatoes. Try this if you buy or catch bluefish!


Grilled Bluefish with Poblano Cream

2 poblano chiles, roasted and chopped*
1/3 c. aged sherry
2 T. olive oil
Pinch salt
Dash cayenne pepper (optional)
1 lb. bluefish fillet
2 T. sour cream

Preheat your grill or broiler. In the meantime, blend the roasted poblanos, aged sherry, olive oil, salt, and cayenne pepper (if using) together in a blender or food processor.

Spread 1-2 tablespoons of the poblano blend on the bluefish. Set it aside for 10-15 minutes to let the fish absorb the flavors, then grill or broil for 10-12 minutes, or until the fish is fully cooked.

While the fish is cooking, add the sour cream to the poblano mixture and blend again in the blender or food processor. Serve this song along with the grilled fish.


* To roast poblano peppers, remove the stems and cut them in half. Place them cut-side down on a foil-lined baking sheet and broil until the skins are blistered and blackened. Remove from the broiler, and when the peppers are cool enough to touch, remove the charred skin.


Sunday, May 19, 2013

A Pre-Vacation Libation

With less than a week til I’m in Key West, I have some work to do – packing. It’s hard to pack for a beach vacation when the temperatures outside conjure up images of tundra rather than tiki bars, so I blended up a tropical cocktail to get myself in the spirit. After all, it’s easier to decide which outfits look best over a bikini when you’re sipping a cold concoction of rum and exotic fruit!

To make an authentic tropical drink, I used frozen naranjilla pulp. Naranjilla is a fruit native to Ecuador that is easily grown from seed in South Florida. The frozen pulp can be found in Latino markets and some grocery stores that have a significant Latino/Caribbean customer base. The pulp is olive green and tastes like a citrusy pineapple with a hint of strawberry. Your cocktail will look like split pea soup, but who cares???


Naranjilla and Coconut Cocktail

14 oz. frozen naranjilla pulp*
32 oz. chilled coconut water
8 oz. dark rum

Thaw the naranjilla pulp for 10-15 minutes, or until you are able to chop it into chunks.

Chop the frozen naranjilla into one-inch chunks and place the chunks in a blender, along with the coconut water and the rum.  Blend, then divide evenly among four chilled cocktail glasses.

* If you cannot locate naranjilla pulp, substitute 8 oz. pineapple juice, ½ cup pineapple chunks, 6 oz. orange juice, and ¼ c. sliced strawberries.


Saturday, April 27, 2013

Around the World in Eighty Bites—Peru

My first introduction to Peruvian food came courtesy of a brief fling with a Peruvian guy. We split up quickly, but my love affair with Peruvian cuisine was the beginning of a beautiful friendship.

Peruvian Ingredients

From my first taste—Lomo Saltado with Aji Paste—to future finds such as my favorite, a layered potato dish called Causa, I’ve never tried a Peruvian dish I didn’t like. One of my close friends grew up in Peru, and she knows all the best Peruvian restaurants in and around Boston.

In recent years, Peruvian food has been touted as the next “It” cuisine. While Peruvian food is exotic enough to be a break from the ordinary, most Peruvian food is not so foreign that it cannot be easily made at home. Still, some authentic ingredients may not be easy to find if you do not live in an area with a significant Hispanic/Latino customer presence. Thankfully, we live in an era where anything we want is merely a click away, and there are plenty of online retailers selling authentic Peruvian foods.

I've created versions of several traditional Peruvian recipes that you can try at home!


Margarita Ceviche

2 cloves garlic, quartered
Juice of 2 limes
Juice of ½ orange
1 shot tequila anejo
1 habanero pepper, quartered
2 sprigs parsley, minced (leaves only)
3 sprigs cilantro, minced (leaves and stems)
A few paper-thin slices red onion
1 lb. dry sea scallops, cut into medallions*

Combine all the ingredients in a large glass or ceramic bowl. Cover with plastic film and place in the refrigerator. Let it chill for at least 2 hours (up to 12). Serve immediately in chilled bowls, or in margarita glasses with a salted rim!

* To cut the sea scallops, it helps if you place them in the freezer for about 30 minutes before slicing. When slicing, slice across the grain of the scallop as shown in the photo to the left—the blue lines in the photo represent the “grain” of the scallop, and the red line shows the direction that the knife’s blade should cut. Slice each scallops into 4 medallions of equal thickness.


Aji Sauce

1 thick slice baguette, torn into pieces
5 oz. can evaporated milk
2 aji amarillo chiles (use habaneros or serranos if you cannot find aji amarillos
2 small garlic clove, minced
2 sprigs cilantro, minced
1/3 c. grated cotija cheese
1 T. olive oil
Pinch smoked sea salt

Soak the bread for 10 minutes in the evaporated milk. Place the bread and milk in a blender or food processor with all remaining ingredients. Blend well until smooth. Keep refrigerated and use as a condiment.


Giant Corn with Cotija and Orange


Giant Corn
8 oz. dried giant corn (Goya sells this product)
4 c. cold water
2 dried de arbol or chipotle chiles
2 oz. cotija cheese, grated
Rind of1/2 orange
1 T. minced red onion
2 T. Aji Sauce (recipe above)

Soak the corn in the cold water overnight. Once soaked, drain the corn. Place it in a pot with the 2 dried chiles, cover with water by 2 inches, and bring to a boil. Boil for approximately 45 minutes, adding water if necessary.

Drain the corn and chiles and place in a bowl. When cool enough to touch, remove the chiles, mince them and place in the bowl with the corn. Add the cotija, orange rind, onion, and Aji Sauce. Blend well.

Serve either at room temperature or chilled.


Purple Potato Causa

1 lb. purple potatoes, peeled and diced
¼ c. grated cotija cheese
3 T. Aji Sauce (recipe above)
1 lime, halved
8 oz. canned crabmeat
2 T. mayonnaise
1 ripe avocado
Salt

Aji Sauce, to serve
Cilantro leaves, for garnish

Boil the potatoes in salted water. Drain and mash, incorporating the cotija cheese, Aji Sauce, and the juice from one of the lime halves. Set aside.

Combine the crabmeat and the mayonnaise and set aside. Next, mash the avocado with the juice from the remaining lime half and a pinch of salt.

Assembly will require a ring mold. To assemble the Causa, spoon a tablespoon or two of Aji Sauce onto a small plate. Set aside. Place your ring mold onto a sheet of parchment or waxed paper. Fill the mold with about 2 inches of the mashed potato mixture. Then, add a ½ inch layer of the avocado mixture. Finally, top the avocado with a 1 inch layer of crabmeat. Place the blade of a spatula under the parchment and over the plate containing the Aji Sauce. Slip the parchment out from the bottom, letting the mold slip onto the sauce (this will take practice—I ruined my first few tries!). Top with one or two cilantro leaves. Repeat until all ingredients are used, and serve chilled or at room temperature.

Giant Corn with Cotija and Orange


Margarita Ceviche


Purple Potato Causa


Peruvian Small Plates


Tuesday, April 2, 2013

Soba Noodles with Thai Pesto

After picking up a bunch of Thai basil in Chinatown for a recipe that only required a few leaves, I needed to come up with something to do with the rest of the bunch. “Why not make pesto with a Thai twist?” I thought. I threw my experiment in the blender and was happy with the result, and my first instinct was to add the Thai pesto to cold Asian noodles, which is what I did in the recipe below.

While the noodle dish is excellent, you can also use Thai pesto on stir-fried or grilled vegetables, meats, and seafood, and thinned with a bit of sesame oil and rice vinegar, it would make an excellent dressing for Asian greens.


Soba Noodles with Thai Pesto

12 oz. buckwheat soba noodles
1 T. coconut oil
Splash sesame oil
½ c. Thai pesto (see recipe below)
1 cup cooked shelled edamame
Handful shredded cabbage

Cook the noodles in boiling water according to package instructions. Drain and place in a large mixing bowl with the coconut oil, sesame oil, Thai pesto, edamame, and cabbage. Toss until the noodles are coated with the pesto and the oil. Place the bowl in your refrigerator. Serve cold, garnishing with extra basil or sesame seeds if desired.


Thai Pesto

¼ c. peanuts, coarsely chopped
Leaves from 1 large bunch Thai basil
Leaves from 1 small bunch mint
2-3 Thai or Serrano chiles (use as many or as few as you’d like)
1 t. grated ginger
1 T. soy sauce
1 T. sesame oil
¼ c. canola oil (plus more if needed)

Place all ingredients in a blender or food processor. Blend until it forms a thick, smooth paste, adding more oil if necessary. Store in an airtight container for up to two weeks.

* Nutritional info: serves 4. 391 calories, 45 g fat, 67 g carbohydrates, 24 g protein.


Monday, March 4, 2013

Salmon with Ginger Chutney & Blueberries

This recipe was born from Things Whole Foods Had On Sale This Week. No restaurant replica, no convoluted tale of inspiration, just a girl trying to save a few bucks on sustainable seafood and produce that wasn’t sprayed with Big Ag’s latest science fair project.


Salmon with Ginger Chutney & Blueberries

¼ c. ginger chutney
1 cup water
4 4-oz portions wild salmon fillet
1 cup organic blueberries

Cooked basmati rice, to serve
Braised Escarole, to serve (recipe below)
Nigella seeds, for garnish

Blend the ginger chutney and the water together in a shallow baking dish, whisking with a fork to remove any lumps from the chutney. Place the salmon fillets in the baking dish, skin side up, and marinate for 30 minutes up to 4 hours. 

Preheat the oven’s broiler to high. Line another large, shallow baking dish with foil and place the salmon fillets skin side up, with plenty of room between each fillet and room between the salmon and the edges of the dish. Pour the ginger chutney marinade into the dish alongside the salmon. Add the blueberries.

Broil for 4-6 minutes, or until the salmon skin starts becomes crispy and develops a slight char. Remove from heat.

Place about ½ c. cooked basmati rice in the center of a dinner plate, creating a round bed. Place braised escarole around the rice like a ring, and place one of the cooked salmon fillets, skin side down, on top of the basmati rice. Spoon some of the cooking liquid and the blueberries on top of the salmon, and sprinkle with the nigella seeds. Prepare three additional plates in the same manner and serve piping hot.


Braised Escarole

2 heads escarole, chopped
1 clove garlic, smashed with the side of a knife
1 allspice berry, smashed with the side of a knife
Pinch salt

Escarole grows best in sandy soil, so it must be thoroughly washed before using or you may end up with gritty greens. To wash the escarole, place the chopped leaves in a large bowl and cover with water. Using your hands, slosh the escarole around in the bowl for a minute or so, wiggling the leaves through your fingers so that any sand falls to the bottom of the bowl.

Place the crushed garlic clove and allspice berry in a large pot with a lid. Without draining, lift the escarole out of the water-filled bowl and place directly into the pot. Sprinkle with a pinch of salt, place the lid on the pot, and cook over medium heat, stirring occasionally, until the escarole has wilted but still retains a firm texture. Pay close attention during cooking—the water that clings to the leaves after washing isn’t always enough; the pot should never be dry, so you may need to add a tablespoon or two of extra water while cooking.

Remove the garlic clove and serve with a slotted spoon to drain away any excess moisture.

* Nutritional info: serves four. 537 calories, 11.5 g fat, 63 g carbohydrates, 32 g protein.


Tuesday, February 19, 2013

Lemongrass Shrimp Skewers with Kiwi & Avocado Guacamole

Recently, I was lucky enough to spot U-7 shrimp at Seaport Fish (U-7 indicates that there are 7 or fewer shrimp per pound – these babies are pretty big!). Originally, I planned on cooking them simply with butter and garlic, but when I spotted kiwis at the local market, I decided to try something more exotic.

In addition to my kiwis, I picked up an avocado, some Serrano chiles, and on a whim, a few stalks of lemongrass. While the lemongrass didn’t contribute much flavor-wise, it certainly added to the presentation. Try this next time you’re craving spicy, tropical flavors!


Lemongrass Shrimp Skewers with Kiwi & Avocado Guacamole

4 stalks lemongrass
8 U-7 (jumbo) shrimp
Kiwi & Avocado Guacamole, as prepared below

Prepare a grill or preheat your oven’s broiler. In the meantime, remove shells from shrimp, leaving the tail shell intact (this helps prevent the smaller end of the shrimp from drying out while cooking. Cut the lemongrass stalks in half, cutting diagonally so that a sharp point is formed (as shown in photo below right). Use your fingers to straighten the raw shrimp, and using the pointed end of the lemongrass spear, insert the lemongrass into the shrimp lengthwise (see photos below).


If using the broiler, line a baking sheet with foil, and place a wire rack on top of the foil. Place the skewered shrimp on the wire rack, and put the shrimp under the broiler. Cook the shrimp for 3-4 minutes, or until the shrimp are firm and pink. If using the grill, place the shrimp over slow coals and grill for 2-4 minutes, or until the shrimp are firm and pink.

While the shrimp cook, prepare two plates by spreading about ½ cup of the Kiwi & Avocado Guacamole on each plate. Once the shrimp are cooked, arrange four shrimp on each plate in a spoke formation.

* Nutritional info: serves 2. 335 calories, 11 g fat, 17 g carbohydrates, 45 g protein.


Kiwi & Avocado Guacamole

3 cloves garlic, very finely minced
2 serrano chiles, very finely minced*
1 T. finely minced onion
2 kiwis, peeled and minced
1 avocado, chopped

Combine all the ingredients in a large mixing bowl. Using a potato masher or a fork, mash until the guacamole is smooth and well-blended (you can use a food processer, but the texture will be almost too smooth—mashing manually gives a heartier texture). Cover the bowl with plastic film and set aside. This recipe makes about 2 cups.

*You can adjust the heat by using a milder or a hotter chile in place of serranos, or simply adjusting the number of chiles used.

* Nutritional info: serves about 4. 111 calories, 7.5 g fat, 15 g carbohydrates, 1.5 g protein.


Monday, February 4, 2013

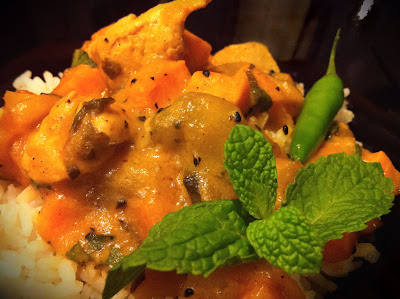
Chicken and Sweet Potato Curry with Tropical Fruits

This recipe was an accident—a happy accident. I’d originally purchased the tropical fruits and Thai seasonings to create what turned out to be painfully underwhelming Tropical Fruit Spring Rolls. By rethinking the ingredients and adding chicken, rice, and vitamin-packed sweet potatoes, I turned my failure into a delectable Thai-inspired curry.

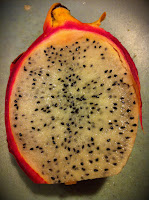
While most large supermarkets sell papayas and mangos (if not fresh, you’ll probably be able to find them in jars or frozen), dragon fruits may be more difficult to track down. Try a Latino or Chinese grocer; if you still can’t find dragon fruit, simply add the diced flesh of 2-3 peeled kiwis.


Dragon Fruit, Cross-Section
Chicken and Sweet Potato Curry with Tropical Fruits

2 T. coconut oil
12 oz. chicken breast, cut into bite-sized pieces
2 medium sweet potatoes, peeled and diced
3-4 Thai chiles, minced
1 mango, peeled and cut into small dice
1 ripe papaya, seeded and cut into small dice
1 dragon fruit, peeled and cut into small dice*
8 oz. can sliced water chestnuts, drained
15 oz. can coconut milk
Juice and grated zest of 1 lime
¼ c. rum
2 T. soy sauce
2 t. cardamom, ground
1 t. grains of paradise, ground
1 t. grated ginger
½ t. ground cinnamon
¼ t. freshly ground black pepper
Handful Thai basil, chopped
Handful fresh mint, chopped

Cooked rice, to serve
Small sprigs of basil and/or mint, for garnish
Thai chiles, for garnish

In a large, heavy-bottomed pot, melt the coconut oil over medium-high heat, then add the chicken, sweet potatoes and chiles. Cook for 5-7 minutes, stirring frequently, until the chicken has mostly browned.

Next, add all remaining ingredients except the Thai basil, mint, and rice. Stir to combine, lower the heat to medium-low, cover, and cook for another 20-25 minutes, stirring occasionally.

When the dish is finished cooking, stir in the chopped Thai basil and the chopped mint. Blend well, spoon over rice in individual serving bowls, and top with a small sprig of basil or mint and a single Thai chile.

*If you cannot locate dragon fruit, substitute 2-3 peeled kiwis.

* Nutritional info: serves 6-8. 406 calories, 16 g fat, 48 g carbohydrates, 22 g protein.


* To purchase ingredients used in this recipe, click the link(s) below:


Sunday, January 27, 2013

Cold-Weather Cooking: Farfalle with Chicken, Mushrooms, and Roasted Red Peppers

When temperatures drop down to single digits, it’s only natural to be inclined to cook hearty dishes with rich, buttery sauces! This recipe, which uses dark meat chicken, roasted red peppers, meaty Portobello mushrooms, and fiber-packed chickpeas, is simple to prepare and immensely satisfying. Bundle up, head to the market and pick up these easy-to-find ingredients, and once you've thawed out, put this on the stove. Serve with lots of Chardonnay!


Farfalle with Chicken, Mushrooms, and Roasted Red Peppers

16 oz. / 455 g. dry farfalle
Splash olive oil
4 boneless, skinless chicken thighs
1-2 large shallots, sliced
1 head garlic, roasted*
4-5 large Portobello mushrooms, diced
2-3 large red peppers, roasted and minced*
1 15-oz.can chickpeas (do not drain)
2 bay leaves
3 whole cloves
Pinch dried rosemary
½ c. Chardonnay
½ c. light cream
Pat butter
Salt and pepper, to taste
Cayenne pepper, to taste (optional)


Cook the pasta in heavily salted water. In the meantime, heat the olive oil over medium-high heat in a large, heavy-bottomed pot. Add the chicken and brown for a few minutes, then add the shallot and garlic and continue to cook for another 3-5 minutes.

Next, add the mushrooms, red peppers, chickpeas, bay leaves, cloves, rosemary, and wine. Cook for 15-20 minutes, stirring occasionally.

When the chicken is fully cooked, add the cream, butter, salt and pepper, and cayenne (if using). Blend well, then add the cooked pasta. Mix well, and serve piping hot.

*Note: For instructions on roasting garlic and peppers, click here. When selecting peppers for roasting, choose peppers that are long rather than round and boxy. I don’t know why, but they seem to yield a more flavorful roasted pepper!

* Nutritional info: serves six. 624 calories, 16 g fat, 75 g carbohydrates, 47 g protein.


Sunday, January 13, 2013

Barley-Stuffed Chicken Rolls with Rose and Whiskey Sauce

Recently, I found a jar of rose preserves—rose petals preserved with sugar and pectin—at a Russian market. Never having tried rose preserves, I obviously needed to buy it! I opened the jar and sniffed the marmalade-like preserves, then tried a spoonful and realized how wonderful it would taste when combined with whiskey. That was all the inspiration I needed for this recipe! Here, I’ve combined traditional Scottish flavors with the sweet, fragrant rose jam. Serve this alongside bitter greens, such as kale or broccoli rabe, which will complement the sugary jam. This is even better when served with a glass of scotch!


Barley-Stuffed Chicken Rolls with Rose and Whiskey Sauce

For the stuffing:
1 T. butter
½ medium brown onion, minced
1 large clove garlic, smashed with the side of a knife blade
3 whole cloves
1 bay leaf
1 small pinch cinnamon
½ c. pearl barley
1.5 c. low-sodium chicken broth

For the sauce:
¼ c. butter
½ medium brown onion, minced
¼ t. dried thyme
1 bay leaf
1 pinch cinnamon
1/3 c. scotch
¼ c. rose preserves*
¼ c. low-sodium chicken broth

For the chicken rolls:
6 slices chicken breasts (approx. 1.5 pounds), pounded ultra-thin
1 batch stuffing
1 batch sauce

First, make the stuffing. Melt the butter over medium-low heat, then add the onion, garlic, cloves, cinnamon, and bay leaf. Cook for 5-7 minutes, or until the onion has softened.

Add the barley, stir until each grain is coated with butter, then add the chicken broth. Stir, bring to a boil, reduce to a simmer and cover, and cook for about 30 minutes.

While the barley is cooking, make the sauce. Melt the butter over low heat. Add the onion, thyme, bay leaf, and cinnamon. Cook for about 10 minutes or until the onion is soft and translucent. Once the onion has cooked, add the scotch, rose preserves, and chicken broth. Cook, stirring constantly, until the rose preserves have completely blended in.

Once the stuffing is done cooking, let it cool a bit, and then prepare the chicken. Lay the pounded chicken on a flat surface, and spread each piece with 1-2 heaping spoonfuls of stuffing. Roll up, starting with the largest end, and secure with kitchen string or silicone ties. Place each roll seam-side down in an ovenproof baking dish.

Pour the sauce over the chicken roll. Bake for 30 minutes, basting every 5 minutes. When done baking, let rest for 5 minutes, then slice, spoon the sauce over the slices, and serve alongside a green vegetable.

* Rose preserves can be found at Russian or Eastern European markets, at specialty retailers, and online. I used Kafkas brand. If you cannot find rose preserves, simply substitute an equal amount of orange marmalade along with1-2 teaspoons rose water.

* Nutritional info: serves six. 350 calories, 12 g fat, 24 g carbohydrates, 31 g protein.

Spreading the barley stuffing on the chicken

Basting the chicken rolls as they bake


Sliced and ready to serve