Showing posts with label garlic. Show all posts

Monday, November 11, 2013

Linguine with Seafood and Citrus

I swear I’m not going to get emotional…I swear I’m not. Not gonna do it! Why am I getting all sentimental? Because I haven’t been inspired to write for a long time. But this weekend, I got the chance to hang out with some amazing friends, some old and some new, and throughout the day when the conversation turned to food, I began to miss cooking for the purposes of sharing recipes.

I don’t often get to share the actual dishes I create—but I can always share my recipes, and I love sharing food with others, even if it’s just through typed words on a page. It’s time to get back to what I love. So here goes. I don’t know how often I’ll get to post, I don’t know if anyone will read my recipes, and I don’t know if anyone will try to cook them…but I get to do what I love—cook, write, and share. Mangia, bitches!


Linguine with Seafood and Citrus

16 oz. linguine
2 oz. butter (1/2 a standard stick)
3-4 cloves garlic, pressed
1 bulb fennel, sliced
2 T. capers
1 t. dried oregano
½ t. crushed chile flakes
Rind and juice of 1 large lemon
Rind and juice of 1 orange
½ c. dry white wine
1 lb. calamari, tubes sliced into rings*
½ lb. large scallops, sliced into bite-sized pieces**
2 cups roughly chopped parsley
2 large handfuls arugula
Salt and pepper to taste
Splash extra virgin olive oil

Cook the linguine in heavily salted water. In the meantime, melt the butter in a large pot over medium heat. Add the garlic, being careful not to let it burn. When the garlic starts to become fragrant, add the fennel, capers, oregano, chile flakes, and lemon and orange rind (save the juice for the next step). Stir gently, stirring every few minutes, until the fennel slices have softened but are still firm.


Timing is important for these next few steps – when the pasta is about 2-3 minutes away from being cooked, add the lemon and orange juice and the wine to the pot with the fennel and seasonings. Turn the heat to high, and stir until the mixture is bubbling.  Add the calamari and the scallops, and cook for about a minute, stirring constantly. Add the parsley and arugula to the pot, stirring just until it is blended in.  Add the salt and pepper to taste.

Immediately after adding the parsley and arugula, drain the pasta and add the cooked pasta to the pot. Add a splash of olive oil, then toss to coat the pasta. Serve piping hot preferably with wine.


* If tentacles give you the willies you can use all tubes, but tentacles add texture and make for a more interesting presentation.

** Always use “dry” scallops—the texture and flavor are superior. They’re more expensive, but you get what you pay for, and you won’t be ingesting a chemistry project.


Tuesday, February 19, 2013

Lemongrass Shrimp Skewers with Kiwi & Avocado Guacamole

Recently, I was lucky enough to spot U-7 shrimp at Seaport Fish (U-7 indicates that there are 7 or fewer shrimp per pound – these babies are pretty big!). Originally, I planned on cooking them simply with butter and garlic, but when I spotted kiwis at the local market, I decided to try something more exotic.

In addition to my kiwis, I picked up an avocado, some Serrano chiles, and on a whim, a few stalks of lemongrass. While the lemongrass didn’t contribute much flavor-wise, it certainly added to the presentation. Try this next time you’re craving spicy, tropical flavors!


Lemongrass Shrimp Skewers with Kiwi & Avocado Guacamole

4 stalks lemongrass
8 U-7 (jumbo) shrimp
Kiwi & Avocado Guacamole, as prepared below

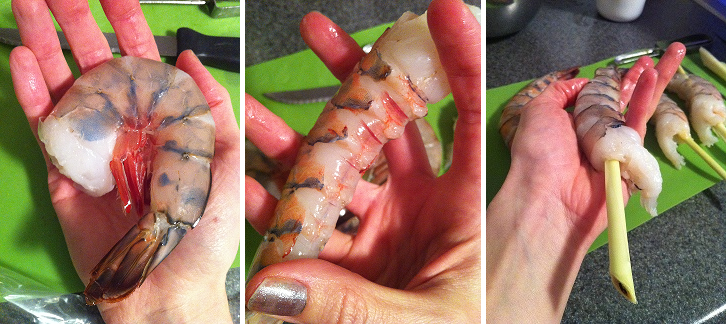
Prepare a grill or preheat your oven’s broiler. In the meantime, remove shells from shrimp, leaving the tail shell intact (this helps prevent the smaller end of the shrimp from drying out while cooking. Cut the lemongrass stalks in half, cutting diagonally so that a sharp point is formed (as shown in photo below right). Use your fingers to straighten the raw shrimp, and using the pointed end of the lemongrass spear, insert the lemongrass into the shrimp lengthwise (see photos below).


If using the broiler, line a baking sheet with foil, and place a wire rack on top of the foil. Place the skewered shrimp on the wire rack, and put the shrimp under the broiler. Cook the shrimp for 3-4 minutes, or until the shrimp are firm and pink. If using the grill, place the shrimp over slow coals and grill for 2-4 minutes, or until the shrimp are firm and pink.

While the shrimp cook, prepare two plates by spreading about ½ cup of the Kiwi & Avocado Guacamole on each plate. Once the shrimp are cooked, arrange four shrimp on each plate in a spoke formation.

* Nutritional info: serves 2. 335 calories, 11 g fat, 17 g carbohydrates, 45 g protein.


Kiwi & Avocado Guacamole

3 cloves garlic, very finely minced
2 serrano chiles, very finely minced*
1 T. finely minced onion
2 kiwis, peeled and minced
1 avocado, chopped

Combine all the ingredients in a large mixing bowl. Using a potato masher or a fork, mash until the guacamole is smooth and well-blended (you can use a food processer, but the texture will be almost too smooth—mashing manually gives a heartier texture). Cover the bowl with plastic film and set aside. This recipe makes about 2 cups.

*You can adjust the heat by using a milder or a hotter chile in place of serranos, or simply adjusting the number of chiles used.

* Nutritional info: serves about 4. 111 calories, 7.5 g fat, 15 g carbohydrates, 1.5 g protein.


Saturday, June 23, 2012

Farro Pasta with Wild Arugula Pesto and Ricotta Salata

I think this is my first post since my vacation that doesn’t feature Southern or Caribbean food! I knew I’d snap out of vacation mode and once again source my inspiration from the ingredients and dishes I come across in my day-to-day travels.

Now that farmers’ market season is here, the inspiration is rolling in with far greater frequency than it does during the winter months. Kimball Fruit Farm’s tidy bundles of wild arugula (also known as Sylvetta arugula) inspired this simple, yet bold, pasta dish. If you cannot find wild arugula, readily available baby arugula can be substituted, but the flavor will be milder.

Farro Pasta with Arugula Pesto and Ricotta Salata

1 17 oz. / 500 g box farro pasta*
1 bunch wild arugula (about 6 loosely packed cups of leaves), washed and torn into bits
2-3 cloves garlic, minced
¼ c. /60 mL peppery olive oil
dash hot chili oil**
Generous pinch salt
A few grinds black pepper
1 tomato, seeded and finely diced
2 oz. / 60 g ricotta salata, thinly sliced or shaved

Cook the pasta in salted water. In the meantime, put the arugula, garlic, olive oil, chili oil, salt, and pepper in a blender (Save $66 on Omega Commercial Blender at CHEFS) and puree until a paste is formed, adding more olive oil if necessary.

When the pasta is done, drain it in a colander and add it back to the pot. Immediately pour the arugula pesto over the pasta and toss until all strands are coated. Serve in individual bowls, sprinkling the tomatoes and ricotta salata on top of each portion. This dish pairs well with a dry, full-bodied white wine.

* To purchase ingredients used in this recipe, click the image below:


** I used my homemade Ghost Pepper Oil - it adds a good punch of heat without an overwhelming chili flavor.

Nutritional info: serves eight. 300 calories, 9 g fat, 44 g carbohydrates, 9 g protein.


Tuesday, February 7, 2012

Farro Tagliatelle with Zucchini, White Beans, and Pink Peppercorns

For weeks, I've been planning to write a post about what to do with game day leftovers, but instead I’m choosing to be petty―there will be no mention of Sunday's main event. Game or no game, post or no post, I still had to eat last night. Although I was tired and had spent the greater part of the morning battling a hangover, ordering take-out was not an option, as my stomach could not handle any more salty, greasy, fatty food. I decided to suck it up and prepare something quick and light.

What ended up on my plate was an unintentionally vegetarian pasta dish using my favorite brand of farro tagliatelle, lots of garlic and butter, fresh zucchini, canned beans, and flavorful seasonings, including pink peppercorns. Try this recipe when you’re feeling lazy but still craving something nutritious!


Farro Tagliatelle with Zucchini, White Beans, and Pink Peppercorns

white beans and zucchini
12 oz. farro tagliatelle
3 oz. butter
Generous splash olive oil
4 cloves garlic, minced
1 lb. zucchini, quartered lengthwise, then thinly sliced
1 16oz. can small white beans
1 t. dried thyme
½ t. dried oregano
1 t. coarsely ground black pepper
1 T. pink peppercorns
Salt to taste
Sprigs of parsley, for garnish
Shaved or grated pecorino romano, for garnish

Cook the pasta in generously salted water. In the meantime, melt the butter in a large, heavy bottomed pot over medium heat. Once the butter is melted, add the olive oil, then add the minced garlic. Sauté the garlic for a minute or two or until the garlic is fragrant.

Next, add the zucchini to the pot. Cook for 3-5 minutes before adding the beans, thyme, oregano, ground pepper, pink peppercorns, and salt. Cook, stirring frequently, until all the ingredients are heated through.

Once the pasta is cooked, add it to the pot with the beans and the zucchini. Toss it well so that each strand is coated with the butter and oil. If it seems a bit dry, add a small splash of the pasta cooking water and toss it again. Serve on individual plates, garnishing each portion with a sprig of parsley and shaved or grated pecorino romano cheese.


Monday, January 16, 2012

Cavatappi with Roasted Cherry Tomato Sauce

Great tomatoes in January, in Boston. If you're a serious foodie, that sentence probably just made you raise your eyebrows and question my credibility; as well you should have. However, I've been buying these tomatoes for quite some time, and I've never been disappointed in them, even in January.

Grown locally by Backyard Farms, these tomatoes are packed with flavor and rival some tomatoes I've had in August. I probably go through at least one box of their cocktail tomatoes per week, if not two or three. The other day, I got the idea to roast them and make a garlicky tomato sauce, and the idea evolved into this quick, easy, and delicious pasta recipe. Try this one the next time you're able to find good tomatoes!
 

Cavatappi with Roasted Cherry Tomato Sauce


1/2 lb. cavatappi, or other textured short pasta
8 cherry tomatoes, quartered
1/4 c. butter
1 c. dry white wine
1/3 c. tomato paste
1 c. grated pecorino romano
3-4 garlic cloves, minced
generous amount coarsely ground black pepper
salt (if necessary)
handful fresh basil leaves, chiffonade-cut*
additional basil leaves, for garnish

Cook the pasta in heavily salted water. In the meantime, preheat the oven's broiler. Arrange the cherry tomatoes on a foil-lined baking sheet with one cut side down (as shown in picture above). Broil the tomatoes for 7-10 minutes, or until the tomatoes' skins have begun to blister and blacken. Remove from oven and set aside.

chiffonade-cut basil
While the pasta cooks and the tomatoes broil, combine the butter, wine, and tomato paste in a large, heavy-bottomed pot over medium-high heat. Whisk vigorously until the tomato paste has completely broken down and blended with the wine and the butter has melted. Turn heat down to low and add the pecorino, garlic, and pepper (you probably won't need salt; pecorino is a salty cheese. Taste for seasonings and only add salt if absolutely necessary). Continue to whisk until the pecorino has completely melted. Once the pasta is cooked, drain it and add it to the sauce along with the roasted tomatoes and the chiffonade-cut basil leaves. Stir a few times until all the pasta is coated, then serve hot, garnished with fresh basil leaves.
 
* Chiffonade-cut is a technique often used on fresh herbs. To cut basil, stack the leaves on top of each other, roll up lengthwise, and cut into 1/8" strips. By placing the largest leaf on the bottom of the stack, the smaller leaves will be contained in the roll and the leaves will be easier to slice.

Tuesday, December 13, 2011

Baked Haddock Fillets with Dill Pesto, Polenta Cakes, Oyster Mushrooms, and Roasted Carrots

Face it.  If it wasn't for the fact that I post photos on this blog, much of the food I cook would end up haphazardly mushed together in a bowl - all function, no form.  But sometimes, human beings are inclined to make the world a prettier place.  Much like the way we decorate our homes, create works of art, or put on makeup for special events, sometimes I like to take my everyday glasses-and-ponytail plates and turn them into prom queens. 

oyster mushrooms
In the recipe below, I've taken three very simple dishes - baked haddock, polenta, and baked carrots - and I've given them a special presentation with a bit of elegance.  Fresh dill is the glue that holds the recipe together.  Originally, I bought a large bunch of fresh dill for use in another recipe, but there was so much of it left that I needed to put the rest to use.  What better way than to transform it into a garlicky pesto?  The dill pesto's flavor complements each element of the dish, especially the oyster mushrooms, whose mild flavor and delightful texture add an earthy element that keeps this presentation grounded.  Try this recipe sometime when you're feeling artistic!


Dill Pesto

2 cups fresh dill (fronds only - discard the stems)
2 cloves garlic, chopped
1/4 cup olive oil*, plus more if necessary
pinch salt

Combine the ingredients in a blender or food processor.  Blend until the mixture is consistent and creamy. 


* This is probably the only instance in which I will ever encourage you to NOT use an extra-virgin olive oil.  Oils labeled "pure olive oil" or simply "olive oil" will work best with this recipe; flavorful virgin olive oils will overpower the other flavors in this recipe


Polenta Cakes with Dill

1 cup instant polenta (I prefer Pastene brand)
5 cups water
2 t. salt
1/4 cup chopped fresh dill
2 T. butter
1/2 cup grated pecorino romano

In a large, heavy-bottomed pot, bring the water, salt, and dill to a rolling boil.  Next, add the polenta in a steady stream, stirring quickly and constantly (this prevents lumps from forming).  Continue stirring, and once the polenta has thickened up considerably, add the butter and the pecorino.  Stir until they have melted into the polenta. 

Pour the polenta into a buttered 9x13 baking dish.  Set the polenta aside to cool for about 20 minutes, then using a round cookie cutter or the lip of a pint glass or tumbler, cut the polenta into round cakes.  Serve the extra polenta as leftovers. 


Baked Haddock Fillets with Dill Pesto, Polenta Cakes, Oyster Mushrooms, and Roasted Carrots

4 3-oz. haddock fillets
4 slices fresh lemon
4 T. butter
4 sprigs fresh dill
4 polenta cakes will dill (see recipe above)
4 very thin carrots with tops, tops trimmed to 1", halved lengthwise
1 bunch fresh oyster mushrooms, divided at base into 4 portions
1/4 c. dill pesto (see recipe above)
2 T. olive oil
splash lemon juice

Preheat the oven to 350.  Place the haddock fillets skin-side down in a baking dish lined with foil (the foil doesn't aid the cooking, it just makes cleanup much easier).  On each fillet, place 1 T of butter and a sprig of dill, and top each with a slice of lemon.  Place in the oven and bake for 10 minutes. 

Once the fillets have baked for 10 minutes, add the carrots to the dish.  Bake for an additional 5 minutes.  In the meantime, place 4 polenta cakes in a separate baking dish.  Once the carrots have baked for 5 minutes, add the polenta cakes to the oven to warm them.  Bake for 5 more minutes, adding the oyster mushroom portions to the dish alongside the polenta rounds for the last two minutes of cooking. 

While the fish, polenta, carrots, and mushrooms are baking, thin the dill pesto with the olive oil and a splash of lemon juice. 

When you are ready to plate the recipe, spoon the thinned pesto into the center of each plate in equal proportions, reserving about a teaspoonful.  Place a polenta round in the center of the pesto.  Next to each polenta round, place one of the oyster mushroom portions, and finally, top the polenta cake with a fish fillet.  Use two of the carrot halves to border the polenta and fish.  Finally, dot the edge of the plate with the remaining pesto.  Serve with a chilled white wine.


Monday, December 13, 2010

Sunday Funday!

After spending the last several Sundays being too lazy to do much of anything, I finally had some motivation this week to whip together some great food and drinks!  Yesterday was the perfect Sunday Funday – it was raining cats and dogs, so I did not feel bad about sitting on my duff in my pajamas, eating, day drinking, and watching football and hockey all day.

Before I get to the recipes, I have to share my belief as to what constitutes a great Sunday Funday.  The presence of good friends (or at least cool roommates) is key, and you must be wearing cozy, comfy clothing.  If you’ve gone out the night before and you’re not feeling so chipper in the morning hours, that’s OK; Sunday Funday is all about starting off with a little “hair of the dog” and continuing from there.  Good breakfast food and drinks, some munchies, some substantial food, good company, and a few good games are just what the doctor ordered! 

I kicked off my Sunday Funday with the perfect brunch cocktail – the “Bourbellini.”  I am not much of a bourbon drinker, I’m a scotch girl.  However, I’m a firm believer that scotch should not be poured before noon.  Enter Bourbon.  Bourbon is sweeter; it is not smoky like scotch, and therefore, it is perfect for my two brunch recipes, The Bourbellini, and Bacon & Bourbon French Toast.  

I created Bacon & Bourbon French Toast because I love the taste of bacon combined with maple syrup, and I wanted to showcase that flavor combination in a recipe.  I also love French Toast, so I decided to stay true to my title and make French Toast containing bacon, butter, and booze.  Rich, satisfying, and unique, this may have to be my go-to weekend breakfast from now on. 

For my snack dish, I managed to replicate Estragon’s Garbanzos Fritos, or fried chickpeas.  Crunchy and flavorful, serve them in a bowl and eat them like popcorn.  They’re a lot more satisfying!  And for the main dish, I cooked up my Halftime Steak, named as such because it takes no longer than an average halftime break to prepare and cook. 

There are only a few weeks of football left, so I suggest you shop for these ingredients on Saturday, gather the troops, and treat yourselves to these recipes on your next Sunday Funday! 


Bourbellini

1 oz. bourbon
1-2 oz. peach nectar
champagne or sparkling wine

Pour the bourbon and peach nectar into a champagne flute or wine glass (or a pint glass, depending on your style).  Fill the rest of the glass with champagne/sparkling wine, stir gently.  (makes 1)

WARNING:  This is a prime example of a danger drink, so do me a favor and don’t drive if you’re drinking these babies...


Bacon & Bourbon French Toast

4 slices center-cut bacon
4 large eggs
2 oz. bourbon
8 slices spongy bread (plain white is fine, as long as it’s fresh)
butter
Powdered sugar
Maple syrup


In a frying pan with a large cooking surface (big enough to hold at least 2 slices of bread), cook the bacon over medium-high heat until crisp.  Turn off heat, remove the bacon from pan and set aside on paper towels; do not drain the bacon fat from the pan, but remove any charred bits.

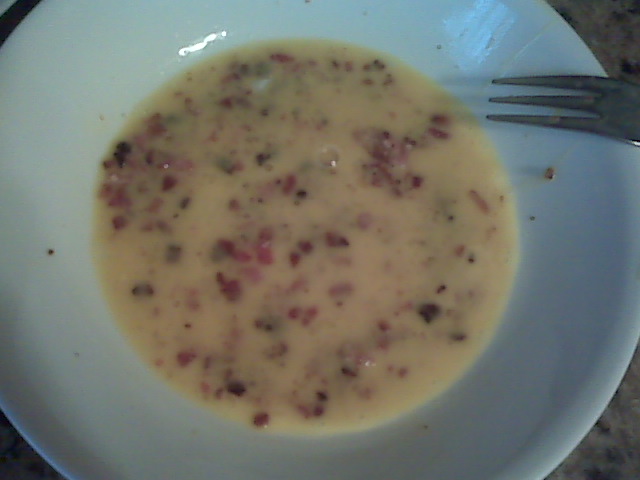
Once the bacon has cooled enough to touch, crumble it into very small pieces (you may have to use a knife and chop it a little if it’s not crispy enough to crumble using your hands).   Place the crumbled bacon in a shallow dish large enough to lay one slice of the bread completely flat.  Add the eggs and the bourbon to this dish, and beat the egg, bacon and bourbon mixture with a fork or whisk until the eggs’ yolk and white are completely blended. 

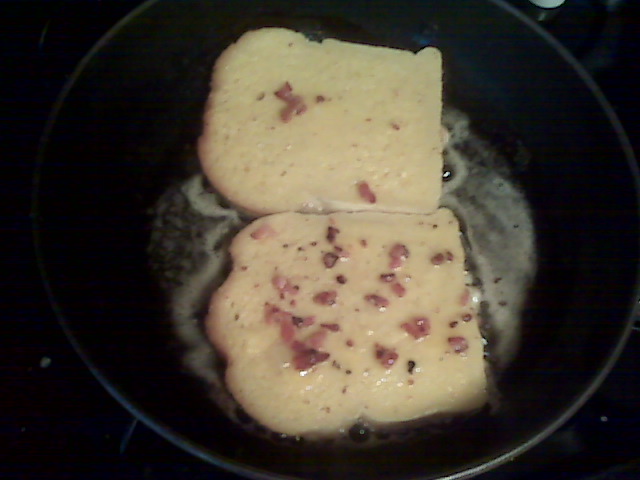
Place the pan containing the bacon drippings over medium heat, and add a pat of butter.  In the meantime, lay one of the slices of bread in the egg mixture until it is completely coated on one side; flip it over and repeat so that both sides of the bread are completely covered with the egg mixture.  Now, add the coated bread to the pan with the bacon drippings, and fry for a minute or two on each side, or until the bread begins to turn golden brown.  Repeat with the remaining slices (you’ll probably have to work in batches), removing with a spatula and adding a little extra butter to the pan between batches (if necessary). 

Serve in stacks of 2-4 slices, dusted with a bit of powdered sugar.  Offer maple syrup, extra butter, and Bourbellinis! 


Garbanzos Fritos

1 can chickpeas, drained
splash olive oil
1/2 t. ground cumin
1/4 t. garlic powder
1 t. smoked paprika
1/2 t. fine sea salt
1 T. chopped fresh parsley

Dry the chickpeas completely, using paper towels.  This is a very important step; if they are not completely dry, they will not fry correctly. 

Heat a frying pan with deep sides over high heat, and add a generous splash of olive oil to completely coat the bottom of the pan.    Add the chickpeas to the pan and cook, shaking occasionally, until you can hear the chickpeas "pop."  If you have a splatter guard, you may want to use it.  This should take about 8 minutes.  You may have to work in batches, depending on the size of your pan. 

Drain the fried chickpeas on a paper towel, then add to a bowl and toss with all remaining ingredients until chickpeas are completely coated.  Serve warm.


Halftime Steak

2 steaks, about 1 inch thick (I use sirloin or filet mignon)
1 clove garlic, halved
kosher salt
coarsely ground black pepper
butter, softened
several paper-thin slices of garlic (think Goodfellas!)

Before kickoff, place your steaks out so that they've reached room temperature by halftime.

As soon as the 2nd quarter ends, heat a heavy-bottomed frying pan, preferably cast-iron, over high heat.  In the meantime, rub the steaks with the garlic clove halves, and then season each side of the steaks with a pinch of kosher salt and a generous coating of black pepper.

Once the steaks are seasoned, check to see if your pan is ready.  If you fling a few drops of water on the surface, they should bead up and dance across the pan rather than staying put and sizzling. 

Once the pan is ready, throw a few pinches of kosher salt into the pan, then add the steaks.  Sear for 1-3 minutes per side, using tongs to turn them over.  (Note:  This timing will result in a rare steak.  If you want yours medium or well, it takes longer.  Not sure how much longer; I eat my steak rare!)

Remove the steaks from the pan and set aside to rest for approx. 5 minutes.  This is very important that you do not touch the steaks while they rest; this step distributes the juices. 

When the steaks are ready to serve, sprinkle a few paper-thin slices of garlic on each one, and top with a pad of butter.  Once the butter has melted, they're ready to eat!  Good accompaniments are baked potatoes or seasoned boiled rice (I prefer rice with a dab of Aji Sauce, a recipe I am still trying to perfect and will post once I'm satisfied).

Tuesday, November 9, 2010

Italian "Sushi"

About a week ago, I was giving serious consideration to turning life as I know it upside-down and heading to a cattle call for a chance to be included in the next crop of reality TV cooking show contestants.  After careful consideration (and careful reading of the fine print legalese on the application form),  I decided not to go after a spot on MasterChef, but I did gain something from the decisionmaking process – a new recipe. 

As part of the audition process for MasterChef, each contestant is required to bring a pre-prepared dish to the audition.  Contestants are not permitted to prep or cook any part of the dish at the audition; all work must be be done off site.  Although some leeway is allegedly given in the judging because of the fact that applicants have to wait for hours at a time, I’m sure the judges would wonder about a contestant’s judgment if he/she presented a dish that was only at its peak under specific temperature conditions.  The instructions suggested packing the prepared dish in temperature-controlled containers, such as coolers and ice packs for cold dishes and heat wraps for hot dishes, so I wanted to make something that would be OK in a cooler whose temperature regulation might crap out after six hours of waiting in queue. 

Although the show’s producers wanted contestants to present their signature dishes, my signature dish – linguine with radicchio and cream - would taste like raw sewage if not served piping hot (OK, not raw sewage – but the flavor and texture would be less than ideal).  I challenged myself to come up with something that would be OK served either slightly chilled or at room temperature.  I thought of making the Seared Sesame Tuna and Gingered Pumpkin that I cooked in “Around the World in Eighty Bites – Japan,” but my mom advised against it, her reasoning being that A) seared tuna has been done a thousand times,  and B) it is not the best example of my cooking style. 

Had I decided to audition for the show, I needed a dish that would make me stand out from the crowd and truly shine.  I was less concerned about perfect execution than I was about creativity – perfect execution can be achieved through practice, but creativity and the ability to be inspired are things that can’t be learned.  I also wanted to stay true to my culinary roots, so I was determined to cook something using Italian ingredients and/or techniques.  Something based on risotto, another one of my go-to dishes, seemed like a good starting point.  That’s when it hit me – Italian “sushi!”

My plan was to wrap cold risotto around a filling of sliced roma tomato, then roll each “log” through a layer of very finely chopped fresh basil.  Each roll would be sliced into small cylinders, much like maki rolls, and they would even look like maki sushi – green basil exterior, white risotto base, and the red tomato in the middle would resemble the filling in a tuna or salmon maki roll.  I’d make plain risotto with only a few teaspoons of grated parmesan – no other additions – so that the flavors from the risotto would not overwhelm the other ingredients.  I conducted my experiment last night, and it worked beautifully. 

I made the risotto using Japanese short-grain sushi rice, not because I thought it would work better, but because yours truly didn’t check her pantry before creating a shopping list.  I assumed I had risotto rice…you know what they say about assuming.  Risotto made using sushi rice tastes just like the real thing, but I’ll have to try this recipe again using real risotto rice to assess the texture and determine which rice is more suitable for this recipe.   Also, I made the first roll using only minced basil for the exterior, but I discovered that combining the basil with a few flakes of kosher salt helped the basil better adhere to the rice.  Be sure to use wax paper to make the rolls – the rice will stick to foil or plastic wrap. 

Try this recipe if you’re feeling creative – the result is a delicious cold dish perfect for an antipasto course! 

Italian "Sushi"

3 cups cold plain risotto
1 or 2 firm roma tomatoes, peeled and sliced lengthwise into thin strips
1 bunch fresh basil, very finely minced
Kosher salt flakes


Place about 1/3 cup of the risotto on a sheet of wax paper 4-5 inches wide.  Using the curved back of a large spoon, press the risotto into a rectangle approximately 2.5” X 6” and about 1/3” thick.


In the center of the risotto rectangle, place two of the tomato strips lengthwise. 


Bring the ends of the paper up and together so that the long edges of the risotto rectangle touch, then roll the remaining edges of the wax paper between your thumbs and index fingers so that the rice comes together around the tomato strips and a long cylinder is formed (as shown in photo, left). 


Spread the basil and a pinch of kosher salt in a thin, even layer on a cutting board.  Bring the risotto roll, still wrapped in wax paper, to the edge of the cutting board, then unroll it and guide the risotto roll onto the basil layer, rolling it through the basil so that the minced leaves cling to the rice. 

Once you have rolled the risotto through the basil, place the risotto roll on a clean surface and slice it crosswise into 1-inch cylinders.  Place them cut-side-down on a platter. 

Repeat these instructions until all of the risotto is used, then serve with Garlic and Caper Dipping Sauce, and eat using chopsticks. 

VARIATION:  To make an entire spread of Italian “Sushi” rolls, vary the fillings, the exterior herbs, and the dipping sauces.  For fillings, try strips of roasted red or yellow bell pepper, smoked mozzarella, thinly sliced prosciutto or mortadella, anchovies, preserved lemon peel, or marinated portabella mushrooms.  For the exterior herbs, try minced oregano, parsley, mint, arugula, or tender young chicory leaves.  For dipping sauces, try balsamic vinaigrette or bagna cauda, a hot dip based on butter, olive oil, and anchovy.


Garlic and Caper Dipping Sauce

¼ cup olive oil
2 T. dry white wine
1 T. grated pecorino romano
1 T. finely minced salt-packed capers (do not rinse salt)
1 garlic clove, finely minced

Combine all ingredients in a small bowl.  Whisk well with a fork or small whisk, let stand for at least 15 minutes, whisk again, and serve with Italian “Sushi.” 


Friday, October 29, 2010

MSPCA Bake Sale, Canine Crumpets


This is what 500 Canine Crumpets looks like!

Whew! 14 hours, 500 canine crumpets, 60 biscotti, and 40 slices of roasted garlic foccacia later, and I am finally done preparing for the MSPCA’s Halloween Bake Sale! This was a lot more time-consuming than I thought it would be, so if I decide to do this again I‘ll definitely try to bribe a few friends to help out. After an entire day of baking, I’m fried!

Two of the recipes I made have been featured in previous posts, but I will repost them, along with a new recipe, Canine Crumpets. This is not an original recipe (I found it online here), but I did tweak it a little, adding more parsley after a suggestion in Natural Dog Magazine. These doggie biscuits are very easy to make, although you might have to hunt for some of the ingredients, suc
h as soy flour. Dogs love them - Tessie, my roommate’s dog, will jump almost four feet in the air for one of these things, and when I take them to the shelter for the dogs on the adoption floor, even the pickiest dogs perk right up for one of these!

Dogs are man’s best friend; bake a batch of these and you’ll be their best friend!


Canine Crumpets

½ pound chicken livers
1 cup chicken stock
½ cup corn oil
¼ c. chopped parsley
1 cup powdered milk
1 cup rolled oats
½ cup brewer’s yeast
1 cup soy flour
1 cup cornmeal
3 cups whole wheat flour
Preheat the oven to 350. Slice the chicken livers into smaller pieces and cook them over high heat in a frying pan. When they are fully cooked through, place them in a blender with the chicken stock, corn oil, and parsley. Blend until liquefied.

In a large mixing bowl, combine all remaining ingredients and mix well. Add the chicken liver puree and mix again, using your hands - the dough will be very stiff.

When dough is completely mixed, break off a tennis-ball section, wrapping the rest in plastic. Take the dough ball and roll it into a quarter-inch thick sheet. Using a small cookie cutter, cut into shapes and place on a baking sheet lined with foil. Bake them 16-20 minutes or until golden brown. Allow to cool completely, then transfer to a plastic container. They will keep longer if stored in the refrigerator.

Pumpkin Pecan Biscotti

3 ½ c. unbleached all-purpose flour
2 ½ t. baking powder
½ t. salt
¼ cup melted butter
1 ¼ c. sugar
2 large eggs
2 large egg whites
1 cup grated raw pumpkin
1 cup toasted and chopped pecans
1 t. vanilla extract


Preheat the oven to 375. Combine the first three ingredients in a mixing bowl; set aside.

In a separate bowl, beat all remaining ingredients with a mixer until well-blended. Stir in the flour mixture until flour is fully incorporated and a moist dough is formed.


Lightly dust a countertop and your hands with flour. Divide the dough in half, shape each half into a log shape (about 11 x 1.5 inches). Place both logs on a cookie sheet lightly greased with butter and flatten them slightly. Bake for 25 minutes. When done, set aside to cool enough to handle.


Once logs are cool, transfer them to a cutting board and slice them crosswise into half-inch thick slides. Return the slices, cut side down, to the baking sheet. Bake for 10 minutes. Remove the baking sheets from the oven, turn the slices over, and bake for 10 more minutes or until they begin to turn golden-brown.

Let cool, serve dunked in hot coffee.


Roasted Garlic Focaccia

For dough starter:

2/3c. warm water
2.5t. active dry yeast
1c. flour

For dough:

2.5c. unbleached flour, plus extra for dusting
1 head roasted garlic
1/3c. water
1/3c. olive oil, plus extra to grease bowl and pan
1/3c. white wine
1t. salt

Olive oil, salt, and oregano for topping
Equipment: two large mixing bowls, cookie sheet lined w/ aluminum foil, water-filled cake pan

First, make the dough starter. In a mixing bowl, combine 2/3c. warm water and the yeast. Cover with a dish towel and let this sit for 10 minutes or until the water looks murky and bubbly around the edges.

Next, add 1c. of the flour to the bowl. Stir until all the flour is incorporated into the water and a sticky dough forms. Again, cover with a dish towel and let this sit for 30 minutes. During this time, the dough should puff up a little. Use this time to remove the individual cloves from a head of roasted garlic – if the individual cloves are soft like a paste, set them aside. If any are still a little firm, chop them up a bit and set aside. Also, coat the inside of the clean mixing bowl with a splash of olive oil and set aside.

Now it’s time to make the dough. Add 2.5c. flour, prepared roasted garlic, 1/3c. water, olive oil, white wine, and salt to the mixing bowl containing the dough starter. Combine all until fully incorporated and dough is formed. Turn the dough out onto a clean countertop dusted with flour, and knead the dough for 8-10 minutes, dusting the countertop with more flour if the dough starts to stick.

Once the kneading is complete, put the ball of dough into the mixing bowl coated with olive oil. Cover with a dish towel and set aside to rise for approximately one hour, or until the dough has doubled in size. In the meantime, line the cookie sheet with aluminum foil and grease the foil with a splash of olive oil.

Once the dough has risen, turn it out onto the greased cookie sheet. Stretch the dough so that it covers the cookie sheet. Once the dough has stretched, use your fingertips to create “dimples” in the dough – the surface should not be even. Be careful not to poke holes in the dough – small craters will do the trick. Once you’ve dimpled the dough, cover it with the dish towel and let it rise for an additional 45 minutes. Use this time to preheat the oven to 425, placing a water-filled cake pan on the bottom rack of the oven (this creates steam inside the oven).

Once the dimpled dough has risen, remove the dish towel and brush your dough with a thin coat of olive oil, and sprinkle it with a few pinches each of salt and oregano. Now it is time to bake – place the cookie sheet on the middle rack of the oven, above the water pan. Lower the oven temperature to 400, close the oven, and bake for 25-30 minutes.

Remove the focaccia from the oven. Once it is cool enough to handle safely, slice it up and serve.