Tuesday, February 28, 2012

Around the World in Eighty Bites - Uganda

As my loyal readers know, I keep track of the countries around the world that read this blog. While it’s fun to watch my numbers increase, the main reason I track my international readership is because I want to try as many different cuisines as possible, and knowing that I’m reaching real people across the globe keeps me inspired to create many new variations of traditional ethnic and national recipes. I also like being able to share the recipes with people who, like me, travel vicariously through their taste buds.
 
from nationsonline.org
The 97th country to hop on the www.baconbutterbooze.com bandwagon was Uganda. Like many countries that have been prone to invasion, Ugandan food features mainly native ingredients while reflecting the influences of invading countries’ cuisines. European, Arab, and Indian traders and explorers brought with them ingredients that have been incorporated into traditional Ugandan cuisine, but traditional dishes rely on native staples such as bananas, yams, and smoked or dried fish.

Cooking Ugandan food was a bit intimidating to me, because with the exceptions of Morocco and Ethiopia, most African nations’ cuisines haven’t become trendy yet, and I feared that finding enough information about the cuisine and its ingredients and cooking techniques would be difficult. However, when I’m intimidated by a kitchen project, I always accept the challenge and step up to the plate, so with a little bit of web research and a basket of fresh ingredients, I was ready to cook. After browsing through about a dozen Ugandan recipes, I selected Oluwombo. Oluwombo is a traditional Ugandan dish featuring meat and smoked fish cooked with tomatoes, peanuts, and mushrooms. I chose this dish because it was so different from the dishes I’ve cooked in the past.

While researching, I found several variations of the meat used in the dish - some used beef, some used chicken, and pork and goat were also featured in a few recipes. The other ingredients had no significant variation from recipe to recipe. Oluwombo is traditionally steamed in banana leaves for almost two hours, but to save time, I’ve varied the cooking method to create a stew that captures the flavors, but requires less preparation and cooking time. My first reaction? “How did I live without this for 30 years?”

Try this when you’re seeking something different from your typical beef stew!


Oluwombo-Inspired Stew

1 T. coconut oil
12 oz. sirloin, cut into ½” cubes
1 small onion, minced
2 medium tomatoes, chopped
1 c. peanuts, crushed
3 oz. Tomato paste
1 cup beef stock or bouillon
4 oz. Fresh button mushrooms, finely chopped
2 chipotles in adobo, minced, plus 2 T. adobo sauce
½ t. toasted cumin seeds, ground
¼ t. ginger
¼ t. turmeric
6 oz. Smoked whitefish, skin and bones removed and flaked

4 baked plantains (instructions below), sliced
Crushed peanuts, to garnish

In a large, heavy-bottomed saucepan, heat 1 T. of the coconut oil over medium-high heat until it has melted. Add the sirloin and cook for several minutes until the meat has browned. Remove the meat with a slotted spoon and set aside, and if a lot of liquid and fat has been released from the meat, drain it. Add more coconut oil if necessary, then add the onion and cook for 3-5 minutes, or until the onion has softened.

Add all the remaining ingredients and the browned sirloin. Stir, reduce the heat to low, and cook for about 45 minutes, stirring occasionally. Once cooked, serve over slices of baked plantain and garnish with crushed peanuts.

Serves four.  Nutrition facts per serving: 790 calories, 68g carbohydrates, 35g fat, 56 g protein


Baked Plantains

4 plantains

Start with plantains that are in their medium stage of ripeness - beginning to blacken, but with a fair amount of yellow still showing. Preheat the oven to 425, and in the meantime, slice the ends off of each plantain, then halve lengthwise. Place the plantains skin side down on a baking sheet, and bake for 30 minutes. Remove from oven, and once the plantain halves are cool enough to touch, peel the skins off and slice the plantain halves into half-inch chunks.

Serves four.  Nutrition facts per serving: 180 calories, 48g carbohydrates, 0.3g fat, 1.2g protein


Wednesday, February 15, 2012

Coppa (Boston, MA) - Restaurant Review, Restaurant Replica Recipe

Last week, I entered a new decade. Goodbye, 20’s, you were pretty damn fun; helloooo, 30 - I have a feeling you’re gonna be just as fun! Although I definitely had a brief freak-out over my old age, the fear didn’t last long. I refuse to believe that my ability to enjoy life is determined by the amount of time I’ve spent on this planet. As long as I can read good books, watch hockey, surround myself with interesting people, and eat good food, the next 70+ years are going to be just as awesome as the first 30.

Speaking of good food, I used my big ol’ birthday as a good excuse to finally try a restaurant that I’ve wanted to try for, oh, two years. A few friends and I gathered at Coppa, a popular, well-known restaurant in Boston’s South End that specializes in Italian-inspired small plates, unique salumi and variety meats. Knowing Coppa’s popularity, I made a reservation about a week in advance. Thank God, because the place is much smaller than I expected! Reservations are a wise choice - the bar area is pretty small, and it‘s likely to be packed because this place is friggin’ awesome.

I started the night with a cocktail, as one should on her 30th birthday. After a painstaking decision making process, I chose the Fumo sull’Acqua (Mezcal, citrus, and chili syrup). I found a new favorite “away” cocktail (as opposed to the Godfathers and dirty martinis I like to mix up at home). Smoky, slightly sweet, mildly spicy, and totally delicious - I could drink these every day.

While each of us ordered an individual entrée, we split several small plates, including arancini, duck prosciutto, and bruschetta con ricotta (crostini with sheep’s milk ricotta and hen of the woods mushrooms). Although the duck prosciutto was phenomenal (the stuff literally melts in your mouth), the dish that we all raved about for the rest of the evening was the bruschetta. The four of us split one small slice of bruschetta, yet it was so rich that we agreed that a larger portion would have been too much.

My individual dishes were the Panino di Riccio di Mare (sea urchin and salami panino with mustard seeds) and the Orecchiette con Trippa (house made orechiette pasta with tripe, beef tongue, pork belly, chick peas and parmesan). If you’re into sea urchin, this mini-panini is to die for!!! Coppa does NOT skimp on the sea urchin in this dish - pieces were literally seeping out of the sides with every bite I took, so I had to eat carefully. It is small, but like the other dishes we sampled, it was so rich that large portions are unnecessary.

The orechiette was good, but I am a tripe lover and I would have been happier with the dish if it had contained more tripe. However, it was still delicious - the pasta was done just right, and the tomato sauce was very light and subtle, as to not overpower the other flavors.

By the end of the evening when our waitress asked us if we were interested in dessert, I didn’t think I could do it (plus, I was wearing a very tiny Free People sweater that revealed my entire midriff¾ I wouldn’t have been able to pull off the look if I’d been full and bloated!). However, being my birthday, our server brought me a complimentary dish of their honey-walnut gelato, topped with a lit birthday candle. As if the food wasn’t enough to encourage me to return to Coppa, touches like this stick in customers’ minds and can be the nudge that will elevate a restaurant from “great” to “favorite.” And the gelato?!? One bite, and I was mentally kicking my own ass for not ordering it in the first place!!! It wasn’t overly sweet, and you could definitely taste the honey. This is one of the most perfect desserts I’ve ever had, and I’m not even a dessert person.

Overall, Coppa is now one of my favorite dining spots in Boston. It’s one of those places with a menu so unique that you’ll want to make sure you try everything on it at least once. Just like a carefully assembled All-Star team, there is no weak link in Coppa’s lineup.

Because age has done nothing to diminish my curiosity, I stopped by Whole Foods and picked up the ingredients I thought I’d need to try and duplicate Coppa’s Bruschetta con Ricotta. Of course, when I say “duplicate,” I really mean “replicate as closely as I can, then tweak it a bit to personalize it.” One characteristic of Coppa’s ricotta topping sparked my curiosity¾while the flavor of the hen of the woods mushrooms stood out, I don’t recall biting into any mushroom bits. Were the mushrooms pureed? Possibly, but I suspected that the chefs pulverized dried mushrooms and folded the powder into the ricotta. So that’s the technique I used. I wouldn’t know where to buy hen of the woods mushrooms if my life depended on it, so I relied on the dried porcinis and shiitakes in my pantry. Using my spice grinder, I buzzed them into a fine powder. Needing my own touch, I decided to add a bit of Spanish flavor with a splash of dry sherry, some fresh thyme, and smoked paprika. Also, I used regular cow’s milk ricotta rather than sheep’s milk ricotta.

This recipe’s concept is the same as Coppa’s, and the flavor is similar, but the finishing touches differ. If you can’t make it to Coppa, make this recipe!


Brushchetta con Ricotta with Thyme

8 dried shiitake mushrooms
4 dried porcini mushrooms
2 T. melted butter
16 oz. Whole milk ricotta
2 t. dry sherry
2 t. fresh thyme
1 t. olive oil
2 t. white truffle oil
pinch kosher salt

Toasted baguette slices
Several thyme leaves, to garnish
Pinch smoked paprika, to garnish

Using a mortar and pestle, spice grinder or coffee grinder, pulverize the dried shiitake and porcini mushrooms to form a powder.

In a deep mixing bowl, combine the mushroom powder and the melted butter. Mix well. Next, add all the remaining ingredients except for the baguette slices and garnishes. Using an electric mixer, beat well until the ingredients are all fully incorporated into the mixture and the mixture is nice and fluffy.

Spread a heaping spoonful of the ricotta mushroom mixture onto each toasted baguette slice. Top with a few fresh thyme leaves, and then sprinkle with a tiny pinch of paprika.


VARIATION: Instead of using the whipped ricotta as a topping for crostini, use it to sauce pasta. Simply use the recipe above to sauce 16oz. of dry pasta, adding about a teaspoon of salt, an extra dash or two of smoked paprika, and some additional thyme leaves.

Tuesday, February 7, 2012

Farro Tagliatelle with Zucchini, White Beans, and Pink Peppercorns

For weeks, I've been planning to write a post about what to do with game day leftovers, but instead I’m choosing to be petty―there will be no mention of Sunday's main event. Game or no game, post or no post, I still had to eat last night. Although I was tired and had spent the greater part of the morning battling a hangover, ordering take-out was not an option, as my stomach could not handle any more salty, greasy, fatty food. I decided to suck it up and prepare something quick and light.

What ended up on my plate was an unintentionally vegetarian pasta dish using my favorite brand of farro tagliatelle, lots of garlic and butter, fresh zucchini, canned beans, and flavorful seasonings, including pink peppercorns. Try this recipe when you’re feeling lazy but still craving something nutritious!


Farro Tagliatelle with Zucchini, White Beans, and Pink Peppercorns

white beans and zucchini
12 oz. farro tagliatelle
3 oz. butter
Generous splash olive oil
4 cloves garlic, minced
1 lb. zucchini, quartered lengthwise, then thinly sliced
1 16oz. can small white beans
1 t. dried thyme
½ t. dried oregano
1 t. coarsely ground black pepper
1 T. pink peppercorns
Salt to taste
Sprigs of parsley, for garnish
Shaved or grated pecorino romano, for garnish

Cook the pasta in generously salted water. In the meantime, melt the butter in a large, heavy bottomed pot over medium heat. Once the butter is melted, add the olive oil, then add the minced garlic. Sauté the garlic for a minute or two or until the garlic is fragrant.

Next, add the zucchini to the pot. Cook for 3-5 minutes before adding the beans, thyme, oregano, ground pepper, pink peppercorns, and salt. Cook, stirring frequently, until all the ingredients are heated through.

Once the pasta is cooked, add it to the pot with the beans and the zucchini. Toss it well so that each strand is coated with the butter and oil. If it seems a bit dry, add a small splash of the pasta cooking water and toss it again. Serve on individual plates, garnishing each portion with a sprig of parsley and shaved or grated pecorino romano cheese.


Wednesday, February 1, 2012

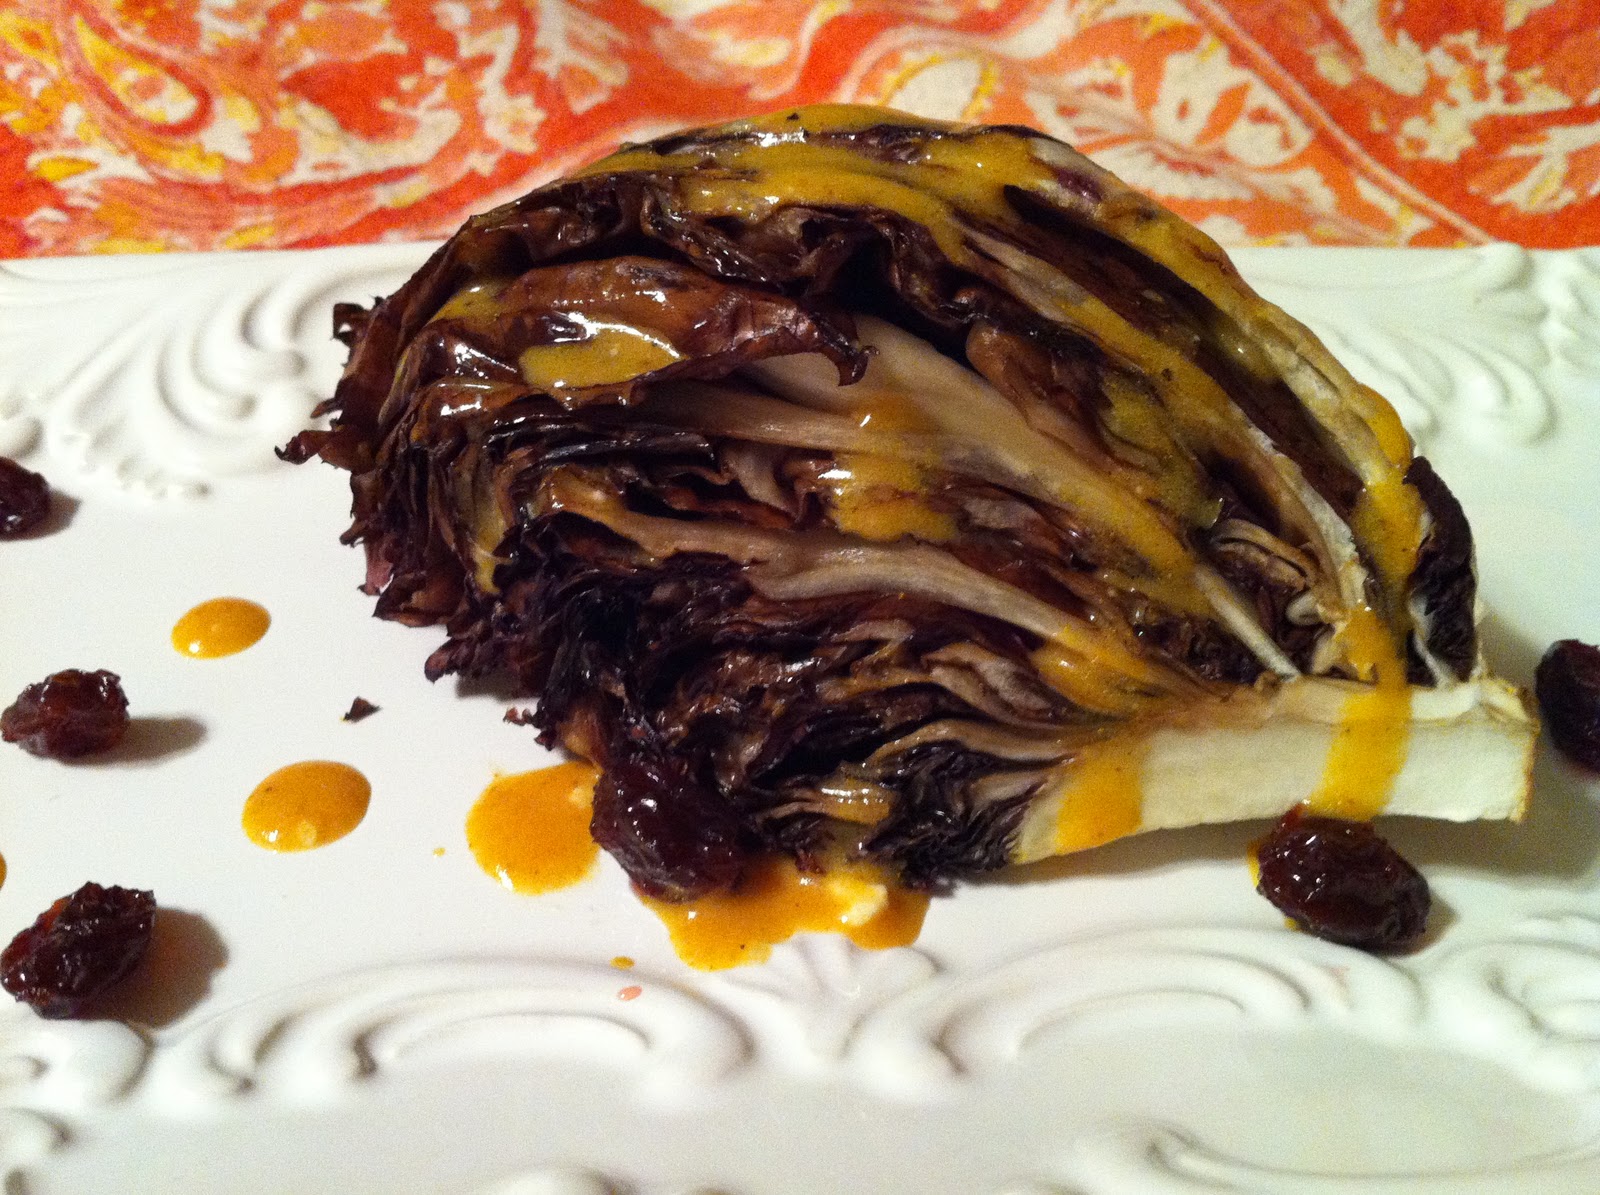
Radicchio Wedge Salad with Curried Blue Cheese Dressing and Campari Raisins

The iceberg wedge salad. Now a common steakhouse and “New American” restaurant menu staple, the iceberg wedge wasn’t always so readily accepted by the hungry public. In fact, yours truly was waiting tables during the iceberg wedge’s rise to popularity, and I recall many a diner shooting me a barbed, “What the hell is this?” or “Um, did someone forget to chop the lettuce? Send it back.” I could feel my tips dwindling. But like hybrid cars, the Internet, and casual Fridays, the iceberg wedge went from shunned to tolerated to embraced. However, as eaters’ palates have become more adventurous, the iceberg wedge is now playing second fiddle to salads that use darker, more exotic greens, innovative dressings, and interesting touches like candied walnuts, pickled shallot, and marketable “superfoods” such as goji berries and pomegranate seeds.

Rather than burn out or fade away, perhaps the wedge salad simply needs a makeover!

Last night, I created a modern twist on the classic wedge salad, using radicchio instead of traditional iceberg lettuce. I originally planned on dressing it in a garlicky aioli, but I decided to at least stay parallel to tradition, so I concocted a runny blue cheese dressing with a punch of curry. The richness of the creamy blue cheese paired delightfully with the warm, bitter radicchio. Still, the plate needed something else, but what? Perhaps something sweet to counter the bitterness of the radicchio and the kick of heat in the curry? Raisins! But I’d have to plump them first; otherwise I’d risk having my plate look like it had been sprinkled with rabbit poo. I didn’t have any open wine, and I feared that whiskey or grappa would be far too strong, so I chose Campari. Campari is an Italian liqueur with a bitter, yet sweet and almost citrusy flavor; it seemed like a logical choice for this dish. I soaked the raising in warmed Campari to speed up the plumping process, and then I sprinkled the raisings on the plate with my radicchio wedge.

The result? Sheer perfection! If your palate is not accustomed to bitter ingredients, you may not appreciate the complexity of this dish, but if you like bold, unique flavors, you’ll surely fall in love with this modern twist on the classic iceberg wedge salad!


Radicchio Wedge Salad with Curried Blue Cheese Dressing and Campari Raisins

For the Campari Raisins:
2 T. raisins
3 T. Campari, warmed but not boiling

For the dressing:
3-4 T. high-quality blue cheese dressing
2 T. olive oil
2 t. Campari (use the liquid left after the raisins have soaked)
2 t. turmeric
1 t. garlic powder
¼ t. cayenne, or to taste
Dash finely ground black pepper

2 heads radicchio, quartered
1 T. olive oil

Soak the raisins in the warmed Campari for at least 20 minutes.

Preheat your oven’s broiler over a low setting, and if you can’t control the setting, simply use the rack farthest away from the heat source. In the meantime, make the dressing by whisking all the ingredients together until they are completely blended. Set aside until ready to use.

Now, it is time to broil the radicchio. Brush each cut surface of the radicchio quarters with the olive oil, lay the curved side on a baking sheet lined with tinfoil, and broil for 5-7 minutes. Do not let the radicchio burn.

Once the radicchio has broiled, place a quarter or two on individual serving plates, drizzle the dressing over the radicchio, and sprinkle each plate with a few raisins. Serve immediately. 


Monday, January 30, 2012

Marinated Salmon with Lemongrass & Mint

I’ve really slacked on posting lately, and I've mentally exhausted every conceivable excuse to sit on my ass and watch the replay of this weekend's NHL All Star Game.  I can't justify going another day without sharing with my readers, so I’ll give you a simple, quick recipe - no backstory, no history, no flowery description, just a wonderful, health-conscious recipe that requires under 10 minutes of prep time. Enjoy!


Marinated Salmon with Lemongrass & Mint

1 lb. wild salmon fillet, skin removed, sliced ¼” thick across the grain
¼ c. thinly sliced red onion
¼ c. Boston Olive Oil Company Lemongrass Mint White Balsamic Vinegar
1 t. coarse kosher salt
1 t. cracked black peppercorns


Combine all the ingredients in a large, nonmetallic bowl with a lid. Secure the lid tightly, shake vigorously, and let marinate for 4-24 hours in the refrigerator, shaking occasionally. Serve cold, either on a dramatic black serving plate, or on a bed of looseleaf lettuce.

If you are not comfortable with the idea of eating uncooked fish, you can lightly steam or lightly broil the fish for an equally delicious dish! 


Wednesday, January 18, 2012

Ingredient Spotlight - Chanterelle Mushrooms

This is yet another one of those occurrences in which I never intended to create a blog-worthy recipe but ended up doing so. It all started with a basketful of chanterelle mushrooms on display at Whole Foods. Being a mushroom lover and never having cooked chanterelles, I picked one up, placed it in a produce bag, tossed it in my basket, and drifted over to the jicamas and peppers…and then I inched my way back to the chanterelles, putting another large mushroom in the bag. And another. With a shoplifter’s quick hand and shifty eyes scanning the periphery, I loaded up an entire produce bag as if I was trying to get away with wrongdoing. I guess I felt kind of guilty about taking most of the Chanterelles and depriving my fellow shoppers.

Fresh chanterelle
Other wild mushrooms such as morels, black trumpets, and truffles may garner all the accolades, but chanterelles are stars in their own right. When I took the first bite, I was overwhelmed, in a good way. The flavor was not what I expected, and the texture was absolutely delightful. Tasting a chanterelle for the first time was only comparable to meeting that one special person who cements in your mind the reason why it never worked out with any of your past loves and lovers and erases any doubts you had about whether or not you made the right call in holding out for something more congruent.

It’s no surprise that the flavor of a food that grows on the floors of coniferous forests amongst damp and decomposing plant debris would be characterized as “woodsy” or “earthy,” but I cannot think of a better description. The flavor is delicate; chanterelles are neither pungent nor musty. Unlike a porcini or a truffle, a chanterelle would not overpower other flavors in a recipe. When sautéed, chanterelles have a texture similar to slightly past its prime lemon meringue pie filling - delicate, but still firm.

Chanterelles cooking
When I cooked these, I planned on simply sautéing the chanterelles in a ton of butter with some sliced garlic. About two minutes into the cooking process, I splashed a bit of the Pouilly-Fuisse in my wine glass into the pan with the mushrooms, adding a bit more moisture and flavor to the mix. While stirring with one hand and using the other to peruse the ‘net for info on chanterelles via iPhone, I decided to add a few crushed juniper berries to the mix so that the flavor would be reminiscent of the pine forests in which the mushrooms grow. I didn’t stop at juniper berries. All these flavors needed a piquant boost; I achieved this by adding an ever-slight dash of finely ground white pepper, then I added a splash of light cream to fuse the whole dish together. This was definitely not what I had in mind as I was hoarding chanterelles at Whole Foods like a crack fiend, but it turned into a cohesive dish with flavor combinations that seemed like a big “DUH” after the fact. I am not exaggerating when I say that my eyes rolled back in my head with pleasure when I took the first bite. This is one of the best side dishes I’ve ever created. Hell, this is one of the best recipes I’ve created, period. I’m very proud of this one.

As an aside, the entire time that I was eating my ego-inflating chanterelle creation, I couldn’t stop thinking about roast chicken. This dish would pair extremely well with a very subtly seasoned roast chicken. Try this recipe if you can get your hands on fresh chanterelles! 


Chanterelles with Juniper Cream Sauce

2 T. butter
2-3 cloves garlic, sliced
1 lb. Fresh chanterelle mushrooms, sliced
Splash Pouilly-Fuisse, Chardonnay, or other oaked white wine
1/8 t. finely ground white pepper
4-6 juniper berries, crushed with the back of a spoon*
2 T. light cream
Pinch sea salt
Mild paprika, to garnish**

Melt the butter in a large saucepan over medium-low heat. Add the garlic and sauté for a 2-3 minutes, or until the garlic has turned slightly golden. Add the mushrooms, wine, white pepper, and juniper berries. Sauté, stirring gently but frequently, for approximately 10 minutes, or until the mushrooms are no longer firm. Add the cream and sea salt; sauté for a minute or two longer. Serve on individual plates, and garnish with a dash of mild paprika. 

* If you cannot locate juniper berries, simply add a teaspoon or two of gin, or purchase them online

** If you have a jar of paprika that has lost its flavor, don’t throw it away - use it as a colorful yet flavorless garnish.


Monday, January 16, 2012

Cavatappi with Roasted Cherry Tomato Sauce

Great tomatoes in January, in Boston. If you're a serious foodie, that sentence probably just made you raise your eyebrows and question my credibility; as well you should have. However, I've been buying these tomatoes for quite some time, and I've never been disappointed in them, even in January.

Grown locally by Backyard Farms, these tomatoes are packed with flavor and rival some tomatoes I've had in August. I probably go through at least one box of their cocktail tomatoes per week, if not two or three. The other day, I got the idea to roast them and make a garlicky tomato sauce, and the idea evolved into this quick, easy, and delicious pasta recipe. Try this one the next time you're able to find good tomatoes!
 

Cavatappi with Roasted Cherry Tomato Sauce


1/2 lb. cavatappi, or other textured short pasta
8 cherry tomatoes, quartered
1/4 c. butter
1 c. dry white wine
1/3 c. tomato paste
1 c. grated pecorino romano
3-4 garlic cloves, minced
generous amount coarsely ground black pepper
salt (if necessary)
handful fresh basil leaves, chiffonade-cut*
additional basil leaves, for garnish

Cook the pasta in heavily salted water. In the meantime, preheat the oven's broiler. Arrange the cherry tomatoes on a foil-lined baking sheet with one cut side down (as shown in picture above). Broil the tomatoes for 7-10 minutes, or until the tomatoes' skins have begun to blister and blacken. Remove from oven and set aside.

chiffonade-cut basil
While the pasta cooks and the tomatoes broil, combine the butter, wine, and tomato paste in a large, heavy-bottomed pot over medium-high heat. Whisk vigorously until the tomato paste has completely broken down and blended with the wine and the butter has melted. Turn heat down to low and add the pecorino, garlic, and pepper (you probably won't need salt; pecorino is a salty cheese. Taste for seasonings and only add salt if absolutely necessary). Continue to whisk until the pecorino has completely melted. Once the pasta is cooked, drain it and add it to the sauce along with the roasted tomatoes and the chiffonade-cut basil leaves. Stir a few times until all the pasta is coated, then serve hot, garnished with fresh basil leaves.
 
* Chiffonade-cut is a technique often used on fresh herbs. To cut basil, stack the leaves on top of each other, roll up lengthwise, and cut into 1/8" strips. By placing the largest leaf on the bottom of the stack, the smaller leaves will be contained in the roll and the leaves will be easier to slice.

Friday, January 13, 2012

Stuffed Plantain Rolls with Callaloo, Bacon and Warm Chipotle Butter

This Christmas, Santa brought me some books on Puerto Rican and Floridian cooking. While I'm familiar with the names of most of the ingredients, I haven't had the experience of cooking with some of them, particularly plantains.  I love plantain - whether it's fried, mashed, or grilled, I've always been a fan of their starchy, semi-sweet flavor. So when I saw plantains in my produce department with a "4 for $1" tag, I threw a few into my basket. Talk about an offer I couldn't refuse! 

semi-ripe plantain
For those of you unfamiliar with plantains, they look almost identical to bananas.  However, they do not taste like bananas, nor can they be eaten raw - plantains must be cooked.  The great thing about plantains is that they can be eaten from their green stage to their fully black stage, each stage of ripeness offering different flavors and textures.  When green, they are starchy and potato-like; when black, they are much sweeter and less firm.  I like them best in the in-between phase, when the skins are starting to turn brown and spotted. 

Unsure of how I wanted to cook my plantains, I reached out to my friends and my Baconbutterbooze.com Facebook followers for input, but in the end, a spark of inspiration (and my compulsion to spike everything with bacon) led me to create the recipe below.  If you can find ripe plantains and callaloo, this recipe is one that I highly recommend! 


Stuffed Plantain Rolls with Callaloo, Bacon and Warm Chipotle Butter

4 c. cooked callaloo leaves*
4 chipotles in adobo, minced
1 T. adobo sauce
2 t. ground ginger
1 t. garlic powder
1/2 t. ground allspice
generous amount finely ground black pepper
1/2 t. salt
2 T. bread crumbs
2 semi-ripe plantains, peeled and cut lengthwise in 4 thin slices
8 slices thick-cut bacon
8 pats butter
Warm Chipotle Butter (recipe below)

Preheat the broiler to high, and soak 16 toothpicks in water.  In the meantime, make the stuffing.  If the cooked callaloo has any moisture, drain it in a colander, pressing any remaining liquid out.  Once drained, place it in a mixing bowl with the minced chipotles, adobo sauce, ginger, garlic powder, allspice, pepper, salt, and bread crumbs.  Mix well and set aside. 

Now, assemble the plantain rolls.  Take each strip of plantain, create a ring, and secure with a toothpick, as shown in the photo to the left.  Stuff the center with the callaloo stuffing, packing it in - it should be packed in tightly.  Next, stretch a slice of bacon around the plantain, and secure with a second toothpick.  Push the toothpicks in so that only the ends of each toothpick are visible - they have a tendency to burn.  Finally, top each roll with a pat of butter. 

Broil 3-4 minutes per side, using barbecue tongs to turn.  Turn them over carefully so that you don't squish the plantains or lose the stuffing mid-turn.  Once both sides are broiled, remove from the oven, turn the broiler to low, and finish under the broiler for about 10-15 more minutes. 

Remove from oven, drizzle with Warm Chipotle Butter, and serve hot.

* If you cannot find fresh callaloo leaves, canned callaloo can be purchased online


Warm Chipotle Butter

3 T. butter
1 T. adobo sauce, from can of chipotles in adobo
1 T. malt vinegar

Melt the butter in a small saucepan.  Whisk in the adobo sauce and malt vinegar.  Continue whisking until the vinegar's aroma has dissipated, and drizzle the hot melted butter over the Plantain Rolls.


Monday, January 9, 2012

Dried Mushroom Crisps

When I was 11, I didn't want clothes or Barbies or video games for Christmas; I wanted a food dehydrator. Weird, right? I blame it on the fact that A) I played waayyy too much "Oregon Trail" at school, B) Kirsten, the Swedish pioneer girl, was my favorite American Girls character (now discontinued...*crying*), and C) I was home sick a lot that year and developed quite an obsession for "Little House on the Prairie" reruns. I believe that those three things led me to my fascination with the American Frontier period. This meant that A) I would never be popular crowd material, and B) although I enjoyed reading fictional and nonfictional accounts of that time period, I wanted to understand the experience. I wanted to eat what they ate; hence the food dehydrator.

Humans have used drying as a food preservation method since the dawn of time, but drying was especially important to the Pioneers who set out across the country on wagon trains. Dried food was lightweight and compact, leaving more room in their wagons for other necessary supplies, like guns and whiskey. 

mushrooms on drying rack
Back to the early 90's. Along with my food dehydrator, my mom bought me a book called "How to Dry Foods" by Deanna DeLong, which I have since learned is practically the Bible of food drying manuals. Ms. DeLong offers a comprehensive guide on prep procedures and drying times for dozens of fruits and vegetables, as well as guides for making meat and fish jerky, fruit leathers, and many other helpful recipes, tips, and ideas. I tried many of them, and even at age 11, I wanted to try to do things my way (hint - orange segments do not dehydrate well).

Of all the foods I dried, sliced mushrooms produced my favorite result by far. Crisp and earthy, these babies always satisfied my crunch cravings. Because I dry my mushrooms in order to use them as snacks, my process is a bit different than that of the Italians and Chinese, who dry mushrooms simply so that they are available for use in recipes when fresh mushrooms are not in season. Imagine that - what my ancestors did out of necessity, I now do simply because I want a tasty snack! You don't even need a food dehydrator; you can do this in your oven as well. Not only is this snack delicious, it's great for all you New Year's Resolution dieters who are looking to replace your artificially flavored, partially hydrogenated, genetically engineered, deep-fried corn and potato crisps. Give this snack a shot! 

* Food dehydrators are available for purchase at many major department stores and housewares stores; they can also be purchased online.

Dried Mushroom Crisps

2 c. boiling water
1 T. mild vinegar
2 t. salt
2 t. seasoning blend of your choice
1 pound button mushrooms, sliced 1/4" thick

Combine everything but the mushrooms in a mixing bowl, and blend until the salt has dissolved. Add the mushrooms. Give them a few stirs so that each of the slices are submerged momentarily. The mushrooms will float, so give them a few stirs every 10 minutes or so, and let marinate for one hour. 

Once the mushrooms have marinated, drain them from the brine and follow the drying method of your choice.

Food Dehydrator Method:
Place the mushrooms on the racks of a food dehydrator with all air vents fully open. Dry for 36-48 hours, or until they are crisp and no moisture remains. 

Oven Method:
Preheat the oven to 190. In the meantime, prepare the mushrooms. The mushrooms will fall through a standard oven rack, so pierce a sheet of foil every half-inch or so and place the tinfoil on a rack. Arrange the mushrooms on the tinfoiled rack and place in the oven. Leave the oven door ajar (you can keep it lodged open with a wooden spoon) and bake for 6-8 hours, or until the mushrooms have dried. 

These are delicious alone, but you can also dip them in traditional chip and veggie dips!

Tuesday, January 3, 2012

Culinary Adventure: Escargot

Tonight, for the first time, I ate escargot¾a/k/a snails.  Yup, the little slithery things that roam through your gardens when the dew is still fresh in the grass.  The little things with the antennas that shrink up into their shells when you touch them.  Gary, SpongeBob's pet.  I consumed him. 

I've always wanted to try snails, not because I'd heard anything about their wondrous qualities; as with most of my culinary adventures, my curiosity got the best of me.  How could I miss out on something that other cultures have enjoyed for centuries?!?  Life is too short to pass up something I might enjoy just because a few onlookers might raise their unadventurous eyebrows.  So, when I saw escargot at Whole Foods tonight, I ordered a half dozen.  If I liked them, it was a good enough portion that I wouldn't feel shortchanged, and if I hated them (fat chance), it wouldn't be too much of a waste.  The openings of the snails' shells* were already filled with a garlic & herb butter; I'm pretty sure the herbs used were parsley and chervil. 

* If you ever find yourself on Jeopardy and have to tell Alex (...or is it ask Alex? What is 'Go Ask Alex?'...) what the opening of a snail's shell is called, the correct anatomical term is "mantle."

I had no idea how to cook these things, and the guy at Whole Foods surprisingly wasn't much help (I'm going to assume that he was either new, or he was having a crappy day - Whole Foods employees are generally a knowledgeable, delightful bunch).  So, I did it the modern way and googled it. According to several potentially credible sources, 10 minutes in a 400-degree oven is the way to achieve gastropod greatness. 

Here's a helpful hint - if you're going to eat escargot, make sure you have a seafood fork.  Seafood forks are smaller than regular forks, and the tines span about half an inch (1.3cm), making it easy for the eater to pierce meat that is lodged inside a shell.  When me and my salad fork finally got a snail out of the shell, I bit into it, hoping it was worth the effort.  Had I used a seafood fork, it would have been! A salad fork was a bit too laborious for my ever-so-impatient soul.  The texture was similar to calamari or fried clams, but the flavor was not at all fishy - very earthy, in fact, almost like a wild mushroom. 

Since I didn't cook these myself, I can't offer you a recipe in good conscience.  What I can do, however, is offer you a photo journal.  Here are the pics I snapped throughout tonight's escargot adventure. 
P.S. Am I the only one who, upon hearing the word "escargot," immediately gets "Hypnotize" by Notorious B.I.G stuck in her head?  "...escargot, my car go 160..." I digress...back to the food, kids.  

Uncooked snails stuffed with garlic-herb butter


Baked in strategically crumpled tinfoil so that the shells stay upright
and the butter melts directly onto the snails.


Cooked escargot


Cooked escargot, snail removed from shell. 
They may look like something from the movie "Alien," but they taste great!