“If you marry him, you’ll live on pickles and rice!” So goes the admonition of Indian fathers in many of the curry-flavored versions of the familiar Gatsby-esque Rich Girl/Poor Boy love story. Thanks to a Groupon for Shalimar, an Indian market in Cambridge, MA, I was able to try these famed pickles, and frankly, I don’t understand why living on pickles and rice is a bad thing!
Lime pickle is made throughout India and in other Southeast Asian countries as well. Recipes often vary from region to region - some versions use sesame oil, others use castor or peanut oil. The spice blends also vary. Once blended, the pickle mix is set aside for at least two weeks, and then it is ready to be used as a condiment or a punchy seasoning, as I’ve done in the recipe below.
If you do not have a reputable Indian grocery in your area, jars of lime pickle can be purchased online via Amazon.
Chickpea and Rice Salad with Lime Pickle
2 ears fresh corn, kernels removed
½ c. / 115g. lime pickle
2 16oz / 439g cans chickpeas, drained
1 8.5oz / 240g can Le Sueur peas, drained
1 large tomato, chopped
½ t / 2g brown mustard seeds
½ t / 2g yellow mustard seeds
½ t / 2g ground cumin
2t. / 10mL malt vinegar
3 c. steamed basmati rice
Handful chopped cilantro
Salt and pepper to taste
First, prepare the corn by microwaving the fresh corn kernels for one minute. Alternatively, heat them in a pan with a splash of water, cook them for a minute or two, then drain. Set aside.
If the lime chunks in your lime pickle are large, use a sharp knife and chop them into small bits.
Now, combine the corn, the lime pickle, and all remaining ingredients in a large bowl. Stir until blended well. Cover with plastic film and chill in the refrigerator for at least two hours. Serve cold, or serve hot with a dollop of plain yogurt or sour cream.
* Usually, I post at least one photo with my recipes. Unfortunately, I forgot to take a picture of this one before I ate all the leftovers. OOPS!
Nutrition information: serves 6. 488 calories, 7.7g fat, 59.6g carbohydrates, 15.3g protein

Tuesday, April 10, 2012


Monday, April 2, 2012
Orechiette with Sausage, King Oyster Mushrooms, and Roasted Red Pepper Crème
Sausage and peppers - a classic flavor combo that really can’t be beat! Whether served on some sort of toasted bread, spooned over pasta, or stewed together and served as a simple side dish, this is one pairing that everyone seems to love in one form or another.
For every written recipe for sausage and peppers, there must be 100 unwritten variations, passed down over time from one person to the next. Here, I tried an unusual variation, roasting and pureeing the peppers, and blending them into a creamy sauce with bits of hot Italian sausage, shallot, pecorino romano, and flavorful, meaty mushrooms.
 I chose king oyster mushrooms for this recipe because of their ability to hold their firm texture during cooking. These large, trumpet-shaped mushrooms (shown left) are recognized by their thick, trunk-like stems and a small caps, and they may be labeled with other names, such as king trumpet mushroom, French horn mushroom, trumpet royale, or in an Asian market, xing bao gu or eringi. Although the flavor is not overpoweringly rich, the texture is very meaty, so if you cannot find these, substitute a mushroom like portabella or porcini - something with a texture that won’t wilt and become lifeless during cooking.
Try this recipe when you need a break from the same old sausage and peppers!
Orechiette with Sausage, King Oyster Mushrooms, and Roasted Red Pepper Crème
 16 oz. orechiette or other short pasta
Splash olive oil
8 oz / 230 g hot Italian sausage, removed from casing
8 oz / 230 g king oyster mushrooms, sliced
1 large shallot, minced
2-3 red bell peppers, roasted*
1 cup / 240 ml dry white wine
½ c. / 115 g coarsely grated pecorino romano
Handful basil, cut chiffonade-style
Salt and pepper to taste
Extra basil leaves, to garnish
Cook the pasta in salted water. In the meantime, heat the olive oil in a large, heavy-bottomed pot, then add the sausage. Brown the sausage for a minute or two, then add the mushrooms and the shallot. Cook for 5-7 minutes, or until the sausage is browned, stirring occasionally and breaking up any large chunks of sausage into smaller bits.
While the sausage, mushrooms, and shallots are cooking, put the roasted red bell peppers and the white wine in a blender or food processor, and puree until mo large chunks remain and the mixture is somewhat emulsified.
Once the sausage has cooked, add the red pepper and wine puree to the pot with the sausage. Cook for another 5-10 minutes or so, stirring frequently to ensure that the sauce is not sticking to the bottom of the pot. Next, add the pecorino and cook for another 2 minutes, stirring frequently, or until the pecorino has melted and blended completely into the sauce.
Finally, drain the pasta and add the cooked, drained pasta to the pot with the sauce (if the mixture seems a little dry, add a small splash of the pasta cooking water). Stir until each piece of pasta is coated with sauce, then add in the basil, salt and pepper. Give the pasta mix a few gentle stirs to work in the basil, then serve in a decorative bowl or on individual plates, garnished with the extra basil leaves.
* As I’ve said many a time, roasted red peppers in a jar ALWAYS taste like roasted red peppers in a jar. Roasting them yourself gives a much better flavor, and it is very easy. Click here for instructions on how to roast red peppers!
Nutrition facts: Serves four. 858 calories, 11.5 g fat, 100 g carbohydrates, 35 g protein


For every written recipe for sausage and peppers, there must be 100 unwritten variations, passed down over time from one person to the next. Here, I tried an unusual variation, roasting and pureeing the peppers, and blending them into a creamy sauce with bits of hot Italian sausage, shallot, pecorino romano, and flavorful, meaty mushrooms.

Try this recipe when you need a break from the same old sausage and peppers!
Orechiette with Sausage, King Oyster Mushrooms, and Roasted Red Pepper Crème

Splash olive oil
8 oz / 230 g hot Italian sausage, removed from casing
8 oz / 230 g king oyster mushrooms, sliced
1 large shallot, minced
2-3 red bell peppers, roasted*
1 cup / 240 ml dry white wine
½ c. / 115 g coarsely grated pecorino romano
Handful basil, cut chiffonade-style
Salt and pepper to taste
Extra basil leaves, to garnish
Cook the pasta in salted water. In the meantime, heat the olive oil in a large, heavy-bottomed pot, then add the sausage. Brown the sausage for a minute or two, then add the mushrooms and the shallot. Cook for 5-7 minutes, or until the sausage is browned, stirring occasionally and breaking up any large chunks of sausage into smaller bits.
While the sausage, mushrooms, and shallots are cooking, put the roasted red bell peppers and the white wine in a blender or food processor, and puree until mo large chunks remain and the mixture is somewhat emulsified.
Once the sausage has cooked, add the red pepper and wine puree to the pot with the sausage. Cook for another 5-10 minutes or so, stirring frequently to ensure that the sauce is not sticking to the bottom of the pot. Next, add the pecorino and cook for another 2 minutes, stirring frequently, or until the pecorino has melted and blended completely into the sauce.
Finally, drain the pasta and add the cooked, drained pasta to the pot with the sauce (if the mixture seems a little dry, add a small splash of the pasta cooking water). Stir until each piece of pasta is coated with sauce, then add in the basil, salt and pepper. Give the pasta mix a few gentle stirs to work in the basil, then serve in a decorative bowl or on individual plates, garnished with the extra basil leaves.
* As I’ve said many a time, roasted red peppers in a jar ALWAYS taste like roasted red peppers in a jar. Roasting them yourself gives a much better flavor, and it is very easy. Click here for instructions on how to roast red peppers!
Nutrition facts: Serves four. 858 calories, 11.5 g fat, 100 g carbohydrates, 35 g protein


Tuesday, March 27, 2012
Restaurant Week - The Method to My Madness, Restaurant Review - Forum (Boston, MA), Restaurant-Inspired Recipe
Restaurant Week in Boston officially kicked off last week! For two weeks, dozens of restaurants in the Boston metro area offer prix-fixe menus for lunch and/or dinner. Normal people browse the listings, check out a handful of menus, and pick a spot, but I am not a normal person. As usual, I scoured every single menu, making notations here and checkmarks there, creating The List that my friends have come to expect (though I suspect no one fully understands).
There is a method to my madness. I only consider restaurants I haven’t yet tried, and I carefully evaluate restaurants and menus based on the following criteria:
Once I’ve color-coded my chart, my choices are based on if/when I can get reservations at the green restaurants. I always aim to hit four new restaurants, but usually I’m lucky if I can squeeze in two. However, I’m not going to complain about getting to try two new restaurants!
This year, my trusty spreadsheet got thrown for a loop for one reason and one reason only¾I never expected the need to create an “outdoor seating” column in March! Mother Nature certainly felt generous last week, blessing us with a sunny, 80-degree day (why she can’t wait until the weekend to give us these little gifts is beyond my comprehension). I ignored my spreadsheet completely and set out on a mission to sit on a patio.
My mission landed me at Forum, a Back Bay fixture for trendy, manicured types who like to imbibe in style. While I knew that Forum served dinner, its reputation as a place to sip cocktails with shiny strangers is what puts Forum on the map, at least among my age demographic. Had I not been desperate for a patio fix, I would have never considered Forum as a dining destination.
Whoa¾when I’m wrong, I cop to it. I was wrong. The meals my friend and I had at Forum were excellent! We had to wait a while for a patio table, but that’s not the restaurant’s fault; I blame a four-top of really stiff-looking MetroWest types that lingered at their table far longer than acceptable by any standard of courtesy. But, I enjoyed an Aviation at the bar while we waited for our table.
Having studied the menu earlier that day, I already knew what I was going to order, and knowing my friend as well as I do, I was fairly certain I could predict his picks as well. I had the Trio Tartare (tuna, steak, and salmon tartare), Salmon with Bulgur Wheat, Rapini, Pomelo, and King Oyster Mushrooms, and for dessert I had the Meyer Lemon Meringue with Graham Cracker and Earl Gray. My friend had the Tortellini (duck confit and butternut squash filling in sage brown butter), Mock “Wellington” (filet mignon in puff pastry with wild mushrooms and bordelaise sauce), and the German Chocolate Cake with coconut, pecans and Guinness.
 My salmon dish was delicious. The fish was perfectly cooked, skin crisped and served atop a bed of bulgur wheat and rapini that had been pureed into a pesto-like sauce. The plate featured a few bite-sized bits of pomelo, and a few small sautéed king oyster mushrooms. Serving the rapini as a puree was a great idea, as its flavor blended very well with the bulgur. I liked that the eater could control how much or how little of the rapini went on his/her fork; otherwise, such a strongly-flavored vegetable could have been overpowering for diners that do not appreciate rapini’s ultra-bitter flavor.
The meringue? Eh. I like meringues, and my lukewarm reaction is certainly no reflection on the chef, I’m just not very likely to fawn over dessert. In fact, I would love to see more restaurants allow diners to skip dessert and instead choose an additional appetizer, a side dish, or an aperitif or cordial.
All of the appetizer and entrée dishes were amazing, but the one that I felt a compulsive need to replicate was the steak tartare. While I used to find the idea of raw beef repulsive, my mind opened up at some point. I’ve been on a mission to try steak tartare for a few weeks now, and the discounted price and small portion on the restaurant week menu allowed me to try it without committing to an entire order (not that there’s ever much of a chance that I’m not going to like a new dish, but I’m very mindful when it comes to animal proteins).
To make steak tartare, start with good, naturally raised sirloin¾if you can find grass fed sirloin, this would be the time to buy it. Although you can cheat and have your butcher grind it for you, true steak tartare is not made with ground beef, but with very finely chopped steak. Time to sharpen your chef’s knife!
I chopped and chopped and chopped until the steak was broken up into miniscule bits. However, I decided to stray from the classic steak tartare, and I flavored it a bit differently. Although I stuck with the classic capers and egg yolk, a bit of grated orange peel, ground coriander, and rose water gave a Middle Eastern flavor to my very first batch of steak tartare. If you’re a steak lover, try this recipe served with some toasted pita crisps!
Recipe - Steak Tartare with Middle Eastern Flavors
8 oz/230 g top-quality sirloin
2 t/10 g ground coriander
1 t/5 g orange rind, very finely grated
½ t/2.5 g rose water
1 t/5 g salt-packed capers, chopped
Coarsely ground black pepper, to taste
2 egg yolks
Four whole wheat mini-pitas, quartered and toasted, to serve
Using your sharpest knife, chop the sirloin until its consistency is very fine, but coarser than ground beef. In a mixing bowl, combine the chopped sirloin, coriander, orange rind, rose water, capers, and black pepper. Using a wooden spoon, fold the seasonings into the chopped sirloin. Set aside in the refrigerator for 30 minutes to an hour.
After the sirloin mixture has chilled, divide the mixture in half. Using ring molds, press the steak into the molds on individual plates. Make an indentation in the top surface, creating a “well” for the egg yolk. Top the steak tartares with a raw egg yolk, and serve with quartered and toasted mini-pitas.


Nutritional information: Serves two. With pita crisps, 393 calories, 23 g fat, 25.9 g carbohydrates, 29.4 g protein. Without pita crisps, 273 calories, 22 g fat, 1.9 g carbohydrates, 23.4 g protein
There is a method to my madness. I only consider restaurants I haven’t yet tried, and I carefully evaluate restaurants and menus based on the following criteria:
- Value: Does the restaurant week price discount allow me to dine at a restaurant I couldn‘t otherwise afford?
- Choice: Does this restaurant offer three or more offerings per course?
- Differentiation: Does this menu offer one or more unique dishes and/or does the menu feature an ingredient or dish I’ve never tried?
- Special features: Does this menu offer any special features, i.e. a wine pairing or complimentary drink?
Once I’ve color-coded my chart, my choices are based on if/when I can get reservations at the green restaurants. I always aim to hit four new restaurants, but usually I’m lucky if I can squeeze in two. However, I’m not going to complain about getting to try two new restaurants!
This year, my trusty spreadsheet got thrown for a loop for one reason and one reason only¾I never expected the need to create an “outdoor seating” column in March! Mother Nature certainly felt generous last week, blessing us with a sunny, 80-degree day (why she can’t wait until the weekend to give us these little gifts is beyond my comprehension). I ignored my spreadsheet completely and set out on a mission to sit on a patio.
 |
| at Forum, 755 Boylston St. |
Whoa¾when I’m wrong, I cop to it. I was wrong. The meals my friend and I had at Forum were excellent! We had to wait a while for a patio table, but that’s not the restaurant’s fault; I blame a four-top of really stiff-looking MetroWest types that lingered at their table far longer than acceptable by any standard of courtesy. But, I enjoyed an Aviation at the bar while we waited for our table.
Having studied the menu earlier that day, I already knew what I was going to order, and knowing my friend as well as I do, I was fairly certain I could predict his picks as well. I had the Trio Tartare (tuna, steak, and salmon tartare), Salmon with Bulgur Wheat, Rapini, Pomelo, and King Oyster Mushrooms, and for dessert I had the Meyer Lemon Meringue with Graham Cracker and Earl Gray. My friend had the Tortellini (duck confit and butternut squash filling in sage brown butter), Mock “Wellington” (filet mignon in puff pastry with wild mushrooms and bordelaise sauce), and the German Chocolate Cake with coconut, pecans and Guinness.

The meringue? Eh. I like meringues, and my lukewarm reaction is certainly no reflection on the chef, I’m just not very likely to fawn over dessert. In fact, I would love to see more restaurants allow diners to skip dessert and instead choose an additional appetizer, a side dish, or an aperitif or cordial.
All of the appetizer and entrée dishes were amazing, but the one that I felt a compulsive need to replicate was the steak tartare. While I used to find the idea of raw beef repulsive, my mind opened up at some point. I’ve been on a mission to try steak tartare for a few weeks now, and the discounted price and small portion on the restaurant week menu allowed me to try it without committing to an entire order (not that there’s ever much of a chance that I’m not going to like a new dish, but I’m very mindful when it comes to animal proteins).
To make steak tartare, start with good, naturally raised sirloin¾if you can find grass fed sirloin, this would be the time to buy it. Although you can cheat and have your butcher grind it for you, true steak tartare is not made with ground beef, but with very finely chopped steak. Time to sharpen your chef’s knife!
I chopped and chopped and chopped until the steak was broken up into miniscule bits. However, I decided to stray from the classic steak tartare, and I flavored it a bit differently. Although I stuck with the classic capers and egg yolk, a bit of grated orange peel, ground coriander, and rose water gave a Middle Eastern flavor to my very first batch of steak tartare. If you’re a steak lover, try this recipe served with some toasted pita crisps!
Recipe - Steak Tartare with Middle Eastern Flavors
8 oz/230 g top-quality sirloin
2 t/10 g ground coriander
1 t/5 g orange rind, very finely grated
½ t/2.5 g rose water
1 t/5 g salt-packed capers, chopped
Coarsely ground black pepper, to taste
2 egg yolks
Four whole wheat mini-pitas, quartered and toasted, to serve
Using your sharpest knife, chop the sirloin until its consistency is very fine, but coarser than ground beef. In a mixing bowl, combine the chopped sirloin, coriander, orange rind, rose water, capers, and black pepper. Using a wooden spoon, fold the seasonings into the chopped sirloin. Set aside in the refrigerator for 30 minutes to an hour.
After the sirloin mixture has chilled, divide the mixture in half. Using ring molds, press the steak into the molds on individual plates. Make an indentation in the top surface, creating a “well” for the egg yolk. Top the steak tartares with a raw egg yolk, and serve with quartered and toasted mini-pitas.


Nutritional information: Serves two. With pita crisps, 393 calories, 23 g fat, 25.9 g carbohydrates, 29.4 g protein. Without pita crisps, 273 calories, 22 g fat, 1.9 g carbohydrates, 23.4 g protein
Friday, March 23, 2012
Chicken with Crunchy Veggies and Thai Flavors
This is yet another one of my recipes that wasn’t necessarily inspired, but came together when I said, “I’m hungry!” Thinking of what I could cook, I realized that I rarely cook chicken. I eat a lot of seafood, pork, beef, and vegetarian dishes, but I don’t do chicken too often. Why not? No conscious reason. I like chicken, but since starting this blog, I’ve leaned towards recipes with stronger flavors and uncommon ingredients.
When I do cook chicken, I buy organic, free-range, air-chilled chicken. Organic and free-range chicken is better for your body, the environment, and the chickens themselves. If you’ve never heard of air-chilled chicken, seek it out¾while normal chickens are dunked in an ice water bath to lower their temperature after slaughter and processing, air-chilled chickens are sent through several courses of cold air. This significantly lowers the risk of bacterial contamination (one infected chicken in an ice water bath can contaminate an entire lot), but it is also more economical - chickens given ice baths absorb water, and the consumer ends up paying for water. When chickens are air-chilled, you're not paying for anything but chicken. Air-chilled poultry costs a little more than conventional chicken, but I think it’s worth it to pay a slightly higher price for clean, unadulterated chicken.
Chicken pairs with pretty much everything, as does rice. But plain chicken and plain rice isn’t very exciting; I wanted to spice it up a bit. When you add in bold flavors, a little meat goes a long way, so if you’re looking to cut down on meat consumption, crunchy vegetables and Thai-inspired flavorings provide flavor and textural contrasts to the rather neutral chicken and jasmine rice. Even better, this recipe couldn’t be easier!
Chicken with Crunchy Veggies and Thai Flavors
1 T. coconut oil
8 oz. Boneless skinless chicken breasts, chopped into bite-sized pieces
1 lb. Green beans, cut into 1” lengths
1-2 cloves garlic, crushed
1 t. grated fresh ginger
2 T. low sodium soy sauce
2 T. fish sauce
2 T. Boston Olive Oil Company’s lemongrass & mint white balsamic vinegar
1 cucumber, seeded and chopped
1 large tomato, seeded and chopped
2 Serrano chiles, minced
2 fresno chiles or red jalapenos, minced
3 green onions, sliced into rings
Handful chiffonade-cut basil
1 T. toasted sesame oil
Coked rice, to serve
Extra basil, to garnish
A few very thin slices Serrano chile, to garnish
In a large metal pan or wok, heat the coconut oil over high heat until it becomes fluid. Add the chicken pieces and brown for 3-4 minutes, stirring constantly.
Reduce heat to medium. Add the green beans, garlic, ginger, soy sauce, fish sauce, and lemongrass & mint vinegar. Cook for 5-7 minutes, continuing to stir constantly. Next, add the cucumber, tomato, Serrano chile, and fresno chile. Continue to stir constantly, and cook for an additional 5 minutes, or until the green beans are no longer raw tasting but still retain their crunch.
Finally, add the green onions, basil, and sesame oil. Stir until blended, then spoon over cooked rice. Garnish with basil sprigs and thin slices of serrano chile.


Tuesday, March 20, 2012
Chestnut Flour Pasta with Sautéed Radicchio, Chicken Livers, and Grapefruit
 |
| chestnut honey, chestnut flour pasta, parsley, radicchio |
It worked! It would have been more appropriate in autumn, but it tasted great! This dish is not for everyone - you have to be a true lover of intensely earthy, woodsy, bitter flavor combinations in order to appreciate this one, but if you’re anything like me and you can’t bear to not try something, take a chance on this recipe!
Chestnut Flour Pasta with Sautéed Radicchio, Chicken Livers, and Grapefruit
1 batch cooked chestnut flour pasta (recipe below)
Splash olive oil
1 large shallot, minced
12 oz. Chicken livers, chopped into bite-sized pieces
2 T. chestnut honey
1/3 c. grapefruit juice
½ c. coarsely grated pecorino romano
2 heads radicchio, shredded
Salt and coarsely ground pepper
Handful coarsely chopped parsley
Pecorino romano shavings, to garnish
In a large, heavy-bottomed pan, heat the olive oil over medium-high heat. Add the shallot and chicken livers and saute for about 5-7 minutes, stirring frequently, until the shallots are softened and the chicken livers have browned.
Add the chestnut honey, grapefruit juice, and pecorino romano, stirring gently a few more times until the mixture is well-blended. Add the radicchio, cover, and reduce heat to low. Cook for 5-7 minutes, stirring once or twice, until the radicchio is wilted.
Add the salt and parsley to the mixture, stir until blended, and spoon over the cooked chestnut flour pasta. Garnish with extra chopped parsley and shaved pecorino romano.
Chestnut Flour Pasta
¾ c. chestnut flour
¾ c. unbleached white flour
1 t. salt
1 t. olive oil
2 eggs
Combine the ingredients in a bowl and blend, using your hands. Work the ingredients together until you have a stiff dough, and knead for 6-8 minutes. Wrap the dough in plastic and refrigerate for at least one hour, if not overnight.
After the dough has refrigerated, use a pasta machine to roll out the dough. Don’t use the thinnest setting; chestnut flour pasta tends to be more brittle than wheat flour pasta. I recommend the 2nd or 3rd thinnest setting. Cut the dough into 1/3” wide noodles, and let dry for at least 30 minutes.
When you are ready to cook the chestnut flour pasta, cook it in heavily salted water and stir as little as possible, as it has a tendency to break easily. Serve with the recipe above.

Tuesday, March 6, 2012
Nothing on my "To-Do" List But Eating, Drinking, and Relaxing!
 |
| Peter Gibbons, my hero! taken from examiner.com |
Once the work day was finally done, I bolted out the door, scrambling to get to Salumeria Italiana before close. I made it in time and filled my basket with an assortment of goodies, including burrata and taleggio cheeses, farro pasta, and a jar of eucalyptus honey produced by Alce Nero, a group of organic farmers based in Italy’s Emilia-Romagna region. Somehow I resisted the salumi counter―no small feat, considering what a rare occurrence it is for me to leave this shop without at least a few strips of their 24-month prosciutto.
Treats in tow, I rounded the corner onto Hanover Street, on my way to The Wine Bottega, where the team was pouring French, Italian, and Portuguese wines from Oz Wine Co., a Massachusetts-based importer of organic/biodynamic/sustainable wines. I left with two wines: an Aglianico-based red from Campania featured in the Oz array, and a recommended Montepulciano d’Abruzzo that I passed on my way to the cash register but couldn’t pass up when I saw that it was only $12.00.
Next stop? Mercato del Mare, because a food-gathering excursion to the North End that doesn’t include oysters is like a martini without an olive. I left with 6 Onset oysters from Buzzards Bay, MA, as well as a half-pound of local cod and inspiration for an interesting mignonette (recipe below).
Finally home! I changed into pajamas, uncorked the Montepulciano, threw “What About Bob?” in the DVD player, shucked my oysters, plated my cheeses, kicked up my feet, sipped my wine, and basked in the glory of doing nothing. It was everything I thought it could be!
Curry Mignonette for Oysters
1 t. malt vinegar
1 T. mild white vinegar
1-2 drops vanilla extract
Dash hot curry powder
Stir the ingredients together in a small bowl; use a few drops to season oysters on the half-shell.
 |
| Onset oyster, Buzzards Bay, MA |
 |
| Onset oyster with Curry Mignonette |
 |
| Burrata - Cow's Milk; Puglia, Italy |
 |
| Taleggio - Cow's Milk; Lombardy, Italy - drizzled with Alce Nero Eucalyptus Honey |
Tuesday, February 28, 2012
Around the World in Eighty Bites - Uganda
As my loyal readers know, I keep track of the countries around the world that read this blog. While it’s fun to watch my numbers increase, the main reason I track my international readership is because I want to try as many different cuisines as possible, and knowing that I’m reaching real people across the globe keeps me inspired to create many new variations of traditional ethnic and national recipes. I also like being able to share the recipes with people who, like me, travel vicariously through their taste buds.
The 97th country to hop on the www.baconbutterbooze.com bandwagon was Uganda. Like many countries that have been prone to invasion, Ugandan food features mainly native ingredients while reflecting the influences of invading countries’ cuisines. European, Arab, and Indian traders and explorers brought with them ingredients that have been incorporated into traditional Ugandan cuisine, but traditional dishes rely on native staples such as bananas, yams, and smoked or dried fish.
Cooking Ugandan food was a bit intimidating to me, because with the exceptions of Morocco and Ethiopia, most African nations’ cuisines haven’t become trendy yet, and I feared that finding enough information about the cuisine and its ingredients and cooking techniques would be difficult. However, when I’m intimidated by a kitchen project, I always accept the challenge and step up to the plate, so with a little bit of web research and a basket of fresh ingredients, I was ready to cook. After browsing through about a dozen Ugandan recipes, I selected Oluwombo. Oluwombo is a traditional Ugandan dish featuring meat and smoked fish cooked with tomatoes, peanuts, and mushrooms. I chose this dish because it was so different from the dishes I’ve cooked in the past.
While researching, I found several variations of the meat used in the dish - some used beef, some used chicken, and pork and goat were also featured in a few recipes. The other ingredients had no significant variation from recipe to recipe. Oluwombo is traditionally steamed in banana leaves for almost two hours, but to save time, I’ve varied the cooking method to create a stew that captures the flavors, but requires less preparation and cooking time. My first reaction? “How did I live without this for 30 years?”
Try this when you’re seeking something different from your typical beef stew!
Oluwombo-Inspired Stew
 1 T. coconut oil
12 oz. sirloin, cut into ½” cubes
1 small onion, minced
2 medium tomatoes, chopped
1 c. peanuts, crushed
3 oz. Tomato paste
1 cup beef stock or bouillon
4 oz. Fresh button mushrooms, finely chopped
2 chipotles in adobo, minced, plus 2 T. adobo sauce
½ t. toasted cumin seeds, ground
¼ t. ginger
¼ t. turmeric
6 oz. Smoked whitefish, skin and bones removed and flaked
4 baked plantains (instructions below), sliced
Crushed peanuts, to garnish
In a large, heavy-bottomed saucepan, heat 1 T. of the coconut oil over medium-high heat until it has melted. Add the sirloin and cook for several minutes until the meat has browned. Remove the meat with a slotted spoon and set aside, and if a lot of liquid and fat has been released from the meat, drain it. Add more coconut oil if necessary, then add the onion and cook for 3-5 minutes, or until the onion has softened.
Add all the remaining ingredients and the browned sirloin. Stir, reduce the heat to low, and cook for about 45 minutes, stirring occasionally. Once cooked, serve over slices of baked plantain and garnish with crushed peanuts.
Serves four. Nutrition facts per serving: 790 calories, 68g carbohydrates, 35g fat, 56 g protein
Baked Plantains
4 plantains
Start with plantains that are in their medium stage of ripeness - beginning to blacken, but with a fair amount of yellow still showing. Preheat the oven to 425, and in the meantime, slice the ends off of each plantain, then halve lengthwise. Place the plantains skin side down on a baking sheet, and bake for 30 minutes. Remove from oven, and once the plantain halves are cool enough to touch, peel the skins off and slice the plantain halves into half-inch chunks.
Serves four. Nutrition facts per serving: 180 calories, 48g carbohydrates, 0.3g fat, 1.2g protein


 |
| from nationsonline.org |
Cooking Ugandan food was a bit intimidating to me, because with the exceptions of Morocco and Ethiopia, most African nations’ cuisines haven’t become trendy yet, and I feared that finding enough information about the cuisine and its ingredients and cooking techniques would be difficult. However, when I’m intimidated by a kitchen project, I always accept the challenge and step up to the plate, so with a little bit of web research and a basket of fresh ingredients, I was ready to cook. After browsing through about a dozen Ugandan recipes, I selected Oluwombo. Oluwombo is a traditional Ugandan dish featuring meat and smoked fish cooked with tomatoes, peanuts, and mushrooms. I chose this dish because it was so different from the dishes I’ve cooked in the past.
While researching, I found several variations of the meat used in the dish - some used beef, some used chicken, and pork and goat were also featured in a few recipes. The other ingredients had no significant variation from recipe to recipe. Oluwombo is traditionally steamed in banana leaves for almost two hours, but to save time, I’ve varied the cooking method to create a stew that captures the flavors, but requires less preparation and cooking time. My first reaction? “How did I live without this for 30 years?”
Try this when you’re seeking something different from your typical beef stew!
Oluwombo-Inspired Stew

12 oz. sirloin, cut into ½” cubes
1 small onion, minced
2 medium tomatoes, chopped
1 c. peanuts, crushed
3 oz. Tomato paste
1 cup beef stock or bouillon
4 oz. Fresh button mushrooms, finely chopped
2 chipotles in adobo, minced, plus 2 T. adobo sauce
½ t. toasted cumin seeds, ground
¼ t. ginger
¼ t. turmeric
6 oz. Smoked whitefish, skin and bones removed and flaked
4 baked plantains (instructions below), sliced
Crushed peanuts, to garnish
In a large, heavy-bottomed saucepan, heat 1 T. of the coconut oil over medium-high heat until it has melted. Add the sirloin and cook for several minutes until the meat has browned. Remove the meat with a slotted spoon and set aside, and if a lot of liquid and fat has been released from the meat, drain it. Add more coconut oil if necessary, then add the onion and cook for 3-5 minutes, or until the onion has softened.
Add all the remaining ingredients and the browned sirloin. Stir, reduce the heat to low, and cook for about 45 minutes, stirring occasionally. Once cooked, serve over slices of baked plantain and garnish with crushed peanuts.
Serves four. Nutrition facts per serving: 790 calories, 68g carbohydrates, 35g fat, 56 g protein
Baked Plantains
4 plantains
Start with plantains that are in their medium stage of ripeness - beginning to blacken, but with a fair amount of yellow still showing. Preheat the oven to 425, and in the meantime, slice the ends off of each plantain, then halve lengthwise. Place the plantains skin side down on a baking sheet, and bake for 30 minutes. Remove from oven, and once the plantain halves are cool enough to touch, peel the skins off and slice the plantain halves into half-inch chunks.
Serves four. Nutrition facts per serving: 180 calories, 48g carbohydrates, 0.3g fat, 1.2g protein


Wednesday, February 15, 2012
Coppa (Boston, MA) - Restaurant Review, Restaurant Replica Recipe
Last week, I entered a new decade. Goodbye, 20’s, you were pretty damn fun; helloooo, 30 - I have a feeling you’re gonna be just as fun! Although I definitely had a brief freak-out over my old age, the fear didn’t last long. I refuse to believe that my ability to enjoy life is determined by the amount of time I’ve spent on this planet. As long as I can read good books, watch hockey, surround myself with interesting people, and eat good food, the next 70+ years are going to be just as awesome as the first 30.
Speaking of good food, I used my big ol’ birthday as a good excuse to finally try a restaurant that I’ve wanted to try for, oh, two years. A few friends and I gathered at Coppa, a popular, well-known restaurant in Boston’s South End that specializes in Italian-inspired small plates, unique salumi and variety meats. Knowing Coppa’s popularity, I made a reservation about a week in advance. Thank God, because the place is much smaller than I expected! Reservations are a wise choice - the bar area is pretty small, and it‘s likely to be packed because this place is friggin’ awesome.
I started the night with a cocktail, as one should on her 30th birthday. After a painstaking decision making process, I chose the Fumo sull’Acqua (Mezcal, citrus, and chili syrup). I found a new favorite “away” cocktail (as opposed to the Godfathers and dirty martinis I like to mix up at home). Smoky, slightly sweet, mildly spicy, and totally delicious - I could drink these every day.
While each of us ordered an individual entrée, we split several small plates, including arancini, duck prosciutto, and bruschetta con ricotta (crostini with sheep’s milk ricotta and hen of the woods mushrooms). Although the duck prosciutto was phenomenal (the stuff literally melts in your mouth), the dish that we all raved about for the rest of the evening was the bruschetta. The four of us split one small slice of bruschetta, yet it was so rich that we agreed that a larger portion would have been too much.
My individual dishes were the Panino di Riccio di Mare (sea urchin and salami panino with mustard seeds) and the Orecchiette con Trippa (house made orechiette pasta with tripe, beef tongue, pork belly, chick peas and parmesan). If you’re into sea urchin, this mini-panini is to die for!!! Coppa does NOT skimp on the sea urchin in this dish - pieces were literally seeping out of the sides with every bite I took, so I had to eat carefully. It is small, but like the other dishes we sampled, it was so rich that large portions are unnecessary.
The orechiette was good, but I am a tripe lover and I would have been happier with the dish if it had contained more tripe. However, it was still delicious - the pasta was done just right, and the tomato sauce was very light and subtle, as to not overpower the other flavors.
 By the end of the evening when our waitress asked us if we were interested in dessert, I didn’t think I could do it (plus, I was wearing a very tiny Free People sweater that revealed my entire midriff¾ I wouldn’t have been able to pull off the look if I’d been full and bloated!). However, being my birthday, our server brought me a complimentary dish of their honey-walnut gelato, topped with a lit birthday candle. As if the food wasn’t enough to encourage me to return to Coppa, touches like this stick in customers’ minds and can be the nudge that will elevate a restaurant from “great” to “favorite.” And the gelato?!? One bite, and I was mentally kicking my own ass for not ordering it in the first place!!! It wasn’t overly sweet, and you could definitely taste the honey. This is one of the most perfect desserts I’ve ever had, and I’m not even a dessert person.
Overall, Coppa is now one of my favorite dining spots in Boston. It’s one of those places with a menu so unique that you’ll want to make sure you try everything on it at least once. Just like a carefully assembled All-Star team, there is no weak link in Coppa’s lineup.
Because age has done nothing to diminish my curiosity, I stopped by Whole Foods and picked up the ingredients I thought I’d need to try and duplicate Coppa’s Bruschetta con Ricotta. Of course, when I say “duplicate,” I really mean “replicate as closely as I can, then tweak it a bit to personalize it.” One characteristic of Coppa’s ricotta topping sparked my curiosity¾while the flavor of the hen of the woods mushrooms stood out, I don’t recall biting into any mushroom bits. Were the mushrooms pureed? Possibly, but I suspected that the chefs pulverized dried mushrooms and folded the powder into the ricotta. So that’s the technique I used. I wouldn’t know where to buy hen of the woods mushrooms if my life depended on it, so I relied on the dried porcinis and shiitakes in my pantry. Using my spice grinder, I buzzed them into a fine powder. Needing my own touch, I decided to add a bit of Spanish flavor with a splash of dry sherry, some fresh thyme, and smoked paprika. Also, I used regular cow’s milk ricotta rather than sheep’s milk ricotta.
This recipe’s concept is the same as Coppa’s, and the flavor is similar, but the finishing touches differ. If you can’t make it to Coppa, make this recipe!
Brushchetta con Ricotta with Thyme
8 dried shiitake mushrooms
4 dried porcini mushrooms
2 T. melted butter
16 oz. Whole milk ricotta
2 t. dry sherry
2 t. fresh thyme
1 t. olive oil
2 t. white truffle oil
pinch kosher salt
Toasted baguette slices
Several thyme leaves, to garnish
Pinch smoked paprika, to garnish
Using a mortar and pestle, spice grinder or coffee grinder, pulverize the dried shiitake and porcini mushrooms to form a powder.
In a deep mixing bowl, combine the mushroom powder and the melted butter. Mix well. Next, add all the remaining ingredients except for the baguette slices and garnishes. Using an electric mixer, beat well until the ingredients are all fully incorporated into the mixture and the mixture is nice and fluffy.
Spread a heaping spoonful of the ricotta mushroom mixture onto each toasted baguette slice. Top with a few fresh thyme leaves, and then sprinkle with a tiny pinch of paprika.

VARIATION: Instead of using the whipped ricotta as a topping for crostini, use it to sauce pasta. Simply use the recipe above to sauce 16oz. of dry pasta, adding about a teaspoon of salt, an extra dash or two of smoked paprika, and some additional thyme leaves.

Speaking of good food, I used my big ol’ birthday as a good excuse to finally try a restaurant that I’ve wanted to try for, oh, two years. A few friends and I gathered at Coppa, a popular, well-known restaurant in Boston’s South End that specializes in Italian-inspired small plates, unique salumi and variety meats. Knowing Coppa’s popularity, I made a reservation about a week in advance. Thank God, because the place is much smaller than I expected! Reservations are a wise choice - the bar area is pretty small, and it‘s likely to be packed because this place is friggin’ awesome.
I started the night with a cocktail, as one should on her 30th birthday. After a painstaking decision making process, I chose the Fumo sull’Acqua (Mezcal, citrus, and chili syrup). I found a new favorite “away” cocktail (as opposed to the Godfathers and dirty martinis I like to mix up at home). Smoky, slightly sweet, mildly spicy, and totally delicious - I could drink these every day.
While each of us ordered an individual entrée, we split several small plates, including arancini, duck prosciutto, and bruschetta con ricotta (crostini with sheep’s milk ricotta and hen of the woods mushrooms). Although the duck prosciutto was phenomenal (the stuff literally melts in your mouth), the dish that we all raved about for the rest of the evening was the bruschetta. The four of us split one small slice of bruschetta, yet it was so rich that we agreed that a larger portion would have been too much.
My individual dishes were the Panino di Riccio di Mare (sea urchin and salami panino with mustard seeds) and the Orecchiette con Trippa (house made orechiette pasta with tripe, beef tongue, pork belly, chick peas and parmesan). If you’re into sea urchin, this mini-panini is to die for!!! Coppa does NOT skimp on the sea urchin in this dish - pieces were literally seeping out of the sides with every bite I took, so I had to eat carefully. It is small, but like the other dishes we sampled, it was so rich that large portions are unnecessary.
The orechiette was good, but I am a tripe lover and I would have been happier with the dish if it had contained more tripe. However, it was still delicious - the pasta was done just right, and the tomato sauce was very light and subtle, as to not overpower the other flavors.

Overall, Coppa is now one of my favorite dining spots in Boston. It’s one of those places with a menu so unique that you’ll want to make sure you try everything on it at least once. Just like a carefully assembled All-Star team, there is no weak link in Coppa’s lineup.
Because age has done nothing to diminish my curiosity, I stopped by Whole Foods and picked up the ingredients I thought I’d need to try and duplicate Coppa’s Bruschetta con Ricotta. Of course, when I say “duplicate,” I really mean “replicate as closely as I can, then tweak it a bit to personalize it.” One characteristic of Coppa’s ricotta topping sparked my curiosity¾while the flavor of the hen of the woods mushrooms stood out, I don’t recall biting into any mushroom bits. Were the mushrooms pureed? Possibly, but I suspected that the chefs pulverized dried mushrooms and folded the powder into the ricotta. So that’s the technique I used. I wouldn’t know where to buy hen of the woods mushrooms if my life depended on it, so I relied on the dried porcinis and shiitakes in my pantry. Using my spice grinder, I buzzed them into a fine powder. Needing my own touch, I decided to add a bit of Spanish flavor with a splash of dry sherry, some fresh thyme, and smoked paprika. Also, I used regular cow’s milk ricotta rather than sheep’s milk ricotta.
This recipe’s concept is the same as Coppa’s, and the flavor is similar, but the finishing touches differ. If you can’t make it to Coppa, make this recipe!
Brushchetta con Ricotta with Thyme
8 dried shiitake mushrooms
4 dried porcini mushrooms
2 T. melted butter
16 oz. Whole milk ricotta
2 t. dry sherry
2 t. fresh thyme
1 t. olive oil
2 t. white truffle oil
pinch kosher salt
Toasted baguette slices
Several thyme leaves, to garnish
Pinch smoked paprika, to garnish
Using a mortar and pestle, spice grinder or coffee grinder, pulverize the dried shiitake and porcini mushrooms to form a powder.
In a deep mixing bowl, combine the mushroom powder and the melted butter. Mix well. Next, add all the remaining ingredients except for the baguette slices and garnishes. Using an electric mixer, beat well until the ingredients are all fully incorporated into the mixture and the mixture is nice and fluffy.
Spread a heaping spoonful of the ricotta mushroom mixture onto each toasted baguette slice. Top with a few fresh thyme leaves, and then sprinkle with a tiny pinch of paprika.

VARIATION: Instead of using the whipped ricotta as a topping for crostini, use it to sauce pasta. Simply use the recipe above to sauce 16oz. of dry pasta, adding about a teaspoon of salt, an extra dash or two of smoked paprika, and some additional thyme leaves.

Tuesday, February 7, 2012
Farro Tagliatelle with Zucchini, White Beans, and Pink Peppercorns
For weeks, I've been planning to write a post about what to do with game day leftovers, but instead I’m choosing to be petty―there will be no mention of Sunday's main event. Game or no game, post or no post, I still had to eat last night. Although I was tired and had spent the greater part of the morning battling a hangover, ordering take-out was not an option, as my stomach could not handle any more salty, greasy, fatty food. I decided to suck it up and prepare something quick and light.
What ended up on my plate was an unintentionally vegetarian pasta dish using my favorite brand of farro tagliatelle, lots of garlic and butter, fresh zucchini, canned beans, and flavorful seasonings, including pink peppercorns. Try this recipe when you’re feeling lazy but still craving something nutritious!
Farro Tagliatelle with Zucchini, White Beans, and Pink Peppercorns
12 oz. farro tagliatelle
3 oz. butter
Generous splash olive oil
4 cloves garlic, minced
1 lb. zucchini, quartered lengthwise, then thinly sliced
1 16oz. can small white beans
1 t. dried thyme
½ t. dried oregano
1 t. coarsely ground black pepper
1 T. pink peppercorns
Salt to taste
Sprigs of parsley, for garnish
Shaved or grated pecorino romano, for garnish
Cook the pasta in generously salted water. In the meantime, melt the butter in a large, heavy bottomed pot over medium heat. Once the butter is melted, add the olive oil, then add the minced garlic. Sauté the garlic for a minute or two or until the garlic is fragrant.
Next, add the zucchini to the pot. Cook for 3-5 minutes before adding the beans, thyme, oregano, ground pepper, pink peppercorns, and salt. Cook, stirring frequently, until all the ingredients are heated through.
Once the pasta is cooked, add it to the pot with the beans and the zucchini. Toss it well so that each strand is coated with the butter and oil. If it seems a bit dry, add a small splash of the pasta cooking water and toss it again. Serve on individual plates, garnishing each portion with a sprig of parsley and shaved or grated pecorino romano cheese.

What ended up on my plate was an unintentionally vegetarian pasta dish using my favorite brand of farro tagliatelle, lots of garlic and butter, fresh zucchini, canned beans, and flavorful seasonings, including pink peppercorns. Try this recipe when you’re feeling lazy but still craving something nutritious!
Farro Tagliatelle with Zucchini, White Beans, and Pink Peppercorns
 |
| white beans and zucchini |
3 oz. butter
Generous splash olive oil
4 cloves garlic, minced
1 lb. zucchini, quartered lengthwise, then thinly sliced
1 16oz. can small white beans
1 t. dried thyme
½ t. dried oregano
1 t. coarsely ground black pepper
1 T. pink peppercorns
Salt to taste
Sprigs of parsley, for garnish
Shaved or grated pecorino romano, for garnish
Cook the pasta in generously salted water. In the meantime, melt the butter in a large, heavy bottomed pot over medium heat. Once the butter is melted, add the olive oil, then add the minced garlic. Sauté the garlic for a minute or two or until the garlic is fragrant.
Next, add the zucchini to the pot. Cook for 3-5 minutes before adding the beans, thyme, oregano, ground pepper, pink peppercorns, and salt. Cook, stirring frequently, until all the ingredients are heated through.
Once the pasta is cooked, add it to the pot with the beans and the zucchini. Toss it well so that each strand is coated with the butter and oil. If it seems a bit dry, add a small splash of the pasta cooking water and toss it again. Serve on individual plates, garnishing each portion with a sprig of parsley and shaved or grated pecorino romano cheese.

Wednesday, February 1, 2012
Radicchio Wedge Salad with Curried Blue Cheese Dressing and Campari Raisins
The iceberg wedge salad. Now a common steakhouse and “New American” restaurant menu staple, the iceberg wedge wasn’t always so readily accepted by the hungry public. In fact, yours truly was waiting tables during the iceberg wedge’s rise to popularity, and I recall many a diner shooting me a barbed, “What the hell is this?” or “Um, did someone forget to chop the lettuce? Send it back.” I could feel my tips dwindling. But like hybrid cars, the Internet, and casual Fridays, the iceberg wedge went from shunned to tolerated to embraced. However, as eaters’ palates have become more adventurous, the iceberg wedge is now playing second fiddle to salads that use darker, more exotic greens, innovative dressings, and interesting touches like candied walnuts, pickled shallot, and marketable “superfoods” such as goji berries and pomegranate seeds.
Rather than burn out or fade away, perhaps the wedge salad simply needs a makeover!
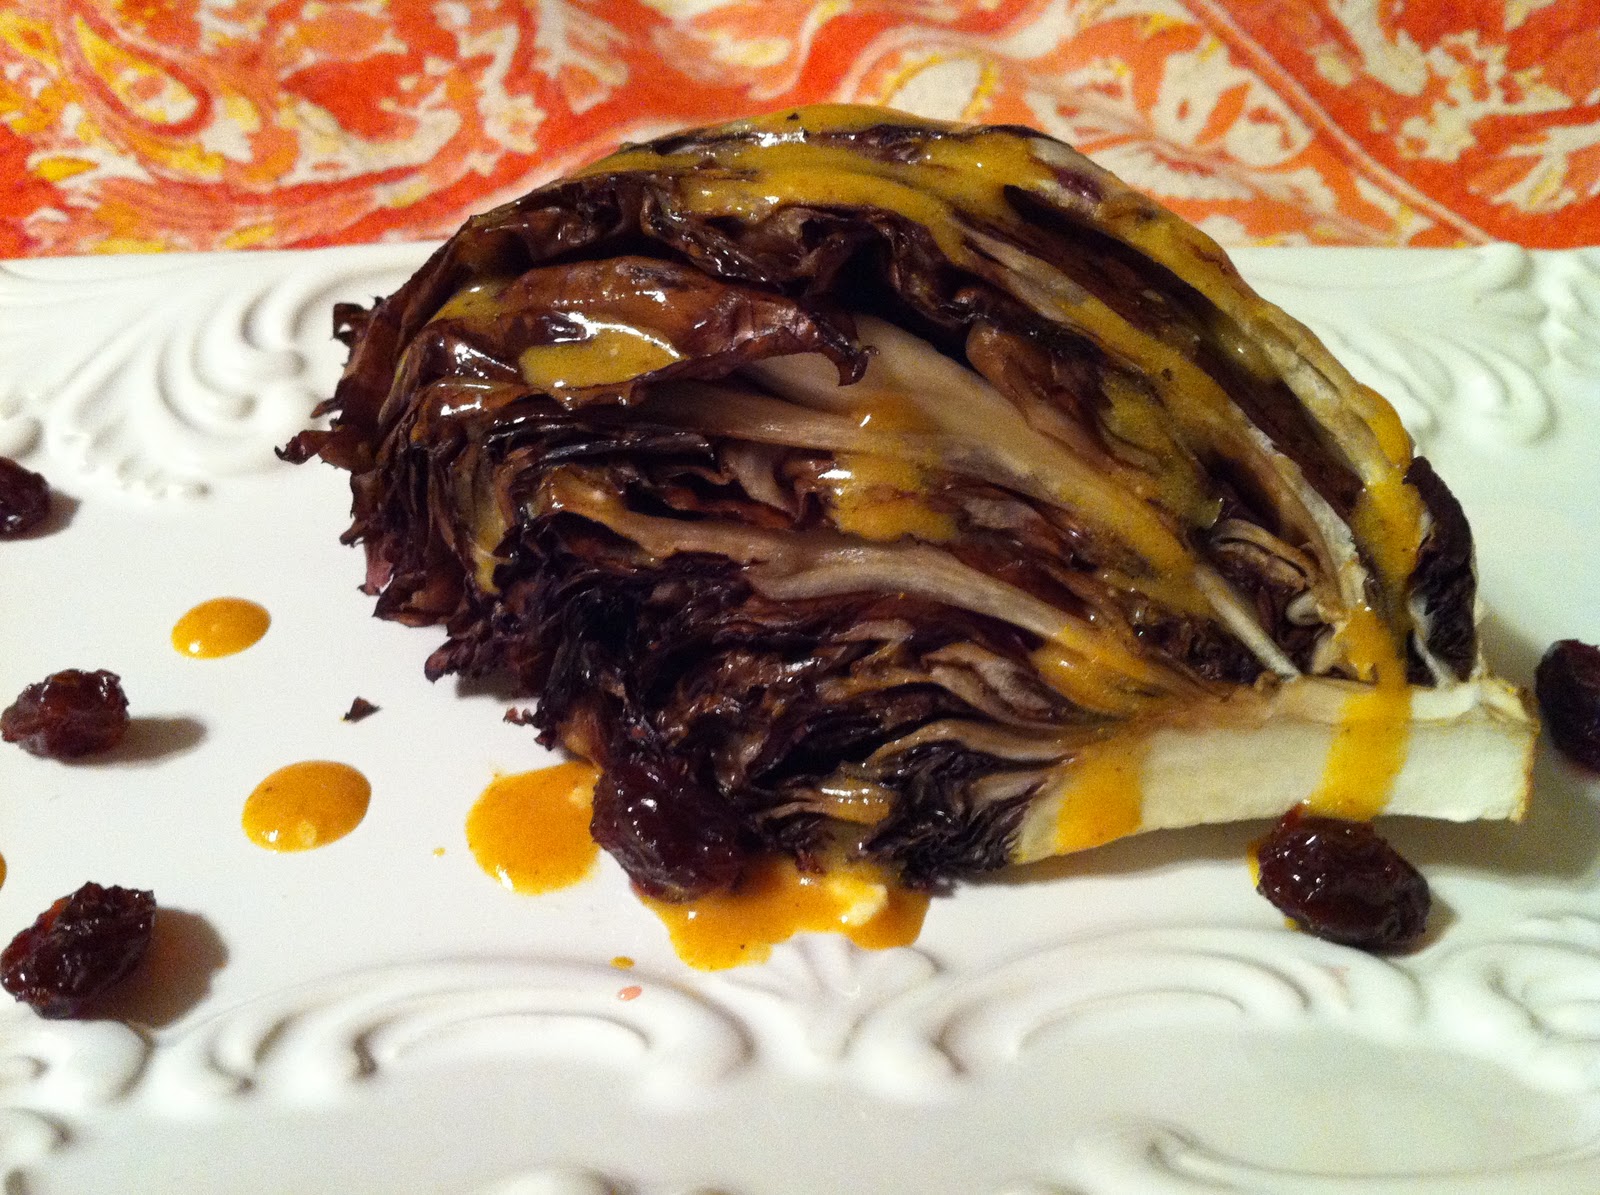
 Last night, I created a modern twist on the classic wedge salad, using radicchio instead of traditional iceberg lettuce. I originally planned on dressing it in a garlicky aioli, but I decided to at least stay parallel to tradition, so I concocted a runny blue cheese dressing with a punch of curry. The richness of the creamy blue cheese paired delightfully with the warm, bitter radicchio. Still, the plate needed something else, but what? Perhaps something sweet to counter the bitterness of the radicchio and the kick of heat in the curry? Raisins! But I’d have to plump them first; otherwise I’d risk having my plate look like it had been sprinkled with rabbit poo. I didn’t have any open wine, and I feared that whiskey or grappa would be far too strong, so I chose Campari. Campari is an Italian liqueur with a bitter, yet sweet and almost citrusy flavor; it seemed like a logical choice for this dish. I soaked the raising in warmed Campari to speed up the plumping process, and then I sprinkled the raisings on the plate with my radicchio wedge.
The result? Sheer perfection! If your palate is not accustomed to bitter ingredients, you may not appreciate the complexity of this dish, but if you like bold, unique flavors, you’ll surely fall in love with this modern twist on the classic iceberg wedge salad!
Radicchio Wedge Salad with Curried Blue Cheese Dressing and Campari Raisins
 For the Campari Raisins:
2 T. raisins
3 T. Campari, warmed but not boiling
For the dressing:
3-4 T. high-quality blue cheese dressing
2 T. olive oil
2 t. Campari (use the liquid left after the raisins have soaked)
2 t. turmeric
1 t. garlic powder
¼ t. cayenne, or to taste
Dash finely ground black pepper
2 heads radicchio, quartered
1 T. olive oil
Soak the raisins in the warmed Campari for at least 20 minutes.
Preheat your oven’s broiler over a low setting, and if you can’t control the setting, simply use the rack farthest away from the heat source. In the meantime, make the dressing by whisking all the ingredients together until they are completely blended. Set aside until ready to use.
Now, it is time to broil the radicchio. Brush each cut surface of the radicchio quarters with the olive oil, lay the curved side on a baking sheet lined with tinfoil, and broil for 5-7 minutes. Do not let the radicchio burn.
Once the radicchio has broiled, place a quarter or two on individual serving plates, drizzle the dressing over the radicchio, and sprinkle each plate with a few raisins. Serve immediately.


Rather than burn out or fade away, perhaps the wedge salad simply needs a makeover!

The result? Sheer perfection! If your palate is not accustomed to bitter ingredients, you may not appreciate the complexity of this dish, but if you like bold, unique flavors, you’ll surely fall in love with this modern twist on the classic iceberg wedge salad!
Radicchio Wedge Salad with Curried Blue Cheese Dressing and Campari Raisins

2 T. raisins
3 T. Campari, warmed but not boiling
For the dressing:
3-4 T. high-quality blue cheese dressing
2 T. olive oil
2 t. Campari (use the liquid left after the raisins have soaked)
2 t. turmeric
1 t. garlic powder
¼ t. cayenne, or to taste
Dash finely ground black pepper
2 heads radicchio, quartered
1 T. olive oil
Soak the raisins in the warmed Campari for at least 20 minutes.
Preheat your oven’s broiler over a low setting, and if you can’t control the setting, simply use the rack farthest away from the heat source. In the meantime, make the dressing by whisking all the ingredients together until they are completely blended. Set aside until ready to use.
Now, it is time to broil the radicchio. Brush each cut surface of the radicchio quarters with the olive oil, lay the curved side on a baking sheet lined with tinfoil, and broil for 5-7 minutes. Do not let the radicchio burn.
Once the radicchio has broiled, place a quarter or two on individual serving plates, drizzle the dressing over the radicchio, and sprinkle each plate with a few raisins. Serve immediately.

Subscribe to:
Posts (Atom)